Lighting / Outdoor Lighting
Installation Manual for Hinkley 10014/10015 Kingston Outdoor Wall Mount Lantern
Comprehensive installation and wiring guide for the Hinkley 10014/10015 Kingston outdoor wall lantern. Includes step-by-step assembly, electrical connection instructions, and essential weatherproofing/caulking procedures.
Quick answers from the manual
Quick answer
- This document provides installation, wiring, and weatherproofing instructions for the Hinkley 10014/10015 outdoor wall lantern. p. 1, 2, 3
Key actions
- Mounting the fixture p. 1
- Wiring the fixture p. 2
- Sealing the fixture p. 3
First start
- Turn off power, prepare mounting strap, connect wires, secure fixture, and apply sealant. p. 1, 2, 3
Problems and fixes
Water leakage
Apply silicone sealant to gaps between fixture and wall.
p. 3Where to find it in the PDF
- Assembly Instructions p. 1
- Wiring and Grounding Instructions p. 2
- Caulking Instructions p. 3
Table of contents
Manual images
Click an image to enlargeQuick guide from the manual
This document provides essential instructions for the installation, wiring, and weatherproofing of the Hinkley 10014/10015 outdoor wall lantern. Safety Warning: Always turn off the power supply before beginning any installation. If you are unfamiliar with electrical wiring, consult a qualified electrician or local authorities for code requirements.
Assembly Instructions
Follow these steps to assemble the fixture:
- Find a clear area to work and unpack the fixture and glass.
- Prepare the mounting strap (A) by threading the two long mounting screws (B) into the back of the strap. Ensure the head of the ground screw is facing the front.
- Attach the mounting strap (A) to the junction box (J) using two screws (C) (not provided).
- Secure the hook (8) to the fixture top (3) using the lock washer (7) and hex nut (6).
- Secure the fixture hook (8) to the canopy using the knob (5).
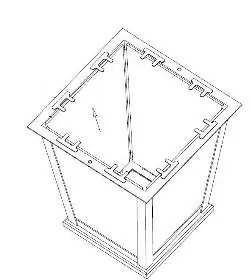
- Place glass panels (2) into the fixture cage and fold down the glass tabs (1) to secure them.
- Attach the fixture top (3) to the fixture cage using screws (4).
- Mount the fixture by slipping the mounting screws (B) through the holes (D) in the backplate (E) and tightening the barrel knobs (F).
Wiring and Grounding
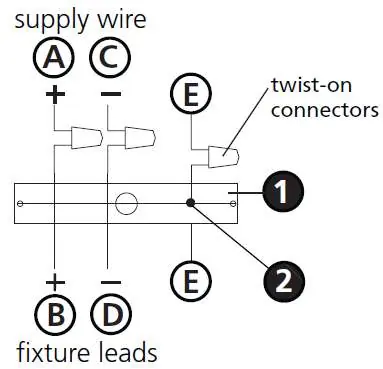
Refer to the I.S. 18 wiring instructions for proper electrical connections:
- Positive Wire: Connect the positive supply wire (A) (typically black or smooth side) to the positive fixture lead (B) using an appropriately sized twist-on connector.
- Negative Wire: Connect the negative supply wire (C) (typically white or ribbed side) to the negative fixture lead (D).
- Grounding: Connect the fixture ground wire (E) (typically copper or green) to the mounting strap (M) using the ground screw (S) for flush mount fixtures, or directly to the building system ground for other configurations.
Weatherproofing and Caulking
To ensure the fixture is weather-tight, follow the IS200 caulking instructions:
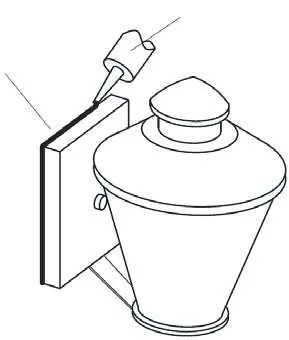
- After securing the fixture to the wall, seal the gap between the wall and the fixture backplate on the top and both sides using a good quality waterproof caulk or silicone sealant.
- It is also recommended to apply a small bead of caulk or sealant under the ball knobs used to mount the fixture to prevent water ingress.
Manufacturer information
Hinkley Lighting
Practical help
Common problems
Water entering the junction box
Apply a good quality waterproof caulk or silicone sealant to the gaps between the fixture backplate and the wall.
Fixture is loose on the wall
Ensure the mounting screws are properly tightened and the barrel knobs are fully engaged.
Before use
- Turn off the main power supply
- Verify all parts (glass, screws, knobs) are present
- Ensure you have a silicone sealant or waterproof caulk
- Confirm the junction box is properly installed
- Consult a qualified electrician if new wiring is required
Images and diagrams
- Drawing 1: Mounting strap and backplate installation
- Drawing 2: Glass panel installation and fixture assembly
- Drawing 3: Glass panel tab securing process
Model compatibility
- Suitable for outdoor use when properly sealed with silicone sealant.

Manual page author
David Miller
Documentation analyst
Organizes user manual content into clear summaries, with attention to model details, product context, and everyday usability.