Power / Energy Storage Systems
Installation Manual for Solplanet Ai-HB 2.56LG Battery Storage System
A comprehensive installation and setup guide for the Solplanet Ai-HB 2.56LG high-voltage lithium-ion phosphate battery. This manual covers safety precautions, system components, mounting procedures, wiring, commissioning, and maintenance...
Quick answers from the manual
Quick answer
- The Solplanet Ai-HB 2.56LG is a high-voltage lithium-ion phosphate battery storage system. Installation requires qualified personnel, specific tools, and strict adherence to safety protocols regarding polarity and environmental conditions. p. 1, 4, 14
Key actions
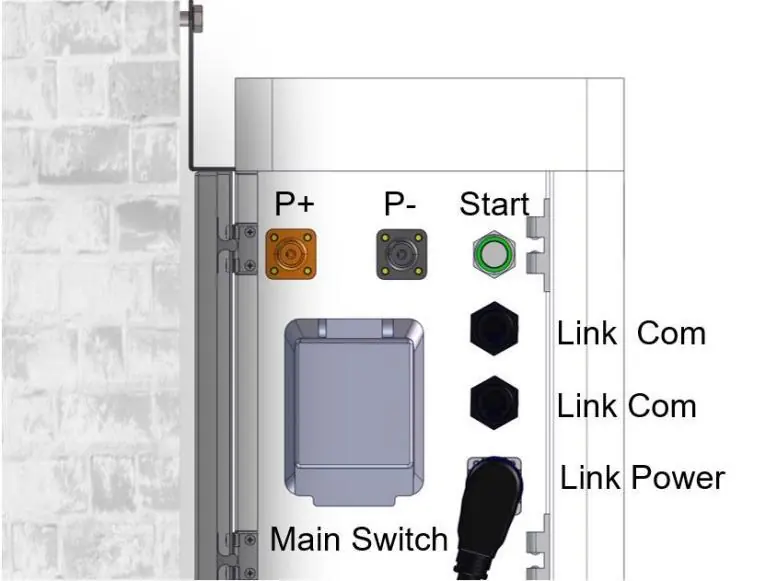
- Start the system: Long press (more than 5 seconds) the Start button on the high-voltage box. p. 8
- Shut down the system: Press the Start button on the high-voltage box for more than 5 seconds until LEDs flash. p. 8
First start
- Turn the DC switch on the HV box ON, wait for LEDs to illuminate, then turn the DC switch on the inverter ON. p. 21
Problems and fixes
System does not work
Keep the internal DC switch on the battery cluster closed.
p. 8Maintenance and reset
- Recharge battery every six months or within 10 days after being fully discharged. p. 6
Technical specifications
| Parameter | Value | Meaning | Pages |
|---|---|---|---|
| Recommended Operating Temperature | 0°C to 30°C | Optimal range for operation and service life. | p. 6 |
Where to find it in the PDF
- Safety Information p. 4, 5, 6
- Installation p. 10, 14, 15, 16
- Commissioning p. 21
Table of contents
Manual images
Click an image to enlargeQuick guide from the manual
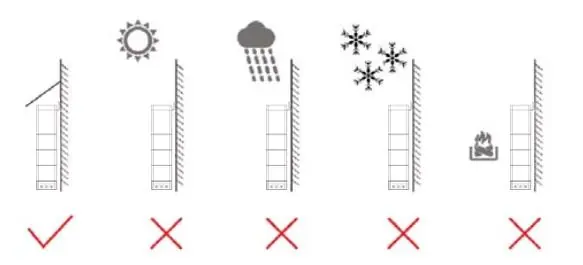
The Solplanet Ai-HB 2.56LG is a high-voltage lithium-ion phosphate battery storage system designed to store excess PV power. Installation must be performed by qualified professionals. Key requirements include a dry, well-ventilated location away from direct sunlight, rain, and fire sources. The system must be mounted on fire-resistant materials. Always ensure the grid is cut off and the battery is powered off before maintenance.
Safety Information
DANGER: Indicates a hazardous situation that will result in serious injury or fire. Do not touch energized battery terminals, do not place the battery in areas accessible by children or pets, and do not stand or sit on the battery.
WARNING: Indicates a hazardous situation that may result in property loss or void the warranty. Ensure cables are terminated with correct polarity to avoid electric arcs.
NOTICE: Indicates situations that may result in damage to the battery. Use appropriately insulated tools for all installation and maintenance tasks.
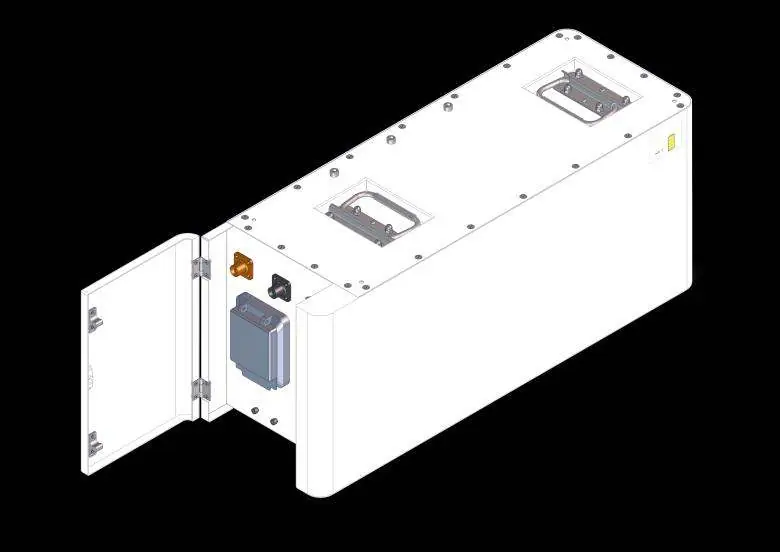
System Information
The system consists of battery modules and a high-voltage box. The connection area includes P+ and P- terminals, a Start button, and communication ports (Link Com, Link Power, Link in/out). The Link Com port connects to the inverter for data retrieval (SOC, DOD, charge current).
Installation
Tools required: Rubber mallet, Phillips screwdriver, hammer drill (10 mm), antistatic gloves, safety goggles, anti-dust respirator, and safety shoes.
Installation steps:
- Place the base against the wall, maintaining a 30mm distance.
- Twist dowel pins into the base and place the first battery module on top.
- Secure the battery module to the base using the L-bracket.
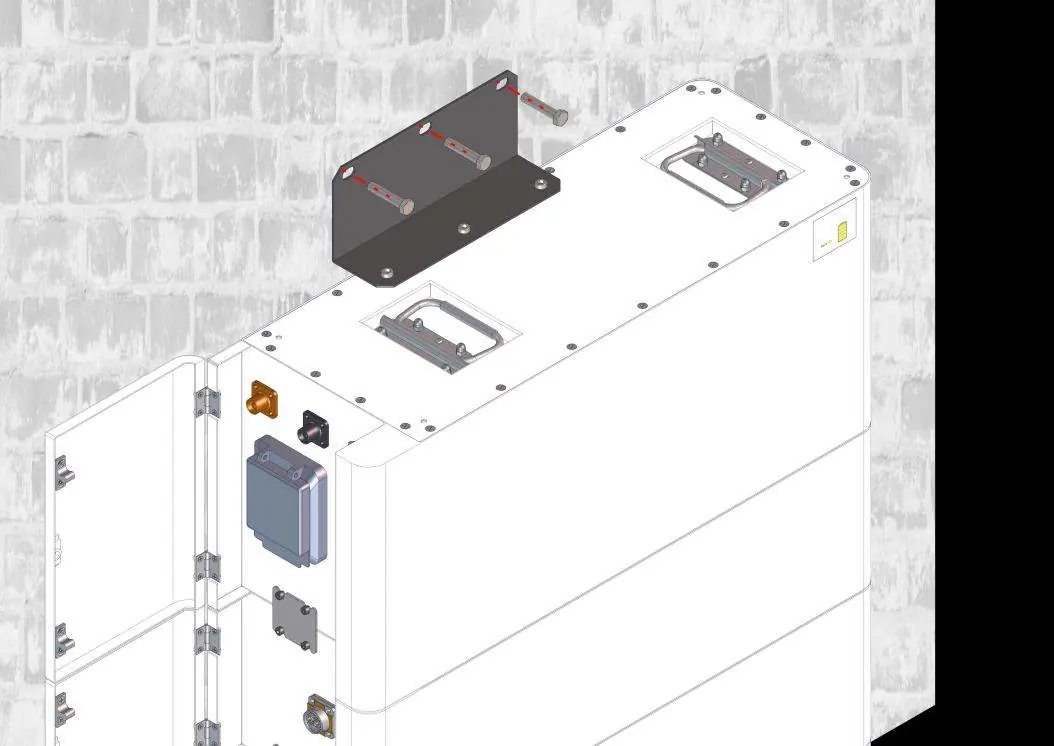
- Stack subsequent battery modules and secure them with the support plate.
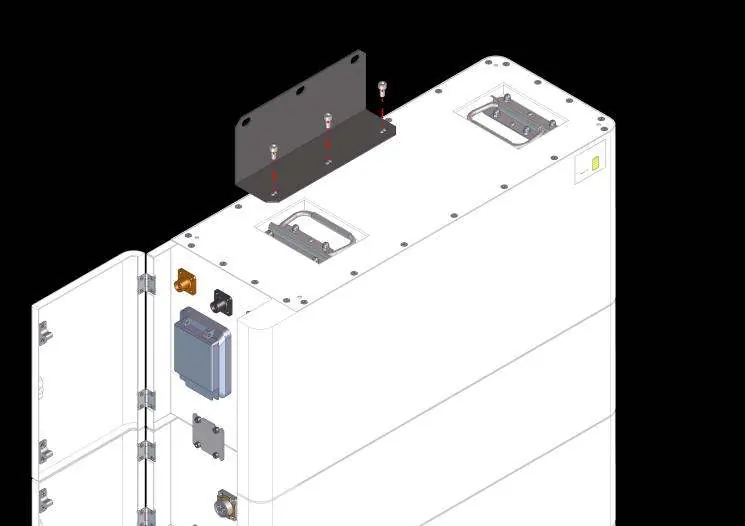
- Place the high-voltage box on top of the last module and secure it.
- Drill holes in the wall and secure the support bracket to the wall.
- Secure the lid of the high-voltage box.
- Connect the small metal plates between each module.
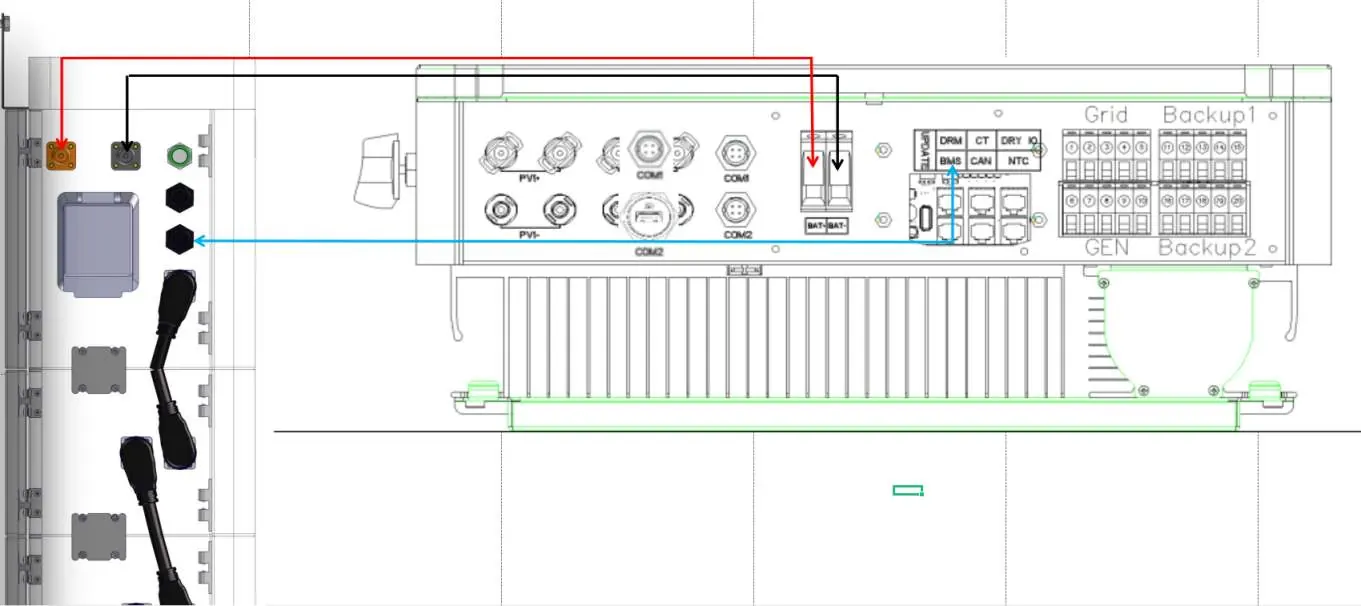
- Connect power cables between battery modules and the high-voltage box.
- Connect the Link Com terminal to the inverter BMS port.
Commissioning Procedure
After completing all connections:
- Ensure DC switches on the inverter and HV box are OFF.
- Turn the DC switch on the HV box ON.
- Refer to the Start procedure (long press Start button for >5s).
- Wait for LEDs to illuminate on the HV box and inverter.
- Turn the DC switch on the inverter ON.
- Set up the system using the Solplanet App.
- Turn the AC switch connected to the grid ON.
Maintenance
Recharge the battery every six months or within 10 days after a full discharge. Store the battery in an environment between -10°C and 45°C. Refer to the specific recharge tables in the manual for storage time limits based on temperature and state of charge (SOC).
Manufacturer information
Solplanet
Practical help
Common problems
System does not work
Keep the internal DC switch on the battery cluster closed.
Communication failure
Ensure the communication cable is connected correctly between the battery and the inverter.
Polarity error
Ensure power cables are installed with the correct polarity; reversed polarity can cause dangerous situations.
Before use
- Ensure the equipment is complete and intact.
- Use appropriately insulated tools.
- Ensure the grid is cut off and the battery is powered off.
- Verify the installation location is dry, well-ventilated, and away from water/fire sources.
- Check that the earth cable is securely connected.
Specs in practice
- Operating Temperature
- Recommended range is 0°C to 30°C for optimal service life.
- Storage Temperature
- -10°C to 45°C; do not store outside this range.
- Communication Ports
- CAN/RS485 for inverter communication; RS232 for manufacturer/service debugging.
Images and diagrams
- Wiring diagram shows the connection path between the battery stack and the inverter.
- Installation steps illustrate the stacking of battery modules and the use of support plates/brackets.
Model compatibility
- Do not connect batteries in series with batteries from different manufacturers.
- Do not connect the battery to a faulty or non-Solplanet inverter.
- Do not connect batteries in parallel.

Manual page author
Emily Carter
User documentation editor
Prepares concise manual descriptions and highlights the most useful setup, operation, and maintenance information for readers.