Power / Solar Inverters
Installation Manual for Solplanet Ai-LB 10K Pro Battery Energy Storage System
Comprehensive installation and operation guide for the Solplanet Ai-LB 10K Pro battery energy storage system. Includes mounting instructions, electrical wiring diagrams, commissioning steps, and maintenance guidelines.
Table of contents
Manual images
Click an image to enlargeQuick guide from the manual
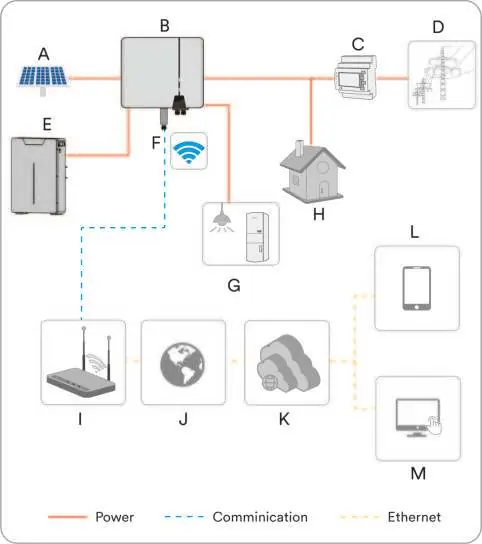
This document provides essential instructions for the installation, commissioning, and maintenance of the Solplanet Ai-LB 10K Pro battery energy storage system (BESS). It is intended for qualified personnel only. Ensure the system is installed in a location suitable for its weight and dimensions, away from flammable materials, and with adequate ventilation. Always verify compatibility with your inverter before installation.
Product Overview
The Ai-LB 10K Pro features a power switch, communication ports (INVERTER, LINK IN, LINK OUT), positive and negative power ports, a grounding point, and a DC breaker. The status is indicated by LED lights: blue for normal operation and red for failure.
Mounting
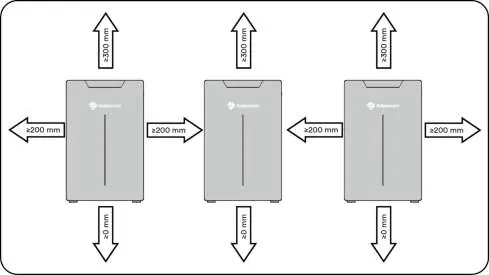
Requirements: The mounting surface must be solid (concrete or masonry). Ensure the location is inaccessible to children, away from direct sunlight, and within the operating temperature range of -5°C to +55°C (charging) or -15°C to +55°C (discharging).

Installation Steps:
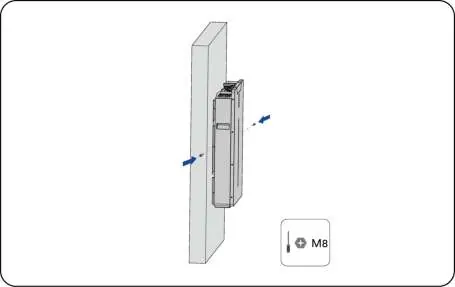
- Measure the space and mark the position using the Mounting Locating Plate.
- Drill holes in the wall (12mm diameter, 80-85mm depth).
- Insert expansion bolts and secure the back plate.
- Hang the battery on the bracket.
- Secure the battery from the side using the provided screws.
Electrical Connection
Power Cable: Use the provided positive (orange plug) and negative (black plug) cables. Ensure the cable is crimped correctly and the isolation cap is tightened.
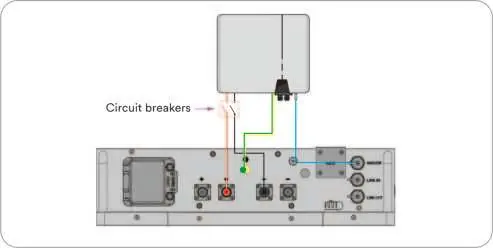
Communication: Connect the communication cable to the 'Inverter' port. A standard straight CAT 5 Ethernet cable can be used if necessary.
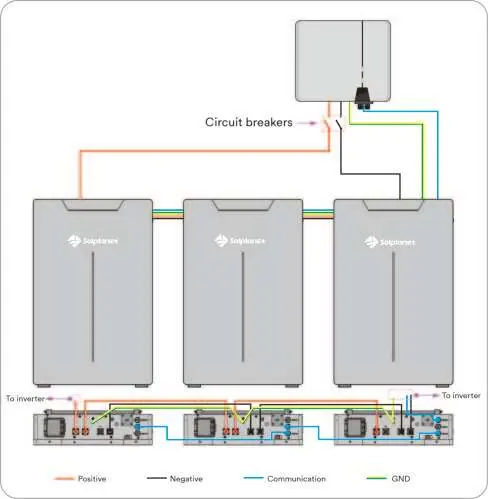
Multi-Unit Connection: The system supports parallel connection of up to 16 units. Connections can be made with or without bus-bars. Ensure all circuit breakers are installed according to local regulations.
Commissioning
Before commissioning, verify that the inverter is compatible, the battery is secured, the isolator is off, and all cables are correctly connected. To start: turn on the battery isolator, then press the Power Switch. If the LED blinks blue, the system is in working mode. Use the Solplanet App to complete the inverter commissioning.
Maintenance
Perform regular maintenance to ensure long-term operation:
- System cleaning: Check for damage and clean every 6-12 months.
- Running state: Check for abnormal sounds, LED status, and system parameters every 6 months.
- Electrical connection: Inspect for loose or discolored cables every 6-12 months.
- Grounding: Verify ground reliability every 6-12 months.
Technical Data
The Ai-LB 10K Pro has a rated capacity of 200 Ah and rated energy of 10.24 kWh. It operates at 51.2 Vdc. The system is rated IP65 and uses natural cooling.
Manufacturer information
Solplanet
Practical help
Common problems
Power Switch LED blinks red or is permanently red
A battery alarm has occurred after the system self-check. Stop commissioning and contact Solplanet service.
Battery not communicating with inverter
Verify communication cable connections and ensure the inverter is compatible and commissioned via the Solplanet App.
System overheating
Ensure the installation location is not exposed to direct sunlight and that there is sufficient clearance around the unit.
Before use
- Verify inverter compatibility via the official list at www.solplanet.net
- Ensure the inverter is mounted according to its specific manual
- Confirm the battery is securely installed
- Ensure the isolator between the battery and inverter is in the OFF position
- Check that all DC and communication cables are securely connected
- Verify the ground terminal is properly grounded
- Confirm correct polarity of DC power cables
Specs in practice
- Rated Capacity
- 200 Ah, representing the total energy storage capacity.
- Rated Voltage
- 51.2 Vdc, the nominal operating voltage of the battery.
Images and diagrams
- Wiring diagrams are provided for single-unit and multi-unit (parallel) configurations.
- Multi-unit connections can be performed with or without bus-bars, supporting up to 16 units in parallel.
Model compatibility
- The battery is designed to operate with Solplanet hybrid inverters.
- For use with other inverters, contact Solplanet service.

Manual page author
David Miller
Documentation analyst
Organizes user manual content into clear summaries, with attention to model details, product context, and everyday usability.