Electronics / Security Cameras
Quick Start Guide for Speco Technologies 04VB1 IP Camera
Quick start guide for the Speco Technologies 04VB1 IP Camera. Includes installation instructions, wiring diagrams, mounting steps, and initial network configuration.
Table of contents
Quick guide from the manual
The Speco Technologies 04VB1 is an IP camera designed for security monitoring. Key setup steps include mounting the camera, connecting the network cable, and accessing the web interface using the default credentials: username admin and password 1234. The camera supports PoE (Power over Ethernet) or a DC 12V power supply.
Safety and Warnings
- Do not disassemble the camera.
- Avoid water or liquid intrusion.
- Ensure installation conforms to local electrical safety codes.
- Do not touch the camera lens.
- Do not aim the camera at the sun or bright light sources.
- Do not block ventilation.
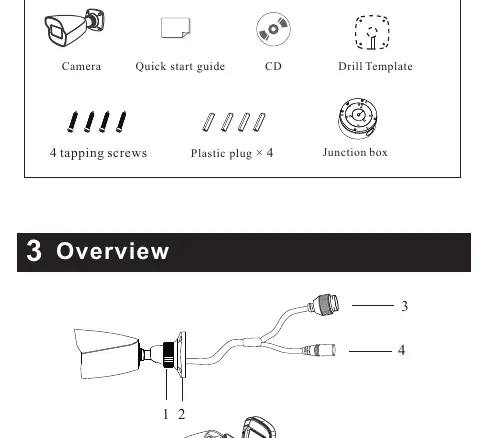
Package Contents
- Camera
- Quick start guide
- CD
- Drill template
- 4 tapping screws
- 4 plastic plugs
- Junction box
Device Overview
The camera features a fixed ring, mounting base, Ethernet connector, DC power connector, Micro SD card slot, and a reset button.
Installation
- Ensure the mounting surface can support three times the weight of the camera.
- Open the mounting base and upper cover of the junction box.
- Install the junction box onto the wall using the provided screws.
- Fasten the camera onto the mounting base.
- Connect the cables and install the camera onto the junction box.
- Loosen the fixed ring to adjust the view angle (Pan 360°, Tilt 80°), then tighten to secure.
Network Connection
For outdoor installations, it is recommended to install the security cap. If using a PoE switch or injector, a DC 12V power supply is not required.
Web Operation and Login
- Connect the camera and PC to the same local network.
- Install the IP Scanner software from the included CD.
- Run the software to find the camera's IP address.
- Double-click the device in the list to open the web viewer or enter the IP address in a web browser.
- Log in using the default credentials (admin/1234) and follow prompts to install plugins.
Practical help
Common problems
Camera not working
Contact your dealer or the nearest service center. Never attempt to disassemble the camera yourself.
Power issues
Ensure voltage is within the specified range. Use a PoE switch or injector if a DC 12V power supply is not used.
Cannot access web interface
Ensure the camera and PC are connected to the same local network. Use the IP Scanner software to locate the device IP address.
Before use
- Verify that the wall or ceiling is strong enough to withstand three times the weight of the camera.
- Ensure the camera is not placed in extremely hot, cold, dusty, or damp locations.
- Do not touch the camera lens.
- Install the security cap for outdoor installations.
- Ensure installation conforms to local electrical safety codes.
Specs in practice
- Default Username
- admin
- Default Password
- 1234
Images and diagrams
- 1: Fixed ring
- 2: Mounting base
- 3: Ethernet connector
- 4: DC power connector
- 5: Micro SD card slot
Model compatibility
- Supports PoE (Power over Ethernet) or DC 12V power supply.
- Requires IP Scanner software (included on CD) for initial network setup.

Manual page author
Michael Turner
Technical manual editor
Reviews PDF manuals for structure, safety notes, and practical product details so readers can find the right information quickly.