Lighting / Stage Lighting
User Manual for Stairville Stage Flood Inst QCL 48x10W LED Floodlight
Quick guide for the Stairville Stage Flood Inst QCL 48x10W LED Floodlight. Learn about installation, DMX configuration, operating modes, safety precautions, and maintenance.
Table of contents
Manual images
Click an image to enlargeQuick guide from the manual
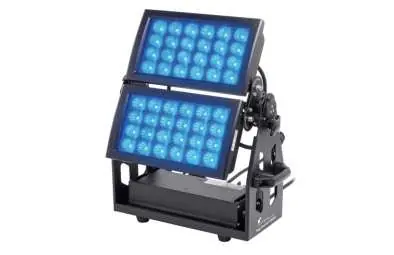
The Stairville Stage Flood Inst QCL 48x10W is a professional LED floodlight designed for stage lighting. Key operational aspects include DMX control, Master/Slave configuration, and various pre-programmed automatic shows. Ensure the device is installed securely with a secondary safety attachment and that all electrical connections are performed by qualified personnel.
Safety instructions
- Electrical safety: Always use properly insulated, three-core mains cables. Do not modify the cable. Ensure the device is turned volt-free before maintenance.
- Heat and ventilation: The device surface becomes hot. Ensure adequate ventilation and keep illuminated surfaces at least 2 meters away. Do not operate in ambient temperatures above 40 °C.
- IP65 Rating: The device is dust-tight and protected against splash water. It is designed for temporary event lighting, not permanent outdoor installation. Regularly check seals and screw connections.
- Children: Keep packaging and small parts out of reach to prevent choking hazards.
Installation
The device can be installed on walls, ceilings, or floors using the included mounting bracket. Always secure the device with a secondary safety attachment (e.g., safety cable or chain). When lifting, hold the device only by the base to avoid damaging the rotatable mounting.
Connections and controls
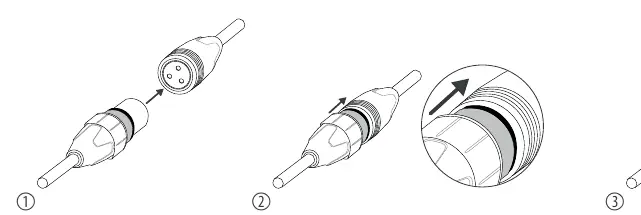
The device features an LC display with four buttons (MENU, ENTER, UP, DOWN) for configuration. Connections include DMX input/output and power input/output. Use special DMX cables for data transfer; do not use standard microphone cables.
Operating modes
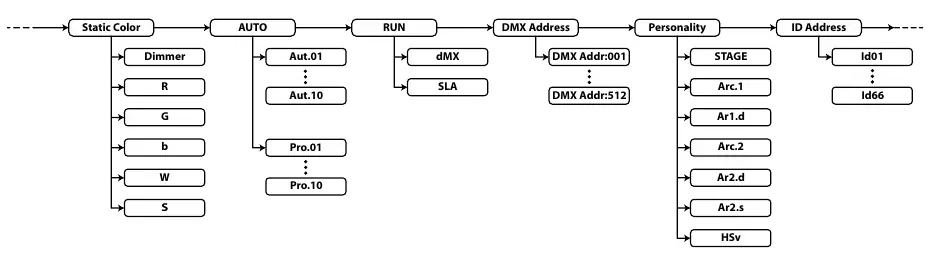
- Static colour: Set individual intensity for Red, Green, Blue, White, and Strobe effect.
- Automatic shows: Choose between 10 pre-programmed shows (Aut.) or 10 editable programs (Pro.).
- DMX mode: Supports 3, 6, 7, 8, 9, 10, or 15-channel modes. Set the DMX address via the menu to match your controller.
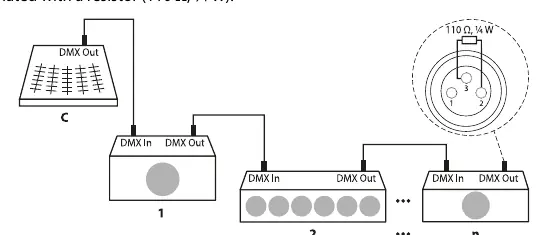
- Master/Slave: Connect multiple units in a daisy chain; the master unit controls the others.
Cleaning and maintenance
Regularly clean the optical lenses to maintain light output. Use a soft cloth and a dedicated lamp/lens cleaner (item no. 280122). Always dry parts carefully after cleaning.
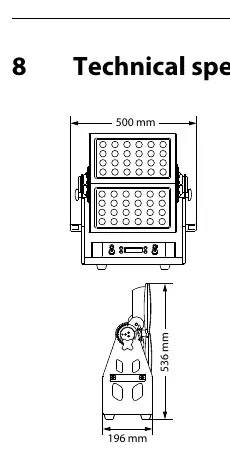
Technical specifications
- Light source: 48 x QCL LEDs (RGBW), 10 W each
- Beam angle: 45°
- Power consumption: 492 W
- Supply voltage: 100 - 240 V, 50/60 Hz
- Weight: 23.5 kg
- Dimensions: 500 mm x 536 mm x 196 mm
Practical help
Common problems
Device is not working, no light, fan is not running
Check the mains connection and the main fuse.
No response to the DMX controller
Check DMX connections/cables, verify address settings and DMX polarity, or try a different DMX controller.
Unintended light effects
Ensure DMX channel assignments do not overlap and that the DMX start address is set correctly.
Before use
- Unpack and check for transportation damage
- Ensure the mounting surface is stable and suitable
- Verify the local power grid voltage matches the device specification
- Use only DMX-rated cables for data connections
- Ensure the safety cable is threaded through both handles
Specs in practice
- Light source
- 48 x 10W RGBW LEDs
- Power consumption
- 492 W
Images and diagrams
- DMX daisy chain: Connect DMX Out of the controller to DMX In of the first device, then DMX Out of the first device to DMX In of the second, and so on.
- Termination: The last DMX device in the chain should be terminated with a 110 Ohm resistor.
Model compatibility
- Do not connect to a dimmer.
- Maximum 32 devices in a DMX daisy chain.
- Maximum 10 devices in series at 110V, 20 devices at 230V.

Manual page author
David Miller
Documentation analyst
Organizes user manual content into clear summaries, with attention to model details, product context, and everyday usability.