HVAC / Heaters & Fireplaces
User Manual for Stelpro Mirage Convector
Quick guide for the Stelpro Mirage Convector. Learn about installation, wiring, thermostat settings, maintenance, and troubleshooting for your heater.
Table of contents
Manual images
Click an image to enlargeQuick guide from the manual
The Stelpro Mirage Convector is designed for residential heating. This manual covers the installation and operation of the MIR series. Important: This unit must be installed by a certified electrician in accordance with local electrical and building codes. Ensure the supply voltage matches the nameplate. The unit requires specific clearances to prevent overheating and fire hazards.
Installation
Before installing, ensure the power is turned off at the circuit breaker. The unit must be mounted on a flat wall surface.
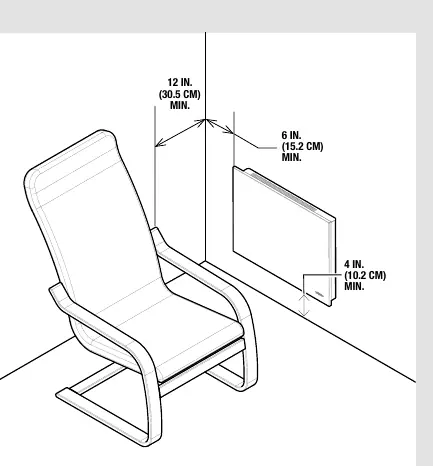
- Clearances: Maintain at least 12 inches (30.5 cm) in front, 6 inches (15.2 cm) on each side, and 4 inches (10.2 cm) from the floor.
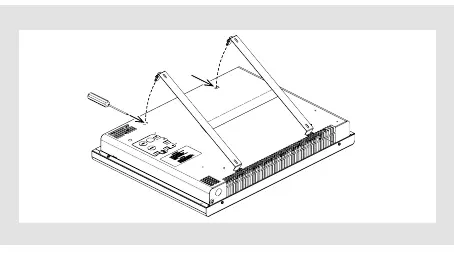
- Wall Bracket: Remove the bracket from the unit by pressing the springs with a screwdriver. Use the bracket as a template to mark screw positions on the wall, ensuring it is level. Secure the bracket using appropriate anchors for your wall type.
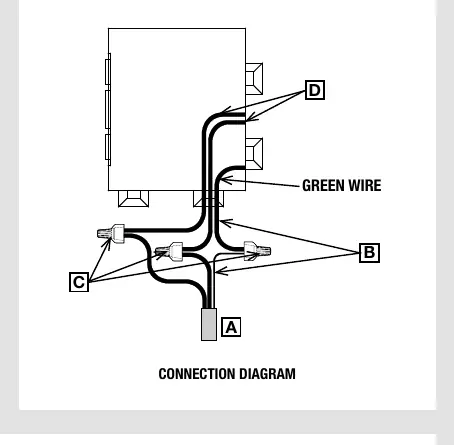
- Wiring: Remove the junction box cover. Connect the ground wire to the green wire using the provided twist-on connectors. Connect the power supply wires to the unit wires using the remaining connectors. Ensure all connections are secure and place wires inside the junction box.
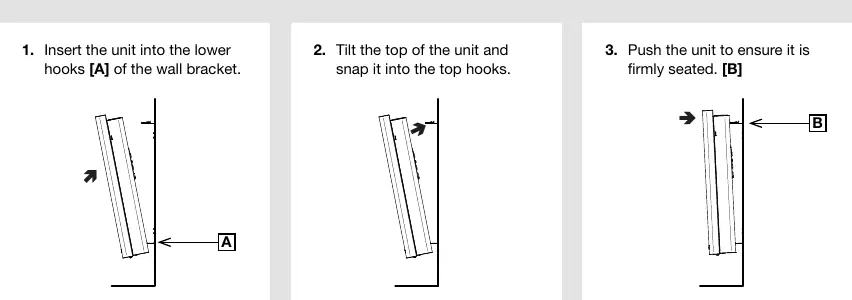
- Mounting: Insert the unit into the lower hooks of the wall bracket, tilt the top of the unit, and snap it into the top hooks. Push firmly to ensure it is seated.
Operation
Depending on the model, the convector uses either a built-in electronic thermostat or a wall-mounted thermostat.
Built-in Thermostat Modes
- Day Mode: Indicated by a sun icon. Use the top/bottom buttons to set the desired temperature.
- Night Mode: Indicated by a moon icon. Allows for energy-saving temperature settings during the night or absences.
- Automatic Mode: Switches between Day and Night modes based on programmed duration.
- Antifreeze Protection: Set temperature between 3°C and 5°C to prevent freezing.
- No Heat Mode: Lower temperature below 3°C to turn off the heat.
Maintenance
Regular cleaning is essential to prevent yellowing and component failure. Turn off the power at the circuit breaker before cleaning. Use a soft, damp cloth to remove dust. Do not use chemical or abrasive cleaning agents, chlorine, or metal brushes. If the unit is in a dusty area, use a vacuum cleaner with a dusting brush.
Troubleshooting
If the unit does not start, check the circuit breaker, thermal protection, or electrical connections. If the unit runs continuously, check the thermostat settings. If the housing is extremely hot, ensure air inlets and outlets are not blocked.
Practical help
Common problems
Unit does not start
Check if the circuit breaker is tripped, thermal protection is activated, or if there is an incorrect connection.
Unit runs continuously
The thermostat or timer may be faulty or incorrectly adjusted.
Housing is extremely hot
Check for blocked air inlets or outlets, or faulty thermal protection.
Desired room temperature not reached
Check for defective components, incorrect thermostat settings, low voltage, or heat losses in the room exceeding unit capacity.
Before use
- Ensure installation is performed by a certified electrician.
- Verify supply voltage matches the unit nameplate.
- Ensure 12-inch (30.5 cm) clearance in front of the unit.
- Ensure 6-inch (15.2 cm) clearance on each side.
- Ensure 4-inch (10.2 cm) clearance from the floor.
- Confirm no flammable materials are near the unit.
Specs in practice
- Heating Capacity
- 1.25 W/cubic foot (0.03 m³) or 10 W/square foot (0.09 m²) based on 8 ft ceiling.
Images and diagrams
- Clearances diagram shows minimum distances required from floor, sides, and front to prevent fire hazards.
- Wiring diagram illustrates the connection of the ground wire and power supply wires using twist-on connectors.
- Wall bracket installation steps show how to level the bracket and mark screw positions.
Model compatibility
- MIR...WC models require a wall-mounted thermostat.
- MIR1501P model includes a 120V plug and must be installed within 1.8 m (6 ft) of a grounded outlet.

Manual page author
Michael Turner
Technical manual editor
Reviews PDF manuals for structure, safety notes, and practical product details so readers can find the right information quickly.