HVAC / Heaters & Fireplaces
Installation Guide for Ximax 1532BTU Aluminium Radiator
Comprehensive installation and maintenance guide for the Ximax 1532BTU aluminium radiator. Includes mounting instructions, system requirements, and safety precautions for central heating systems.
Table of contents
Important information
This radiator is designed for use in central heating systems only. It is not suitable for direct hot water systems. Installation must be carried out by a suitably qualified professional in accordance with relevant British and European Standards (BS7593:1992, EN12828:2003, EN12831:2003, EN14336:2004) and applicable Building Regulations. Before drilling into walls, floors, or ceilings, always check for hidden pipes and wires.
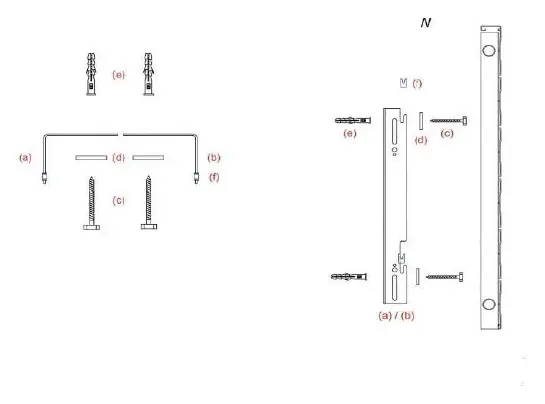
Components included
- Blank Plug
- Air Vent Plug
- Left Bracket
- Right Bracket
- Coach Screws
- Washers
- Wall Plugs
- Bracket Buffers
Installation instructions
- Apply a thick layer (at least 6 turns) of PTFE tape clockwise around the radiator valve tails (not supplied) and screw them into the bottom threads firmly.
- Ensure the wall is strong enough to support the weight of the radiator when filled with water. For plasterboard walls, we strongly recommend fixing to the timbers.
- Position the bottom of the brackets at least 257mm above the finished floor level. This ensures the bottom of the radiator is at least 150mm above the floor.
- Ensure the wide side of the brackets is against the wall and the fixing holes are facing inwards so they are hidden after installation.
- Mark the top slot positions, drill the holes, and secure the brackets. Level the brackets horizontally and vertically.
- Use the slot at the bottom of the bracket for initial adjustment, then tighten all 4 fixings.
- Insert the plastic bracket buffers into the slots on the brackets.
- Lift the radiator into position on the brackets.
- Connect the radiator valves (not supplied) and fill the system to check for leaks.
System preparation and maintenance
After installation, flush the entire central heating system with a DWTA approved central heating cleanser, following the manufacturer's instructions. Once flushed, refill the system adding a DWTA approved central heating protector. Run the system up to full temperature and release any trapped air using the Air Vent Plug. For regular cleaning, use a soft cloth and soapy water. Do not use abrasive or chemical cleaners as these will damage the surface finish.
Technical specifications
- Maximum Working Temperature: 120°C
- Maximum Working Pressure: 10 bar
- Material: Aluminium
Practical help
Common problems
Leaks after installation
Check that valve tails were installed with at least 6 turns of PTFE tape and tightened firmly.
Radiator not heating or air trapped
Run the central heating system to full temperature and use the Air Vent Plug to release trapped air.
Before use
- Verify all components (brackets, plugs, screws) are present.
- Ensure the wall is strong enough to support the radiator weight.
- Check for pipes and wires before drilling.
- Confirm the system is a central heating system (not direct hot water).
- Ensure you have PTFE tape for valve connections.
Specs in practice
- Maximum Working Temperature
- 120°C - The upper limit for safe operation.
- Maximum Working Pressure
- 10 bar - The maximum pressure the radiator can withstand.
Images and diagrams
- Top View: Illustrates the positioning of the brackets and the radiator assembly.
- Side View: Shows the mounting assembly including the wall, bracket, screws, washers, and buffers.
Model compatibility
- Suitable for central heating systems only.
- Not suitable for direct hot water systems.

Manual page author
David Miller
Documentation analyst
Organizes user manual content into clear summaries, with attention to model details, product context, and everyday usability.