Home Appliances / Small Kitchen Appliances
User Manual for Stirling 1.5L Ice Cube Maker IA3833
Quick guide for the Stirling 1.5L Ice Cube Maker (IA3833). Includes setup, operation, cleaning, maintenance, and troubleshooting steps.
Table of contents
Manual images
Click an image to enlargeImportant Information for First Use
Before using your Stirling Ice Cube Maker for the first time, please note the following critical steps to ensure proper operation and safety:
- Resting Period: After unpacking, allow the unit to rest in an upright position with the cover open for at least 2 hours. This allows the refrigerant gases to settle into the compressor.
- Water Quality: Use only potable water (still mineral, purified, or tap water). Never use distilled water, as it may damage the appliance.
- Ventilation: Ensure at least 15cm of clearance on all sides of the unit for proper ventilation. Do not place in a cupboard or confined space.
- Cleaning: Clean the interior with a soft, damp cloth and wash the ice basket and scoop in warm, soapy water before first use.
Safety Precautions
This appliance contains flammable refrigerant (isobutane R600a) and insulation blowing gas (cyclopentane). Always follow these safety rules:
- Do not expose the appliance to high heat, sparks, or open flames.
- Do not use the appliance outdoors or for commercial purposes.
- Do not immerse the unit in water or any other liquid.
- Always switch off and unplug the unit before cleaning, moving, or maintenance.
- Do not use mechanical devices to accelerate the defrosting process.
- The unit is heavy; use two people to move it or drain the reservoir.
Product Overview
The Ice Cube Maker consists of the following main components:
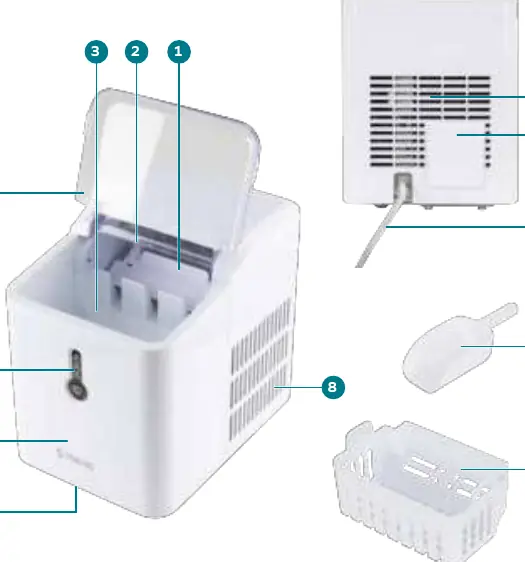
- Automated Ice Shovel: The moving part that transfers ice to the basket.
- Ice Dispensing Chamber: Where ice is formed and ejected.
- Water Reservoir: Holds up to 1.5L of water.
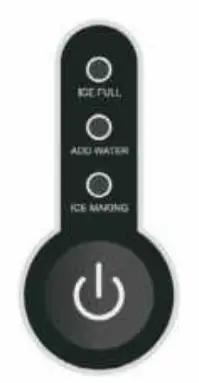
- Control Panel: Features indicators for ICE FULL, ADD WATER, and ICE MAKING, along with the Power button.
- Drain Plug: Located on the underside of the unit for emptying the reservoir.
Operating the Ice Cube Maker
Follow these steps to produce ice:
- Place the unit on a clean, dry, level surface with adequate ventilation.
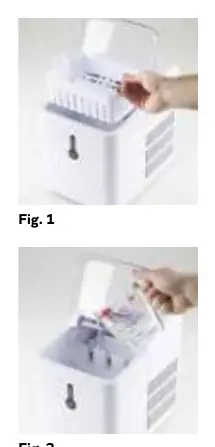
- Open the cover and remove the ice basket.
- Pour water into the reservoir up to the MAX line (maximum 1.5L).
- Replace the ice basket and close the cover.
- Plug the unit into a power outlet and switch it on. The ICE MAKING indicator will flash green (standby mode).
- Press the Power button. The ICE MAKING indicator will illuminate solid green, and the compressor will start.
- Once the ice basket is full, the ICE FULL indicator will flash red. Remove the ice using the included scoop.
Cleaning and Maintenance
For hygiene, drain and clean the unit after every use and at least every 24 hours:
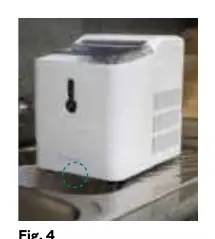
- Drainage: Switch off and unplug the unit. Place it over a sink, remove the drain plug from the underside, and allow water to drain. Replace the plug securely.
- Cleaning: Wipe the interior with a diluted solution of water and vinegar. Wipe the exterior with a soft, damp cloth.
- Accessories: Wash the ice basket and scoop in warm, soapy water. These parts are not dishwasher safe.
- Storage: Ensure the unit is completely dry before storing it in its original carton in a clean, dry place.
Troubleshooting
If you encounter issues, check the following:
- Unit not turning on: Check the power button, power connection, and circuit breaker.
- Abnormal noise: A loud sound like a fridge is normal when the compressor kicks in. If buzzing persists, turn off and contact support.
- ADD WATER light flashing: The water level is too low; refill the reservoir.
- ICE FULL light flashing: The basket is full; remove the ice.
- All three lights flashing: Ice may be blocking the shovel. Turn off, unplug, remove the blockage, and wait 5 minutes before restarting.
Technical Specifications
- Model: IA3833
- Voltage: 220-240V ~ 50Hz
- Power: 120W
- Ice Output: 12kg/24 hours
- Water Reservoir Capacity: 1.5L
- Dimensions: 32 x 23 x 30cm
Practical help
Common problems
Ice Cube Maker is not turning ON
Check that the power button is pressed, the power cord is connected, and the outlet is working. Check your home circuit breaker.
Compressor making abnormal noise
Loud sounds like a fridge are normal when the compressor starts. If buzzing persists, turn off and contact support.
ADD WATER indicator is flashing (red)
The water level is too low. Press the power button to return to standby, then refill the water reservoir.
All three indicator lights are flashing simultaneously
Ice may be blocking the automated shovel. Switch off, unplug, remove the ice blockage, and wait 5 minutes before restarting.
Ice Cube Maker has stopped working and is in standby mode
Overheat protection may have activated. It will reset and restart automatically after 5 minutes.
Before use
- Unpack the unit and remove all packaging materials.
- Place on a clean, dry, level surface with at least 15cm clearance on all sides.
- Allow the unit to rest upright with the cover open for at least 2 hours before plugging in.
- Clean the interior with a soft, damp cloth.
- Wash the removable ice basket and ice scoop in warm, soapy water.
Specs in practice
- Water Reservoir Capacity
- Maximum capacity is 1.5L.
Images and diagrams
- Control Panel: Features ICE FULL, ADD WATER, and ICE MAKING indicators, and a Power button.
- Drain Plug: Located on the underside of the unit; must be removed to drain the water reservoir.
Model compatibility
- Use only potable water (still mineral, purified, or tap water).
- Never use distilled water as it may damage the appliance.

Manual page author
Michael Turner
Technical manual editor
Reviews PDF manuals for structure, safety notes, and practical product details so readers can find the right information quickly.