Power / Solar Inverters
Quick Installation Guide for Sungrow SG5.0RS-ADA / SG8.0RS / SG9.0RS / SG10RS Inverter
Quick installation guide for Sungrow SG5.0RS-ADA, SG8.0RS, SG9.0RS, and SG10RS PV grid-connected inverters. Includes mounting, electrical connections, communication setup, and startup procedures.
Table of contents
Manual images
Click an image to enlargeQuick guide from the manual
This document provides essential installation and setup instructions for the Sungrow SG5.0RS-ADA, SG8.0RS, SG9.0RS, and SG10RS series inverters. All installations must be performed by qualified personnel. Before starting, verify that all package contents are present and intact. Ensure you have the necessary tools, including a multimeter, hammer drill, wire stripper, and crimping tools.
Safety and Preparation
- Qualified Personnel: Only trained professionals should perform installation and commissioning.
- PPE: Always wear proper personal protective equipment.
- Discharge Time: Wait at least 10 minutes after disconnecting from power sources before touching live parts.
- Insulation: Ensure all cables are intact and well-insulated.
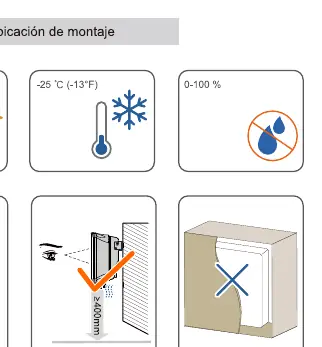
- Environment: Do not install in direct sunlight or areas with extreme temperatures outside the specified range.
Mounting
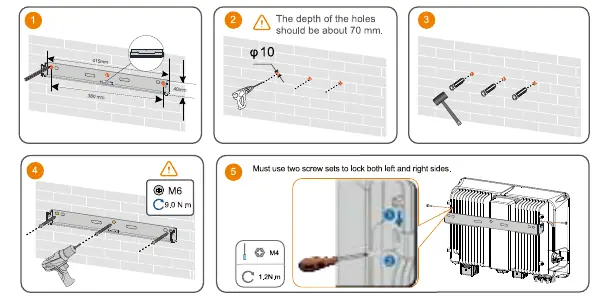
Choose a mounting location that supports the weight of the inverter and allows for proper heat dissipation. Ensure the following clearances: at least 500mm above, 400mm below, and 300mm on both sides. Use the provided wall-mounting bracket and expansion plugs to secure the unit to the wall.
Electrical Connections
PE (Grounding): Prepare the PE cable by stripping the insulation and crimping the terminal. Connect it to the grounding point on the inverter housing.
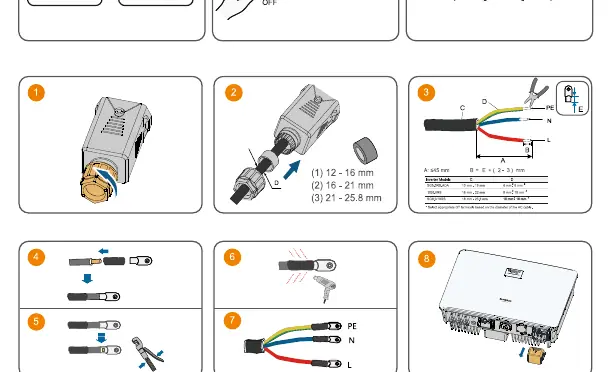
AC Connection: Use appropriate OT terminals based on the cable diameter. Ensure the AC cable is connected to the grid connector according to the L, N, and PE markings. Tighten the connector to the specified torque.
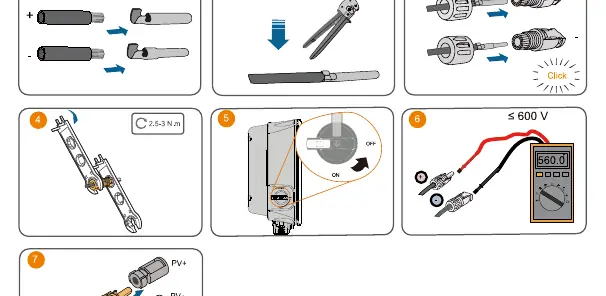
DC Connection: Ensure the DC switch is OFF. Use the provided PV connectors. Crimp the contacts onto the PV cables and insert them into the connectors until they click. Verify the voltage with a multimeter before connecting to the inverter.
Communication Setup
The inverter supports WLAN and Ethernet connections. For WLAN, insert the WiNet-S module into the communication port. For Ethernet, use a standard RJ45 cable following TIA/EIA 568B standards. The COM2 port is available for specific interfaces like Smart Energy Meters or DRM devices.
Startup and LED Indicators
Once all connections are secure, turn on the AC breaker and the DC switch. The LED indicator on the front panel provides status updates:
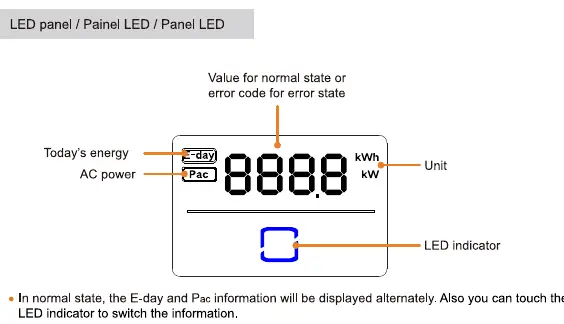
- Blue ON: Inverter is normally running.
- Blue Flashing: Inverter is at standby or startup state.
- Red ON: A system fault has occurred.
- OFF: Both AC and DC sides are powered down.
Practical help
Common problems
Inverter not starting
Check that the AC breaker and DC switch are in the ON position and verify all cable connections.
LED indicator flashing blue
The inverter is in standby or startup mode; it is not yet feeding power into the grid.
Red LED indicator ON
A system fault has occurred. Touch the LED indicator to view error codes.
Before use
- Verify package contents against the packing list.
- Ensure installation is performed by qualified personnel.
- Wear proper personal protective equipment (PPE).
- Check that all cables are intact and well-insulated.
- Wait 10 minutes after power disconnection before maintenance.
- Ensure the mounting surface can support the inverter weight.
Images and diagrams
- Mounting clearance: Maintain >= 500mm above, >= 400mm below, and >= 300mm on sides.
- AC Cable: Ensure L, N, and PE wires are correctly identified and connected to the grid connector.
- DC Connection: Ensure correct polarity (+/-) when crimping and connecting PV cables.
Model compatibility
- Requires qualified personnel for country-specific settings.
- Compatible with Smart Energy Meters via COM2 port.
- Supports DRM (Demand Response Enabling Device) for AU/NZ regions.

Manual page author
David Miller
Documentation analyst
Organizes user manual content into clear summaries, with attention to model details, product context, and everyday usability.