Lighting / Fixtures
Installation Instructions for Sunlite 122F LED Linear Strip Light
Comprehensive installation guide for the Sunlite 122F LED Linear Strip Light. Includes detailed wiring diagrams for standard, 0-10V dimming, emergency battery, motion sensor, and photocell configurations, along with mounting instructions...
Table of contents
Manual images
Click an image to enlargeQuick Guide from the Manual
This document provides installation and wiring instructions for the Sunlite 122F LED Linear Strip Light. Before beginning, ensure the power is turned off. Installation should be performed by a qualified electrician. The fixture is suitable for damp locations and operates in ambient temperatures between -20°C and 50°C (-4°F to 122°F). For emergency battery models, the operating temperature range is 0°C to 50°C (32°F to 122°F).
Installation Methods
The fixture supports multiple mounting configurations:
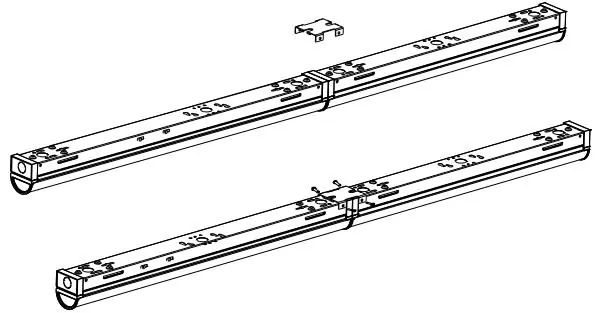
- Ceiling Mount: Use the provided reference guide to drill holes. Insert anchors, attach the fixture using provided screws, and connect the J-Box cover to the slots on the bottom of the fixture.
- Suspended Mount: Requires the suspended mount kit (sold separately). Attach V-Hooks to the existing keyholes on the fixture and hang them on the chain. Wiring must be routed through a conduit.
- Corner Mount: Requires the corner bracket (sold separately). Drill mounting holes on the wall using the reference guide, attach the bracket with anchors and screws, and mount the fixture onto the brackets using M4*10 screws.
Wiring Instructions
Standard Wiring: Connect supply wires to fixture wires: Black to Black, White to White, and Green to Green.
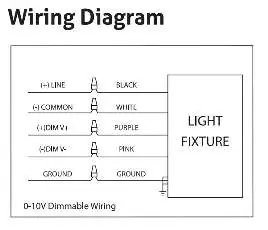
0-10V Dimming: Connect the violet wire to the positive dimming wire and the grey wire to the negative dimming wire.
Settings and Adjustments
The fixture features switches on the side to select the desired color temperature (CCT) and wattage. Ensure these are set according to your lighting requirements before finalizing the installation.
Accessories and Add-ons
The following accessories are available (sold separately) and require specific wiring:
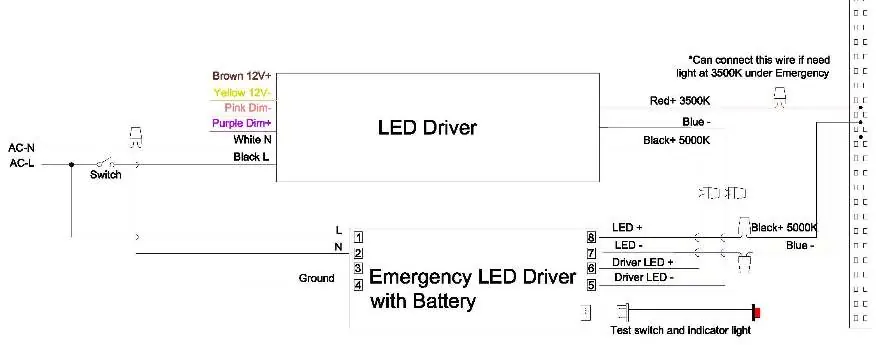
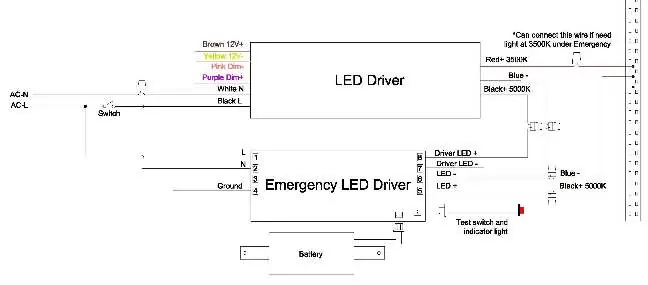
- Emergency Battery (4W, 6W, or 8W): Includes an LED driver and battery. Follow the specific wiring diagram provided in the manual for the respective wattage. Use the test switch to confirm emergency function.
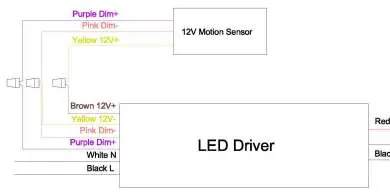
- Motion Sensor: Install the 12V sensor on the fixture and connect it to the driver using the fast connector. Default settings include 100% brightness, 75% sensitivity, and 10s hold time.
- Photocell: Follow the provided wiring diagram to connect the photocell to the fixture's line and load wires.
Practical help
Common problems
Fixture does not dim correctly
Ensure the violet wire is connected to the positive dimming wire and the grey wire is connected to the negative dimming wire.
Emergency battery not functioning
Press the test switch to confirm emergency function. Verify that the wiring matches the specific diagram for your battery wattage (4W, 6W, or 8W).
Before use
- Turn off power before inspection or installation.
- Ensure the installer has sufficient electrical wiring experience.
- Verify the mounting surface is suitable for the fixture weight.
- Check that ambient temperature is between -20°C and 50°C.
- Ensure supply conductors are rated for at least 90°C.
Specs in practice
- Ambient Temperature
- -20°C to 50°C (-4°F to 122°F) for standard operation; 0°C to 50°C for emergency battery.
- 0-10V Dimming
- Requires connection of violet (positive) and grey (negative) wires to a compatible 0-10V controller.
Images and diagrams
- Wiring Diagram: Shows standard line, neutral, ground, and 0-10V dimming connections.
- CCT/W Switch: Located on the side of the fixture to adjust color temperature and power output.
- Emergency Wiring: Specific diagrams provided for 4W and 6W/8W battery configurations.
Model compatibility
- Emergency battery, motion sensor, and photocell are sold separately.
- Suspended mount kit and corner brackets are sold separately.

Manual page author
Emily Carter
User documentation editor
Prepares concise manual descriptions and highlights the most useful setup, operation, and maintenance information for readers.