Electronics / Speakers & Soundbars
Installation and User Guide for Tannoy VMS 1 Compact Monitor
Quick start guide for the Tannoy VMS 1 and VMS 1-WH 5-inch compact monitors. Includes installation, wiring, amplifier requirements, and technical specifications.
Quick answers from the manual
Quick answer
- The VMS 1 is a 5-inch 2-way compact monitor. Connect it to a professional power amplifier using bare speaker wire via the spring clips on the back. p. 5, 8, 13
Key actions
- Connect speaker wire to spring clips p. 5, 8, 13
- Position the speakers p. 5, 8, 13
Problems and fixes
Sound is thin, weak bass, or poor stereo imaging
Check polarity. Ensure the (+) terminal on the speaker connects to the (+) terminal on the amplifier, and the (-) to the (-).
p. 5, 8, 13Maintenance and reset
- Clean the cabinet with a soft lint-free cloth. Avoid solvents or abrasive cleaners. p. 5, 8, 13
Technical specifications
| Parameter | Value | Meaning | Pages |
|---|---|---|---|
| Frequency response | 70 Hz to 20 kHz | Frequency range | p. 16 |
| Nominal Impedance | 4 Ohm | Speaker impedance | p. 16 |
Where to find it in the PDF
- Safety Instructions p. 2, 3, 4
- Operation and Connections p. 5, 8, 13
- Technical Specifications p. 16
Table of contents
Manual images
Click an image to enlargeQuick guide from the manual
The Tannoy VMS 1 and VMS 1-WH are 5-inch, 2-way compact monitors designed for professional installation applications. This guide covers the essential steps for connecting, positioning, and maintaining your monitors to ensure optimal performance.
Amplifier Considerations
To ensure long-term reliability and sound quality, the VMS 1 should be driven by high-quality professional power amplifiers. The amplifier should be capable of delivering long-term broadband power equal to half the loudspeaker's peak power rating at its stated nominal impedance. Avoid using underpowered amplifiers, as heavily clipped signals can cause permanent damage to the loudspeaker.
Connections
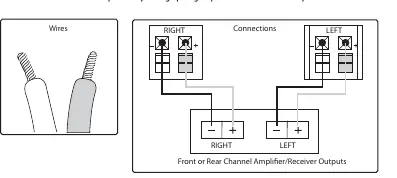
The VMS 1 connects to your amplifier using bare speaker wire via spring clips located on the rear panel. Ensure that the (+) and (-) terminals on the speaker match the corresponding terminals on your amplifier. Incorrect connection will result in "out of phase" sound, characterized by a thin audio profile, weak bass response, and poor stereo imaging.
Connecting speaker wire to spring clips
- Cut your speaker wire to the desired length, leaving a little extra.
- If using a conjoined jacket, separate the two wires by approximately two inches.
- Use a wire stripper to remove about 1/2 inch of insulation from the end of each wire.
- Twist the bare wire strands tightly between your thumb and forefinger.
- Press down on the spring clips' plastic tabs to open the connection holes.
- Insert the wire into the hole, ensuring correct polarity.
- Release the plastic tabs to secure the wire.
Positioning your speakers
These monitors are designed for near-field use, typically positioned 0.75 to 3 meters from the listener. They are commonly placed on a mixer metering bridge or on a table on either side of a mixing desk. For best results regarding stability and vibration, they may also be mounted on appropriate loudspeaker stands or brackets. In all cases, angle the speakers towards the listener, with the tweeter approximately at ear height.

Cabinet care
Clean the cabinet using a soft, lint-free cloth. Avoid the use of solvents or abrasive cleaners.
Technical Specifications
- Frequency response: 70 Hz to 20 kHz (-10 dB)
- Sensitivity: 86 dB (1 W @ 1 m)
- Nominal Impedance: 4 Ohm
- Power handling (IEC): 25 W (Continuous), 100 W (Peak)
- Dimensions (H x W x D): 235 x 159 x 142 mm
- Net weight: 1.8 kg
Practical help
Common problems
Sound is thin, weak bass, or poor stereo imaging
Check polarity. Ensure the (+) terminal on the speaker connects to the (+) terminal on the amplifier, and the (-) to the (-).
Risk of permanent loudspeaker damage
Avoid using underpowered amplifiers, as heavily clipped signals can cause permanent damage.
Before use
- Ensure your amplifier is a high-quality professional model.
- Verify that the amplifier power is roughly half the loudspeaker's peak power rating.
- Prepare speaker wire by cutting to length and stripping 1/2 inch of insulation.
- Ensure you have appropriate mounting brackets if not placing on a desk.
Specs in practice
- Frequency response
- The range of frequencies the speaker can reproduce (70 Hz to 20 kHz).
- Nominal Impedance
- The electrical resistance of the speaker (4 Ohms), important for amplifier matching.
Images and diagrams
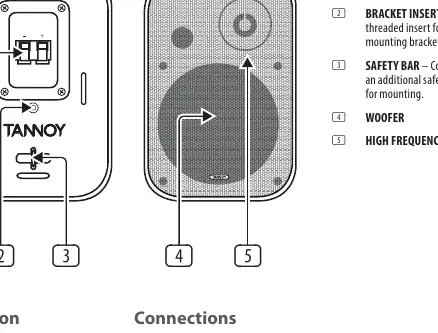
- The rear panel diagram identifies the spring clips, bracket insert, safety bar, woofer, and high-frequency driver.
- The wiring diagram shows the correct polarity connection between the amplifier and the speaker terminals.
- The positioning diagram illustrates the optimal near-field setup, angling speakers towards the listener.
Model compatibility
- Designed as near-field monitors.
- Recommended distance from listener: 0.75 to 3 meters.

Manual page author
Emily Carter
User documentation editor
Prepares concise manual descriptions and highlights the most useful setup, operation, and maintenance information for readers.