Lighting / Fixtures
User Manual for Tecnolite 12YSNLED022MV LED Spot Lamp
Quick guide for the Tecnolite 12YSNLED022MV LED spot lamp. Includes installation steps, CCT color temperature selection, technical specifications, and safety warnings.
Table of contents
Quick Guide
This document provides installation and operation instructions for the Tecnolite 12YSNLED022MV LED spot lamp. The installation involves mounting the bracket, connecting the electrical wiring (including physical grounding), and selecting the desired color temperature (CCT) using the integrated switch.
Installation
- Preparation: Ensure the power supply is disconnected before starting any installation work.
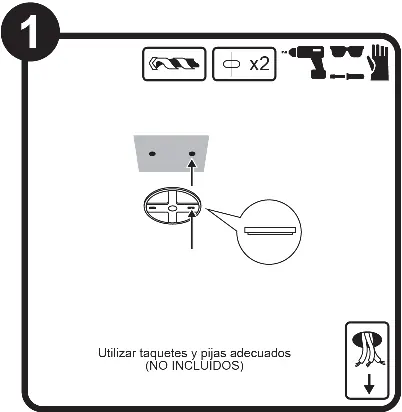
- Mounting: Drill holes and mount the bracket to the ceiling using appropriate anchors and screws (not included).
- Wiring: Connect the electrical wires according to the diagram. Ensure the ground connection is physical.
- Final Assembly: Attach the lamp to the mounted bracket.
CCT Color Temperature Selection
The lamp features a CCT selector switch that allows you to choose between three color temperatures:
- WW (Warm White): 3000 K
- NW (Neutral White): 4000 K
- CW (Cool White): 6500 K
Safety Warnings
- The lamp must be installed at a minimum distance of 0.50 m from any combustible material to avoid fire hazards.
- Disconnect the electric power source before installation and before performing any maintenance.
- The lamp and other parts of the luminaire may heat up enough to cause burns; use a clean rag and gloves to handle the luminaire.
- Clean the luminaire and its internal parts with a dry rag and check the connections periodically.
Technical Specifications
- Power: 12 W
- Voltage: 100 V - 240 V ~ 50/60 Hz
- Current: 0.13 A - 0.05 A
- Base: LED integrated
Manufacturer information
Tecnolite
Practical help
Common problems
Lamp does not turn on
Verify that the power supply is connected and active. Ensure the wiring connections are secure.
Lamp gets too hot
Ensure the lamp is installed at least 0.5m away from combustible materials and that the area is well-ventilated.
Before use
- Ensure power is disconnected before installation
- Verify voltage is 100-240V
- Ensure grounding is physical
- Check that the mounting surface is suitable for the fixture
- Have appropriate anchors and screws ready (not included)
Images and diagrams
- Step 1: Mounting the bracket to the ceiling.
- Step 2: Wiring diagram showing Line, Neutral, and Ground connections.
- Step 3: Adjusting the CCT selector switch.
Model compatibility
- Requires physical grounding.
- Not suitable for constant voltage work outside the specified range.

Manual page author
Emily Carter
User documentation editor
Prepares concise manual descriptions and highlights the most useful setup, operation, and maintenance information for readers.