Lighting / Outdoor Landscape
User Guide for Tecnolite 180FTLP3431MVN Outdoor Light
Quick guide for the Tecnolite 180FTLP3431MVN outdoor light. Includes installation steps, technical specifications, safety warnings, and maintenance instructions.
Table of contents
Quick guide from the manual
This document provides essential installation and safety instructions for the Tecnolite 180FTLP3431MVN outdoor light. Before starting, ensure the power supply is disconnected. The fixture must be installed at least 0.50 meters away from any combustible material. Proper grounding is mandatory for safe operation.
Installation
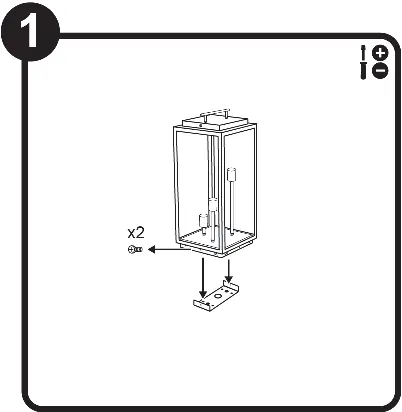
- Remove the base: Detach the mounting base from the main fixture body.
- Mounting: Drill holes in the mounting surface, insert the provided anchors (A-02), and secure the base using the screws (A-01) and washers (A-04).
- Wiring: Connect the electrical wires. Ensure the ground wire is physically connected. Use the provided connector (A-05) and secure connections with electrical tape.
- Attach fixture: Secure the main fixture body onto the mounted base using the screws.
- Final assembly: Remove the top cover, install the three E27 LED bulbs, and reattach the top cover.
Safety and Maintenance
Safety: Always disconnect the power source before performing any installation or maintenance work. The fixture and its parts can become hot during operation; allow them to cool before handling. Wear gloves if necessary.
Maintenance: Clean the fixture and its internal parts periodically using a dry rag. Ensure all connections remain secure.
Technical Specifications
- Model: 180FTLP3431MVN
- Voltage: 100V - 240V, 50/60Hz
- Power: 25.5W
- Base: E27
- Light Source: LED 8.5W x 3
Warranty
The product includes a 5-year warranty for LED fixtures. This warranty covers defects in materials or components under normal use. It does not cover installation or uninstallation costs, or damage caused by improper installation, unauthorized modifications, or voltage fluctuations exceeding 10% of the nominal value.
Manufacturer information
Tecnolite
Practical help
Common problems
Light does not turn on
Verify that the power supply is connected, the bulbs are properly installed, and the wiring connections are secure.
Fixture overheating
Ensure the fixture is installed at least 0.50m away from combustible materials and that the voltage is within the 100V-240V range.
Before use
- Disconnect the main power supply before starting installation.
- Ensure the mounting surface is stable and suitable for the fixture.
- Verify that the ground wire is physically connected.
- Check that the voltage matches the 100V-240V specification.
- Ensure you have the necessary tools (drill, screwdriver, gloves).
Images and diagrams
- Step 1: Removing the base from the fixture body.
- Step 2: Drilling and mounting the base to the wall.
- Step 3: Wiring connections (Line, Neutral, Ground).
- Step 4: Securing the fixture to the base.
- Step 5: Installing the bulbs and top cover.
Model compatibility
- Not suitable for constant work with voltages over or under the specified range.
- Requires physical grounding.

Manual page author
Emily Carter
User documentation editor
Prepares concise manual descriptions and highlights the most useful setup, operation, and maintenance information for readers.