Automotive / Dash Cams
Thinkware Dash Cam ARC 700 Quick Start Guide
Quick start guide for the Thinkware Dash Cam ARC 700. Learn how to power the device, install it on your windshield, connect to the mobile app, and configure default settings.
Quick answers from the manual
Quick answer
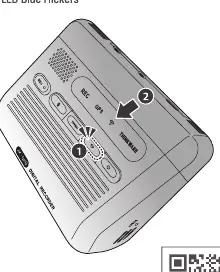
- To connect the dash cam to the app, press the Wi-Fi button on the device for at least 3 seconds until the Wi-Fi LED flickers blue, then follow the instructions in the THINKWARE DASH CAM LINK app. p. 4
Key actions
- Install the camera at the center of the windshield. p. 5
- Remove protective film from the lens. p. 5
First start
- Download the THINKWARE DASH CAM LINK app. p. 3
Technical specifications
| Parameter | Value | Meaning | Pages |
|---|---|---|---|
| Voice Recording | Enabled | Default setting | p. 7 |
| Parking Mode | Motion Detection | Default setting | p. 7 |
Where to find it in the PDF
- Powering the Dash Cam p. 2
- App Connection p. 3, 4
- Installation p. 5, 6
- Settings p. 7
Table of contents
Manual images
Click an image to enlargeQuick guide from the manual
This guide provides the essential steps to set up and operate your Thinkware Dash Cam ARC 700. Key procedures include selecting a power source, installing the camera, and connecting to the mobile application for configuration.
Powering the Dash Cam
The dash cam can be powered using one of the following options. Note that the included cables vary depending on the model purchased:

- 12V Power Cable: Standard power connection.
- Hardwiring Cable: Required for Parking Surveillance mode. Professional installation by a trained mechanic is strongly recommended to avoid damage or electrical hazards.
- OBD-II Cable: Required for Parking Surveillance mode.
Note: To enable Parking Surveillance mode, the dash cam must be powered by either the Hardwiring Cable or the OBD-II Cable.
Connecting to the App
To configure settings and view footage, use the THINKWARE DASH CAM LINK app available on the Google Play Store or Apple App Store.
- Download and install the THINKWARE DASH CAM LINK app on your smartphone.
- Press the Wi-Fi button on the Dash Cam for at least 3 seconds.
- Wait until the Wi-Fi LED indicator flickers blue, indicating it is ready to connect.
- Follow the on-screen instructions within the app to complete the pairing.
Installing the Front Camera
Proper installation is critical for optimal recording and safety:
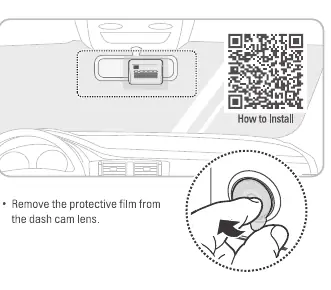
- Location: Install the front camera at the center of the windshield, ensuring it does not block the driver's view.
- Preparation: Remove the protective film from the dash cam lens before installation.
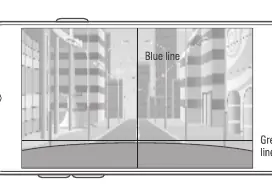
- Alignment: Open the Live View in the app to adjust the camera angle. The blue line should align with the center of the road, and the green line should align with the front edge of the hood.
Default Settings
The device comes with the following default settings, which can be adjusted via the app:
- Voice Recording: Enabled
- System Volume: 0 1 2 3
- Parking Mode: Motion Detection
- Smart Parking Recording: Enabled
- Battery Protection: Enabled (Vehicle Type: Regular car)
- Super Night Vision: Parking Mode
- HDR: Enabled
- Safety Camera: Enabled
- Speed Stamp: Disabled
Practical help
Common problems
Parking Surveillance mode is not working
Ensure the camera is powered using the Hardwiring Cable or OBD-II Cable. Parking mode requires these specific power sources.
Cannot connect to the app
Press and hold the Wi-Fi button on the dash cam for at least 3 seconds until the Wi-Fi LED flickers blue.
Before use
- Remove the protective film from the dash cam lens.
- Download the THINKWARE DASH CAM LINK app from the app store.
- Choose the appropriate power cable (12V, Hardwiring, or OBD-II) based on your needs.
- If using Hardwiring or OBD-II for parking mode, professional installation is recommended.
Specs in practice
- Parking Mode
- Records events while the vehicle is parked; requires hardwiring or OBD-II connection.
- Super Night Vision
- Enhances video quality in low-light conditions during parking mode.
- Battery Protection
- Prevents the vehicle battery from draining by monitoring voltage levels.
Images and diagrams
- The Wi-Fi button is located on the top panel of the dash cam, marked with a Wi-Fi icon.
- Live View alignment uses a blue line for the center and a green line for the hood edge.
Model compatibility
- Parking Surveillance mode requires Hardwiring or OBD-II cable installation.
- Professional installation is recommended for hardwiring to prevent electrical damage.

Manual page author
David Miller
Documentation analyst
Organizes user manual content into clear summaries, with attention to model details, product context, and everyday usability.