Home Appliances / Small Kitchen Appliances
User Manual for Tower XpressPro Combo 11L 10-in-1 Digital Air Fryer Oven T17076
Quick guide for the Tower XpressPro Combo 11L 10-in-1 Digital Air Fryer Oven (T17076). Includes setup, cooking programs, accessory usage, cleaning, and troubleshooting.
Table of contents
Manual images
Click an image to enlargeQuick Guide
This air fryer oven is designed for frying, roasting, baking, grilling, drying, and warming food. Before first use, remove all packaging, wash accessories, and perform a 15-minute trial run at 200°C without food to remove manufacturing residues. Always place the unit on a stable, level, heat-resistant surface with at least 10cm of clearance on all sides.
Getting to Know Your Air Fryer
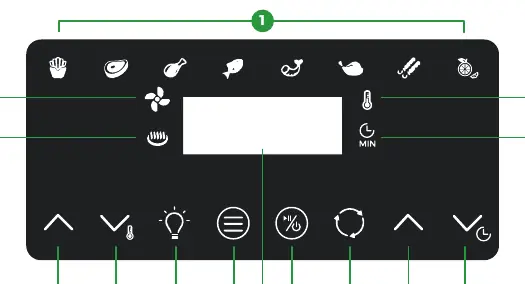
The unit features a digital control panel with pre-set programs for fries, steak, chicken, fish, prawns, roast chicken, rotisserie, and dehydration. The control panel allows for manual adjustment of temperature (30°C - 200°C) and time (1-60 minutes). The heating element is located at the top of the cooking space.
Using Accessories
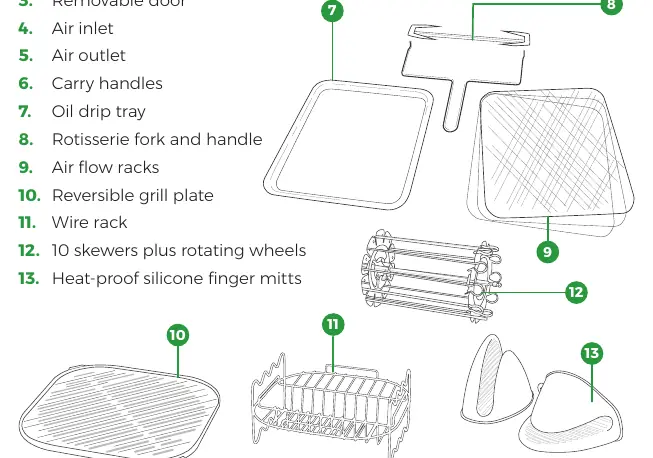
The unit comes with several accessories:
- Air flow racks: Ideal for drying or crisping. Higher placement results in faster, crispier cooking.
- Rotisserie fork: Used for large pieces of meat (max 1.3kg). Secure food with fork heads and locking screws.
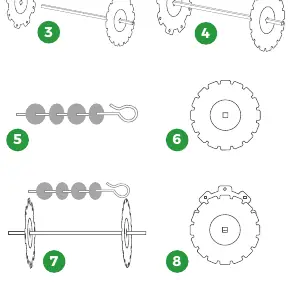
- Kebab skewers: Assemble by placing discs on the shaft and securing skewers into the slots.
- Reversible grill plate: Flat side for pizza, ridged side for griddling. Place on the wire rack.
- Wire rack: Used as a stand for the grill plate, toast rack, or grill.
Always use the provided heat-proof silicone finger mitts or oven gloves when handling hot accessories.
Cooking Instructions
To operate the air fryer:
- Connect to a mains wall socket.
- Slide the oil drip tray into the bottom of the cooking space.
- Select the appropriate accessory and place food inside.
- Close the door and press the power key to activate the control panel.
- Select a pre-set program or manually adjust time and temperature.
- Press the power key to start cooking.
- The unit will beep when the time elapses.
The unit has a pause function; press and hold the power key to pause. Opening the door during cooking will automatically pause the operation.
Cleaning and Maintenance
Unplug the unit and allow it to cool completely before cleaning. Wipe the main unit with a damp cloth. Wash accessories in warm, soapy water. Do not use metal utensils or abrasive cleaners. The door is removable for easier cleaning: push the door down to 70 degrees, push the latch on the right hinge, and pull the door down to release.
Troubleshooting
If the unit emits smoke, it is likely grease buildup (white smoke) or burning food (dark smoke). If the unit does not work, ensure it is plugged into an earthed socket. For uneven cooking, use smaller batches or rotate the racks during the cooking process.
Practical help
Common problems
The air fryer does not work
Plug the appliance into an earthed wall socket and press the power key.
The air fryer is emitting smoke
White smoke is caused by grease; clean the appliance after each use. Dark smoke indicates burning food; unplug immediately.
Foods are overcooked or burned
Decrease the cooking temperature or time.
Fried ingredients are not done
Use smaller batches for more even frying or increase the cooking time/temperature.
Before use
- Remove all packaging, stickers, and labels.
- Check for damage to the cord or body.
- Wash and dry all accessories.
- Place on a stable, level, heat-resistant surface.
- Perform a trial run for 15 minutes at 200°C without food.
Specs in practice
- Power Consumption
- 2000W
- Temperature Range
- 30°C - 200°C
Images and diagrams
- Control Panel: Features icons for pre-set programs, temperature/timer arrows, and mode selection.
- Rotisserie Assembly: Involves securing fork heads onto the shaft with locking screws and inserting into the side holders.
- Door Removal: Push door down to 70 degrees, push the latch on the right hinge, and pull down to detach.
Model compatibility
- For UK use only: Ensure plug is fitted with a fuse conforming to BS 1362.
- Do not use metal utensils on non-stick surfaces.
- The appliance is not intended to be operated by an external timer or remote-control system.

Manual page author
David Miller
Documentation analyst
Organizes user manual content into clear summaries, with attention to model details, product context, and everyday usability.