Automotive / Dash Cams
User Manual for Tracer 2.2S FHD Draco Dashcam
Comprehensive user guide for the Tracer 2.2S FHD Draco dashcam. Learn how to install, operate, configure settings, and troubleshoot your device.
Quick answers from the manual
Quick answer
- The Tracer 2.2S FHD Draco is a car dashcam. It requires a Class 10 microSD card (8-32GB) and must be connected to a constant power source in the vehicle for operation. p. 4, 8, 9
Key actions
- Resetting the device p. 4, 8
- Installing the dashcam p. 4, 8, 9
First start
- Insert a Class 10 microSD card (8-32GB), mount the camera, connect the power cable to the car charger, and start the engine. p. 4, 8, 9
Problems and fixes
Device frozen or unresponsive
Press the Reset button (hole #8) for 5 seconds.
p. 4, 8Maintenance and reset
- Use the Reset button (hole #8) to restore factory settings if the device is unresponsive. p. 4, 8
Technical specifications
| Parameter | Value | Meaning | Pages |
|---|---|---|---|
| Power | DC 5V 1.5A | Required power input | p. 6, 10 |
| Memory Card | 8-32GB Class 10 | Supported storage | p. 6, 10 |
Where to find it in the PDF
- Device Diagram p. 2
- Installation Guide p. 4, 8, 9
- Technical Specifications p. 6, 10
Table of contents
Quick guide from the manual
The Tracer 2.2S FHD Draco is a vehicle video recorder. For proper operation, it must be connected to a constant power source in the vehicle using the provided car charger. The built-in battery is intended only for saving settings and emergency recordings, not for continuous operation. A high-speed microSD card (Class 10 or higher, 8-32GB) is required for recording.
Device overview
The device features a 2.2-inch IPS screen and 4 control buttons:
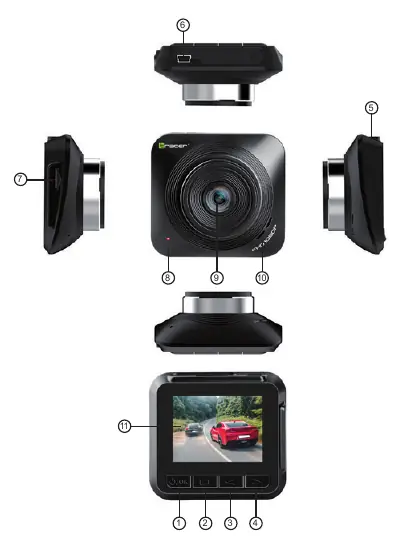
- 1. Power/OK: Turns the device on/off (hold 2 sec) and confirms selections.
- 2. Mode/Menu: Switches modes (Recording/Camera/Playback) and enters the menu.
- 3. Up: Navigates menus and playback.
- 4. Down: Navigates menus and toggles parking mode/audio recording.
Other key components include the micro USB power/data port (#7), microSD card slot (#7), and the Reset button (#8).
Safety instructions
- Keep the device away from fire, high temperatures, water, and high humidity.
- Do not connect the device if it has been exposed to water or moisture to prevent electric shock or damage.
- Do not operate the device with wet hands.
- Keep out of reach of children; this is not a toy.
- Do not expose the battery to direct fire, high heat, or sunlight.
Installation
- Ensure the car engine is turned off.
- Insert a high-speed microSD card (Class 10, 8-32GB) into the card slot.
- Attach the suction cup bracket to the camera mount.
- Connect the car charger to the vehicle's cigarette lighter socket.
- Connect the power cable to the camera.
- Mount the device on the windshield and adjust the lens position.
- Start the engine; the device should automatically power on and begin recording.
Operation
Recording: The camera automatically starts recording when the engine is started. Files are saved in the DCIMA folder. When the memory card is full, the oldest files are overwritten.
Settings: Hold the Menu button (Button 2) to access settings such as recording quality, G-sensor sensitivity, and parking mode.
Playback: Enter playback mode to view recorded files. Use the Up/Down buttons to select files and the OK button to play/pause.
Advanced features
- G-sensor: Detects collisions or sudden shocks and locks the current recording file to prevent it from being overwritten.
- Parking mode: When active, the camera automatically starts recording for 20 seconds if it detects a shock while the car is parked.
- Motion detection: Automatically records when movement is detected in the camera's field of view.
Troubleshooting
If the device freezes or fails to turn on, use a thin object to press the Reset button (located at position #8) for approximately 5 seconds to restore factory settings.
Technical specifications
- Screen: 2.2 inch IPS
- Power: DC 5V 1.5A
- Memory: 8-32GB microSD (Class 10+)
- Operating Temperature: -10°C to 60°C
- Video Format: MOV
- Photo Format: JPEG
Practical help
Common problems
Device is frozen or will not turn on
Use a thin object to press the Reset button (hole #8) for 5 seconds.
Device shuts down immediately after unplugging
The built-in battery is only for emergency saving; the device must be connected to a constant power source in the vehicle to operate.
Before use
- Ensure the car engine is off before installation.
- Insert a Class 10 or higher microSD card (8-32GB).
- Connect the device to the car's cigarette lighter socket.
- Adjust the lens to be level with the ground.
Specs in practice
- Operating Temperature
- -10°C to 60°C; do not operate outside this range.
Images and diagrams
- Button 1: Power/OK
- Button 2: Mode/Menu
- Button 4: Down/Parking mode
- Port 7: Micro USB power/data
- Hole 8: Reset button
Model compatibility
- Requires Class 10 or higher microSD card.
- Supports 8GB to 32GB capacity cards.

Manual page author
David Miller
Documentation analyst
Organizes user manual content into clear summaries, with attention to model details, product context, and everyday usability.