Automotive / Dash Cams
User Manual for Tracer 2.2S FHD Draco Car Camera
Quick guide for the Tracer 2.2S FHD Draco car camera. Learn how to install, operate, and configure your dash cam, including G-sensor and parking mode settings.
Quick answers from the manual
Quick answer
- The Tracer 2.2S FHD Draco is a car dash camera that records video in MOV format. It supports 8-32GB Class 10 microSD cards and includes features like G-sensor, parking mode, and motion detection. p. 1, 10
Key actions
- Start recording p. 8
- Enter Menu settings p. 8
First start
- Installation steps p. 8
Problems and fixes
Device crashes
Press and hold the reset button for 5 seconds.
p. 8Maintenance and reset
- Reset the device p. 8
Technical specifications
| Parameter | Value | Meaning | Pages |
|---|---|---|---|
| Display | 2.2 inch IPS | Screen size and type | p. 10 |
| Memory | 8-32GB Class 10 | Supported microSD card capacity and speed | p. 10 |
Where to find it in the PDF
- Device Diagram p. 2
- Installation Guide p. 8
- Technical Specifications p. 10
Table of contents
Manual images
Click an image to enlargeQuick guide from the manual
The Tracer 2.2S FHD Draco is a car dash camera designed for recording driving footage. This guide provides essential information on installation, operation, and key features such as the G-sensor and parking mode. Always ensure you use a high-speed Class 10 (8-32GB) microSD card for reliable recording.
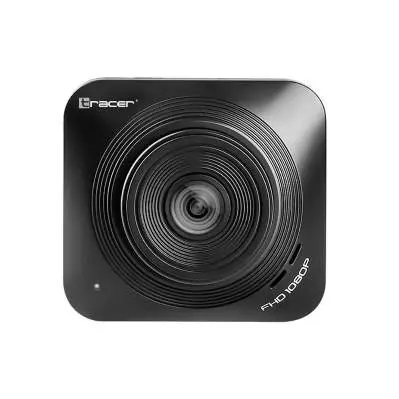
Device Overview
The device features the following components:
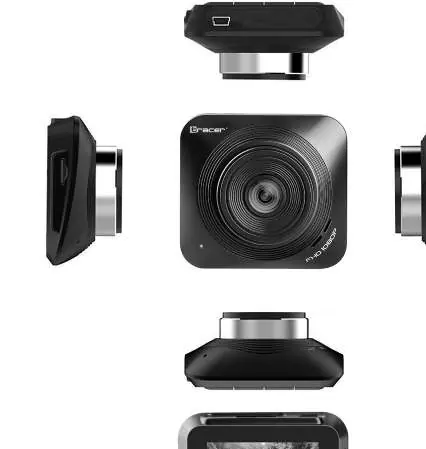
- 1: Power ON/OFF/OK button
- 2: Mode/Menu button
- 3: Up button
- 4: Down button (parking mode shortcut)
- 5: Suction cup holder socket
- 6: Micro USB socket (power/data)
- 7: microSD card slot
- 8: Reset button
- 9: Lens
- 10: Speaker
- 11: LCD screen
Installation
- Ensure the car engine is turned off.
- Insert a high-speed microSD card (Class 10, 8-32GB) into the card slot.
- Attach the suction cup bracket to the camera.
- Mount the camera to the windshield and adjust the lens position to be level with the ground.
- Connect the car charger to the vehicle's power outlet and the camera's USB port.
- Start the engine. The camera should turn on automatically and begin recording.
Button Functions

- Power ON/OFF/OK: Press and hold for 2 seconds to turn the device on or off. In recording mode, press to start/stop recording. In camera mode, press to take a photo.
- Mode/Menu: Short press to switch between modes (recording, camera, playback). In standby mode, press to enter the main menu settings.
- Up/Down: Used for navigating menus and playback. In recording mode, the Down button can toggle the microphone.
Features
- Automatic Recording: Starts automatically when the engine is on. Files are saved in the DCIMA folder. When the memory card is full, the camera overwrites the oldest files.
- G-sensor (Collision Sensor): Detects strong vibrations or collisions. It locks the current recording file to prevent it from being overwritten.
- Parking Mode: When enabled, the camera automatically starts recording for 20 seconds if it detects vibration while the car is parked and the device is off.
- Motion Detection: Records automatically when movement is detected in the camera's field of view.
Troubleshooting and Reset
If the device crashes or becomes unresponsive, locate the Reset button (8) and press it with a thin object for approximately 5 seconds to restore factory settings.
Technical Specifications
- Display: 2.2 inch IPS
- Video Format: MOV
- Image Format: JPEG
- Memory: 8-32GB Class 10 microSD
- Battery: 200mAh
- Power Input: DC5V 1.5A
- Operating Temperature: -10°C to 60°C
Practical help
Common problems
Device crashes or will not turn on/off
Press and hold the reset button (8) for 5 seconds to perform a factory reset.
Recording stops or files are missing
Ensure you are using a high-speed Class 10 microSD card (8-32GB). Lower class cards may cause recording errors.
Before use
- Ensure the car engine is off before installation.
- Insert a Class 10 or higher microSD card (8-32GB).
- Mount the camera securely to the windshield.
- Connect the device to a constant power source in the vehicle.
- Adjust the lens to be level with the ground.
Specs in practice
- Video Format
- MOV format, compatible with most media players.
- Operating Temperature
- The device is designed to function between -10°C and 60°C.
Images and diagrams
- The device has 4 control buttons located below the screen.
- The microSD slot is located on the side of the unit.
- The Reset button is a pinhole button used for system recovery.
Model compatibility
- Requires high-speed TF card (Class 10 or higher).
- Supports 8GB to 32GB capacity cards.

Manual page author
Emily Carter
User documentation editor
Prepares concise manual descriptions and highlights the most useful setup, operation, and maintenance information for readers.