Automotive / Dash Cams
User Manual for Tracer 2.2S FHD Pavo Dashcam
Quick guide for the Tracer 2.2S FHD Pavo dashcam. Learn how to install, operate, and configure your car camera, including G-sensor, motion detection, and loop recording settings.
Quick answers from the manual
Quick answer
- The Tracer 2.2S FHD Pavo is a dashcam that requires a Class 10 microSD card (8-32GB) and must be connected to a constant power source in the vehicle to function properly. p. 6, 7
Key actions
- Reset the device p. 6
- Install the camera p. 7
First start
- Insert SD card, mount to windshield, connect power, and start engine. p. 7
Problems and fixes
Device freezes
Use a pin to press the Reset button for 5 seconds.
p. 6Maintenance and reset
- Use the Reset pinhole to reboot the device. p. 6
Technical specifications
| Parameter | Value | Meaning | Pages |
|---|---|---|---|
| Video Resolution | 1920*1080/1280*720/640*480 | Recording quality options | p. 7 |
| Power | 5V 0.5A | Required power input | p. 7 |
Where to find it in the PDF
- Device Diagram p. 2
- English Instructions p. 6, 7
Table of contents
Quick guide from the manual
The Tracer 2.2S FHD Pavo is a vehicle dashcam designed for recording road events. It requires a Class 10 or higher microSD card (8-32GB) and must be connected to a constant power source in the vehicle using the provided car charger. The built-in battery is intended for saving settings and emergency recording, not for continuous operation.
Device Overview
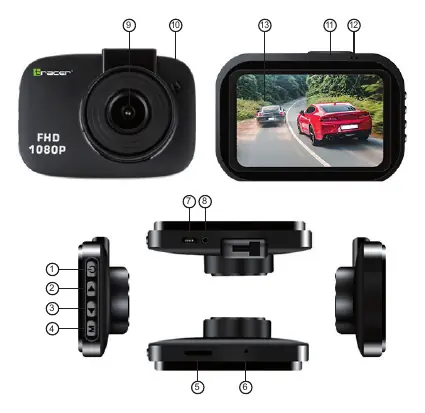
- OK Button: Power on/off, confirm menu settings, start/stop recording, take photos, play/pause video.
- Up/Down Buttons: Navigate menu options. Short press Up to toggle audio recording.
- Mode/Menu Button: Long press to switch modes (Recording/Photo/Playback). Short press to enter settings menu.
- Reset: Pinhole button to reboot the device if it freezes.
- Ports: USB port for power/data, TF Card slot for storage, Rear camera input (optional).
Installation
- Ensure the car engine is turned off.
- Insert a high-speed microSD card (Class 10, 8-32GB) into the slot.
- Attach the suction bracket to the windshield and fix the camera.
- Connect the car charger to the cigarette lighter and the USB cable to the camera.
- Adjust the lens position to be level with the ground.
- Start the engine; the camera should power on and begin recording automatically.
Functions
- Motion Detect: Automatically records when movement is detected in standby mode.
- Loop Recording: Overwrites the oldest files when the memory card is full (1/2/3/5 minute intervals).
- G-Sensor: Detects sudden impacts or acceleration and locks the current video file to prevent deletion.
- Parking Mode: Records automatically if an impact is detected while the car is parked.
Safety
- Keep the device away from heat sources, direct sunlight, and water.
- Do not operate with wet hands.
- Do not use if the device has been dropped or damaged.
- Repairs should only be performed by qualified professionals.
Practical help
Common problems
Device is frozen or unresponsive
Insert a thin pin into the Reset hole (6) and hold for approximately 5 seconds to reboot.
Camera not recording
Ensure a Class 10 microSD card (8-32GB) is inserted and the device is connected to a constant power source.
Battery dies quickly
The internal battery is for emergency use only; the camera must be connected to the car charger for continuous operation.
Before use
- Insert a Class 10 or higher microSD card (8-32GB).
- Ensure the car engine is off before installation.
- Mount the camera securely to the windshield.
- Connect the device to the car's power outlet.
- Adjust the lens angle.
Specs in practice
- Loop Recording
- Continuously records by overwriting the oldest files when the card is full.
- Parking Mode
- Automatically triggers recording if an impact is detected while the car is parked.
Images and diagrams
- 1: OK button (Power/Record/Confirm)
- 4: Mode/Menu button
- 6: Reset pinhole
- 7: USB power port
- 8: Rear camera input
Model compatibility
- Requires Class 10 or higher microSD card.
- Supports 8-32GB capacity.
- Rear camera is an optional accessory (not included).

Manual page author
Michael Turner
Technical manual editor
Reviews PDF manuals for structure, safety notes, and practical product details so readers can find the right information quickly.