HVAC / Motor Drives
Installation Guide for Trane QuikBox Air Filter Enclosure
Comprehensive installation and maintenance guide for Trane QuikBox air filter enclosures. Includes mounting instructions, clearance requirements, and filter replacement schedules.
Quick answers from the manual
Quick answer
- The Trane QuikBox is an air filter enclosure installed on the return air side of a furnace or air handler. It requires 28 inches of clearance for maintenance and must not be exposed to UV light. p. 1, 2
Key actions
- Install on the return air side of the furnace or air handler. p. 2
- Maintain 28 inches of clearance in front of the enclosure. p. 2
Maintenance and reset
- Replace filter every 1-6 months depending on fan usage (Continuous vs Auto) and environmental conditions (Dusty vs Normal). p. 1
Where to find it in the PDF
- Components and Maintenance Schedule p. 1
- Pre-Installation and Location p. 2
- Bottom Mount Installation p. 3
Table of contents
Manual images
Click an image to enlargeQuick Guide
The Trane QuikBox air filter enclosure is designed for residential HVAC systems. Key requirements for installation include placing the unit on the return air side of the furnace or air handler and ensuring a minimum of 28 inches of clearance in front of the enclosure for filter access. Do not install the unit in the discharge air stream or where it will be exposed to UV light.
Product Overview
The QuikBox system consists of three main components:
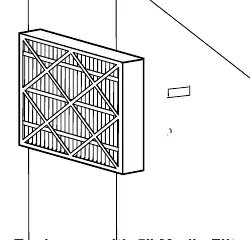
- Enclosure: 22-gauge painted steel with internal insulation.
- Filter: Collapsible 5-inch, electrostatically charged media, available in MERV 11 or MERV 13 ratings.
- Access Door: Fully insulated door with quarter-turn latches for easy filter access.
Pre-Installation Requirements
Before beginning the installation, ensure the following conditions are met:
- Location: The enclosure must be mounted in the return air duct on the entering air side of the central forced-air furnace or air handler.
- Orientation: The face of the filter must be at a right angle to the air stream.
- Clearance: Allow a minimum of 28 inches of clearance in front of the enclosure to permit filter removal.
- UV Protection: Do not install the air cleaner where the filter can be exposed to UV light, as this can cause plastic material to deteriorate.
- Humidifiers: If using atomizing spray type humidifiers, they must be installed on the supply side, away from the filter.
Installation: Bottom Mount
Follow these steps to install the enclosure on the bottom of a furnace or air handler:
- Remove the access door by rotating the two quarter-turn latches. Remove the filter and set it aside.
- Position the furnace or air handler on a protective pad on the floor with the bottom facing up.
- Install the self-adhesive gasket material onto the flange of the discharge-air side of the filter enclosure. The gasket must be placed toward the outside edge of the flange.
- Position the filter enclosure on the bottom of the unit with the gasket against the unit. Align the rear and sides of the enclosure with the unit. Note that the front of the enclosure will not align flush with the front of the unit.
- Ensure the front of the filter enclosure is facing the front of the unit.
- Securely attach the filter enclosure to the unit using heavy-duty self-tapping sheet metal screws (recommended: #12-14, 1/2 inch length, hex washer head).
Maintenance and Replacement
The maintenance schedule depends on the amount of air passing through the filter and the amount of dust, pollen, or smoke in the air. The following schedule is an estimate:
- Continuous Fan (Dusty): 1-2 Months
- Continuous Fan (Normal): 3 Months
- Auto Fan (Dusty): 3 Months
- Auto Fan (Normal): 6 Months
Practical help
Common problems
Filter deterioration
Ensure the filter is not installed where it will be exposed to UV light.
Improper airflow
Do not install the air filter in the discharge air stream of the heating or cooling unit.
Cannot remove filter for replacement
Ensure a minimum of 28 inches of clearance is maintained in front of the filter enclosure.
Before use
- Verify the installation location is on the return air side of the furnace/air handler.
- Ensure there is at least 28 inches of clearance in front of the unit.
- Confirm the filter face is at a right angle to the air stream.
- Check that any atomizing spray humidifiers are on the supply side.
- Have #12-14, 1/2 inch hex washer head self-tapping screws ready for mounting.
Specs in practice
- 22-gauge steel
- Material thickness and type used for the enclosure construction.
Images and diagrams
- Figure 1 shows the components of the filter enclosure including the access door and filter media.
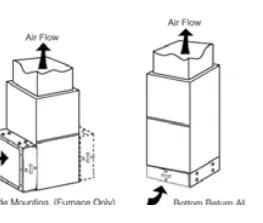
- Figure 5 illustrates the bottom installation details for mounting the enclosure to the furnace or air handler.
Model compatibility
- Compatible with central forced-air furnace/air handler systems.
- Not for use in discharge air streams.

Manual page author
Michael Turner
Technical manual editor
Reviews PDF manuals for structure, safety notes, and practical product details so readers can find the right information quickly.