Sports / Fitness
User Manual for Sunny Health & Fitness SF-B023005WHT Under Desk Smart Mini Pedal Exerciser
Quick guide for the Sunny Health & Fitness SF-B023005WHT Under Desk Smart Mini Pedal Exerciser. Includes assembly instructions, battery installation, meter operation, and app connection steps.
Table of contents
Manual images
Click an image to enlargeQuick guide from the manual
This manual provides essential instructions for the assembly, operation, and maintenance of the Sunny Health & Fitness SF-B023005WHT Under Desk Smart Mini Pedal Exerciser. Key points include:
- Safety First: The unit is for indoor, home use only. Do not stand on the unit; use it only while sitting.
- Assembly: Requires attaching stabilizers and pedals using the provided hardware and tools.
- Maintenance: Regularly check that all nuts and bolts are securely tightened.
- App Connectivity: The device connects to the SunnyFit app via Bluetooth for tracking workout stats.
Important Safety Information
Before using the equipment, please observe the following:
- Consult a physician before starting any exercise program, especially if you have medical conditions or take medication affecting heart rate or blood pressure.
- Stop exercising immediately if you experience pain, chest tightness, irregular heartbeat, shortness of breath, dizziness, or nausea.
- Keep children and pets away from the equipment.
- Use on a solid, flat, level surface with a protective cover. Ensure at least 2 feet (60 cm) of free space around the unit.
- Do not place fingers or objects into moving parts.
- The equipment is not suitable for therapeutic use.
Assembly Instructions
Follow these steps to assemble your unit:
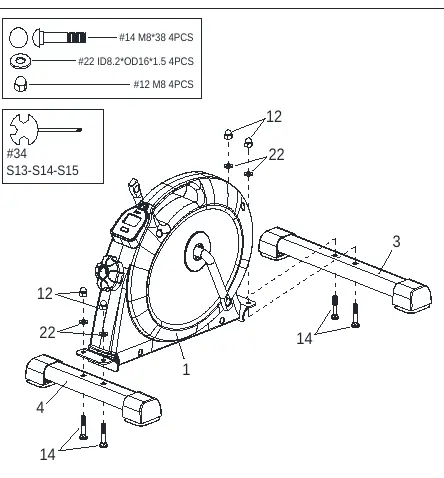

- Step 1: Attach the Rear Stabilizer (No. 4) and Front Stabilizer (No. 3) to the Main Frame (No. 1) using Carriage Bolts (No. 14), Flat Washers (No. 22), and High Cap Nuts (No. 12). Secure with Spanner (No. 34).
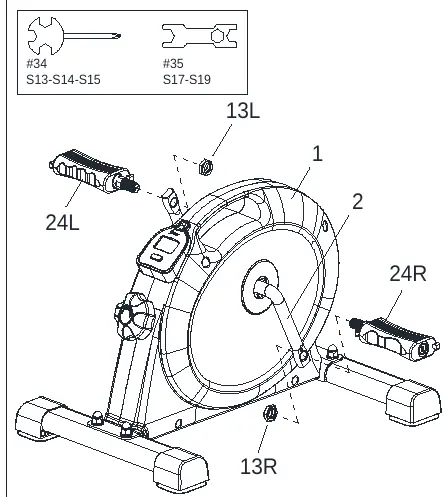
- Step 2: Install the Left and Right Pedals (No. 24L & 24R). Note that pedals are marked 'L' and 'R'. Insert pedals into the Crank Arm (No. 2) and tighten. Secure with Nylon Nuts (No. 13L & 13R) using Spanners (No. 34 & 35).
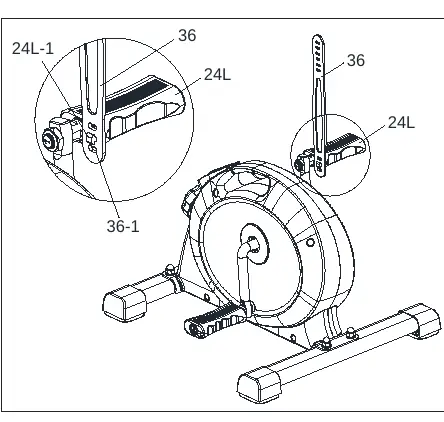
- Step 3 & 4: Attach the Pedal Straps (No. 36) to the pedals by inserting the fixing holes into the grooves on the pedals.
Battery Installation & Replacement
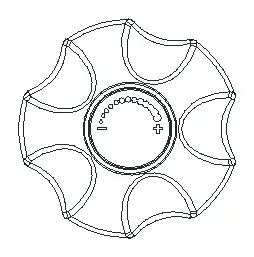
The meter requires 2 AAA batteries.
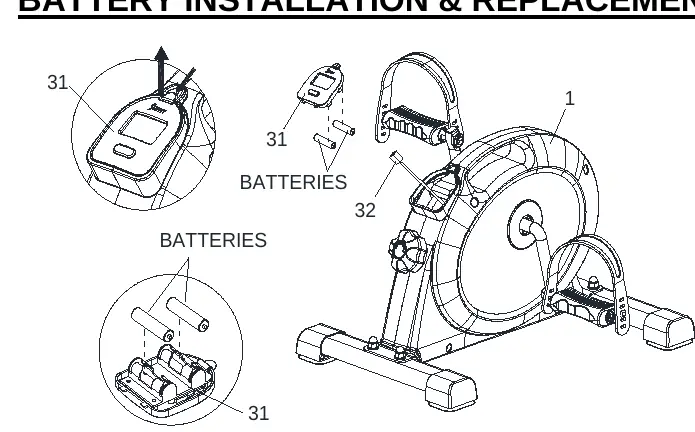
- Remove the Meter (No. 31) from the Main Frame.
- Disconnect the Sensor Wire (No. 32).
- Install 2 AAA batteries into the battery case on the back of the meter, ensuring correct polarity (+/-).
- Reconnect the Sensor Wire and attach the meter back to the frame.
Exercise Meter
The meter tracks your workout data:
- TMR (Time): Elapsed time during exercise.
- SPD (Speed): Current speed.
- DIS (Distance): Distance traveled.
- CAL (Calories): Estimated calories burned.
- ODO: Total distance since battery installation.
Press the Mode key to select functions. Hold the key for 3 seconds to reset values (except ODO). The meter shuts off automatically after 4 minutes of inactivity.
Adjustments & Usage Guide
Adjust the resistance by rotating the Tension Control Knob (No. 28). Rotate clockwise to increase resistance and counter-clockwise to decrease it. The adjustment is stepless.
App Connection
To connect to the SunnyFit app:
- Scan the QR code in the manual to download the app.
- Register or log in to your account.
- Ensure Bluetooth is enabled on your mobile device.
- In the app, go to the 'Workout' tab and press 'Search' to find your equipment.
- Select your equipment from the list to confirm.
Practical help
Common problems
Display not showing properly
Re-install or replace the 2 AAA batteries.
Equipment not appearing in app search
Ensure the meter is not in sleep mode (press a key or start pedaling) and that your phone's Bluetooth is turned on.
Unusual noises during exercise
Discontinue use immediately, check for defective components, and ensure all parts are tightened.
Before use
- Ensure all nuts and bolts are securely tightened.
- Place the unit on a solid, flat, level surface.
- Ensure at least 2 feet (60 cm) of free space around the unit.
- Check that batteries are installed correctly (+/- poles).
- Wear suitable clothing; avoid loose items that could get entangled.
Specs in practice
- Tension Control Knob
- Rotate clockwise to increase resistance, counter-clockwise to decrease.
- Meter Auto-Shutoff
- The meter turns off automatically after 4 minutes of inactivity to save battery.
Images and diagrams
- The Exploded Diagram (page 14) provides a complete view of all parts and hardware for assembly and maintenance reference.
- Assembly steps (pages 5-8) illustrate the correct attachment of stabilizers, pedals, and straps.
Model compatibility
- Indoor and home use only.
- Not intended for commercial use.
- Not suitable for therapeutic use.
- Do not stand on the unit; use only while sitting.

Manual page author
Michael Turner
Technical manual editor
Reviews PDF manuals for structure, safety notes, and practical product details so readers can find the right information quickly.