Lighting / LED Strips
User Manual for Utilitech 17000610-D8 Hardwired Floodlight
Quick guide for the Utilitech 17000610-D8 Hardwired Floodlight. Includes installation steps, wiring instructions, GFCI outlet operation, and troubleshooting tips.
Quick answers from the manual
Quick answer
- The Utilitech 17000610-D8 is a hardwired floodlight with integrated GFCI outlets. It supports two modes: Dusk-to-Dawn (automatic) and Switch-controlled (manual). p. 1, 7, 8
Key actions
- Wiring the fixture p. 4, 9
- Caulking the fixture p. 4, 9
First start
- Turn on the power at the breaker and set the dial to either 'D2D' or 'Switch' mode. p. 4, 7
Problems and fixes
GFCI outlet not working
Press the 'RESET' button on the outlet. If the red light persists, check wiring.
p. 5, 8, 10Maintenance and reset
- Reset the GFCI outlet by pressing the 'RESET' button. p. 5, 8, 10
Technical specifications
| Parameter | Value | Meaning | Pages |
|---|---|---|---|
| Voltage | 120V AC | Standard residential power requirement. | p. 3, 8 |
Where to find it in the PDF
- Installation p. 3, 4, 5, 8
- Operation p. 4, 5, 7, 8
Table of contents
Manual images
Click an image to enlargeQuick guide from the manual
The Utilitech 17000610-D8 is a hardwired floodlight featuring integrated GFCI outlets and selectable operation modes (Dusk-to-Dawn or Switch-controlled). This manual provides instructions for safe installation, wiring, and troubleshooting.
Safety Information
- Voltage: This fixture requires 120 volts AC.
- Installation: Some codes require installation by a qualified electrician.
- Power: Always turn off power at the circuit breaker or fuse box before installation. Do not rely on a wall switch alone.
- Compatibility: Do not connect this fixture to a dimmer switch or timer.
- Fire Hazard: Do not aim the lamp head at combustible surfaces within 3 ft. (1 m).
Installation
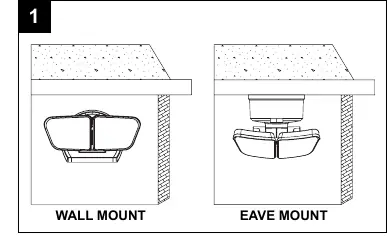
Mounting
- Determine the mounting location (Wall Mount or Eave Mount).
- Turn off power at the main breaker.
- Remove the fixture mounting bolt and silicone washer to detach the mounting plate.
- Secure the mounting bracket (AA) to the junction box using the appropriate mounting screws (BB or CC).
- Pull house wires through the hole (X) on the mounting plate.
- Secure the mounting plate to the mounting bracket using the mounting plate mounting bolt (DD).
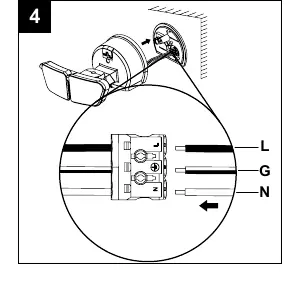
Wiring
- Connect the green GROUND (G) wire from the house to the ground wire on the fixture using the pre-installed connector.
- Connect the white NEUTRAL (N) wire from the house to the white wire on the fixture using the pre-installed connector.
- Connect the black LINE (L) wire from the house to the black wire on the fixture using the pre-installed connector.
- Secure the light fixture to the mounting plate using the fixture mounting bolt and silicone washer.
- Insert the rubber stopper (EE).
- Important: Caulk around the light fixture and mounting surface with silicone sealant to prevent water seepage.
Operating Instructions
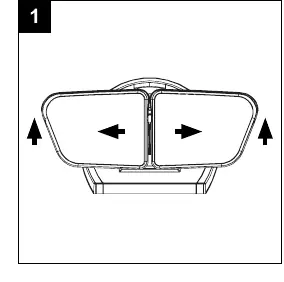
Adjusting Lamp Heads
Gently grasp the lamp heads and tilt them up, down, or side to side to adjust the light coverage area.
Selecting Modes
Use the dial on the fixture to switch between modes:
- Dusk to Dawn (D2D): The light turns on at dusk and off at dawn automatically.
- Switch Activation: The light is controlled manually by the wall switch.
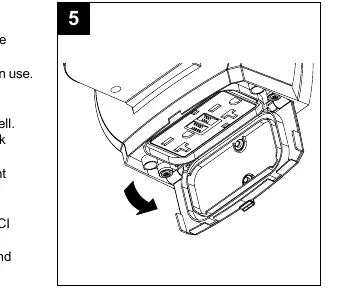
Integrated GFCI Outlets
The fixture includes integrated GFCI outlets. In D2D mode, the outlets have power day and night. In Switch mode, the outlets are controlled by the wall switch.
Troubleshooting
If the GFCI outlet stops working, the indicator light (Y) will flash red. Press the RESET button (Z) to restore power. If the light remains red, check the fixture wiring.
Manufacturer information
Utilitech
Practical help
Common problems
Light will not turn on
Check if the fuse is blown or circuit breaker is off. Verify wiring is correct. Ensure the wall switch is turned ON.
Lights stay on during the day
Ensure the fixture is not in 'Switch' mode. Check if the photocell is blocked or covered. Ensure it is not wired through a dimmer or timer.
GFCI outlet not working
If the indicator light is flashing red, press the 'RESET' button on the outlet. If it remains red, check the fixture wiring.
Before use
- Turn off power at the circuit breaker or fuse box.
- Verify power is off at the fixture using a tester.
- Ensure you have a Phillips and flathead screwdriver, silicone caulk, and a step ladder.
- Confirm the junction box is standard and supply wiring is installed.
- Do not install on a circuit with a dimmer or timer.
Images and diagrams
- Wiring: Connect Green to Ground, White to Neutral, Black to Line.
- GFCI: Use the 'RESET' button located between the outlets to restore power if the red indicator light flashes.
Model compatibility
- Not compatible with dimmer switches.
- Not compatible with timers.

Manual page author
Emily Carter
User documentation editor
Prepares concise manual descriptions and highlights the most useful setup, operation, and maintenance information for readers.