Lighting / Fixtures
Installation Guide for Utilitech 18-Inch Direct-Wire LED Undercabinet Light
Quick installation and troubleshooting guide for the Utilitech 18-Inch Direct-Wire LED Undercabinet Light (MXW1011-L75K9027). Includes wiring instructions, safety warnings, and maintenance tips.
Quick answers from the manual
Quick answer
- This manual provides instructions for installing the Utilitech 18-Inch Direct-Wire LED Undercabinet Light. Key steps include turning off power, connecting wires (Black-Black, White-White, Green-Ground), and mounting the fixture. p. 1, 2
Key actions
- Turn off power at the circuit breaker or fuse box before installation. p. 1
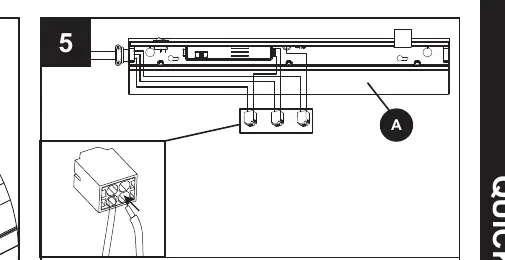
- Connect fixture wires: Black to Black (Live), White to White (Neutral), Green to Copper/Bare (Ground). p. 2
First start
- Select the desired color temperature on the fixture before mounting. p. 2
Problems and fixes
Fixture does not light
Check circuit breaker or wall switch, check wire splices, or replace wall switch.
p. 1Maintenance and reset
- Clean with a mild glass cleaner and soft cloth. Apply cleaner to cloth, not the fixture. p. 1
Where to find it in the PDF
- Safety, Troubleshooting, and Warranty p. 1
- Installation Steps p. 2
Table of contents
Manual images
Click an image to enlargeQuick Guide from the Manual
This document provides instructions for the installation and maintenance of the Utilitech 18-Inch Direct-Wire LED Undercabinet Light. Important: Ensure the power is turned off at the circuit breaker or fuse box before beginning any work. This product is not compatible with dimmer switches.
Safety Information
- Always turn off electricity to the wires you are working on.
- Do not use this product with a dimmer switch.
- This device complies with Part 15 of the FCC Rules.
- Consult a qualified electrician if you are unsure about the branch circuit conductor connection.
Installation Overview
- Preparation: Ensure all parts are present and you have the necessary tools (not included). Estimated assembly time is 20 minutes.
- Color Temperature: Select the desired color temperature on the fixture.
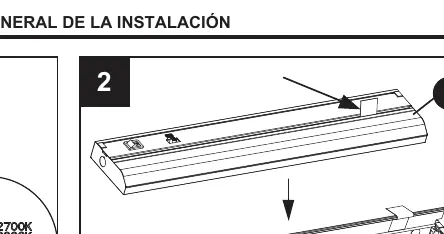
- Open Cover: Pull the blue tab in the indicated direction to open the cover.
- Wiring: Connect the fixture wires to the supply wires: Black to Black (Live), White to White (Neutral), and Green to Copper/Bare (Ground).
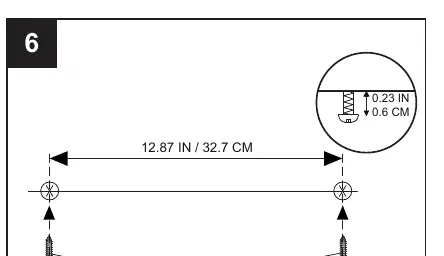
- Mounting: Use the provided hardware to mount the fixture securely.
- Final Assembly: Close the cover. Note that the cover can be reopened from the side using a flat-head screwdriver if necessary.
Troubleshooting
If the fixture does not light:
- Check the circuit breaker or wall switch.
- Check the wire splices for proper connection.
- Replace the wall switch if it is defective.
Care and Maintenance
Ensure the power is off before cleaning. Clean the fixture with a mild glass cleaner and a soft cloth. Apply the cleaner to the cloth, not directly to the fixture. Do not attempt to replace the LEDs.
Warranty
This fixture is warranted to be free from defects in materials and workmanship for three (3) years from the date of original purchase. For claims, call 866-994-4148 to obtain a Return Authorization number.
Manufacturer information
Utilitech
Practical help
Common problems
Fixture does not light
Check circuit breaker or wall switch, verify wire splices, or replace the wall switch.
Before use
- Ensure power is off at the circuit breaker or fuse box.
- Verify all parts are present according to the package contents list.
- Ensure you have the necessary tools (not included).
- Confirm the installation location is suitable for direct-wire connection.
- Do not use with a dimmer switch.
Specs in practice
- Color Temperature
- Selectable setting on the fixture to adjust the light appearance.
Images and diagrams
- Step 1: Select color temperature.
- Step 2: Open the cover using the blue tab.
- Step 5: Wiring diagram showing Black-to-Black, White-to-White, and Green-to-Ground connections.
- Step 6: Mounting diagram showing screw placement.
Model compatibility
- Not compatible with dimmer switches.

Manual page author
Michael Turner
Technical manual editor
Reviews PDF manuals for structure, safety notes, and practical product details so readers can find the right information quickly.