Computers / Computer Cases
User Manual for Vevor Portable Heated Lunch Box Bag
Quick guide for the Vevor Portable Heated Lunch Box Bag. Learn how to safely heat your meals, compatible containers, cleaning instructions, and operating tips for models 210-BK, 210-BU, 110-BU, 110-BK, and 310-BK.
Quick answers from the manual
Quick answer
- The Vevor Portable Heated Lunch Box Bag is designed to heat food using low-slow conduction heat. Simply place your sealed, flat-bottom container inside, zip it up, and plug it into a compatible power source (12V/24V vehicle or 110V wall outlet depending on the model). p. 5, 6, 7
Key actions
- Heating food p. 5, 6, 7
First start
- Ensure the container is sealed and placed inside the bag, then connect the power cord. p. 5, 6
Show 3 more answers Show less
Problems and fixes
Radio frequency interference
If the device causes interference, reorient the antenna or increase the distance between the product and the receiver.
p. 4Technical specifications
| Parameter | Value | Meaning | Pages |
|---|---|---|---|
| 310-BK Power | 55W/80W/80W (Max 100W) | Power consumption based on voltage. | p. 4 |
Where to find it in the PDF
- Important Safeguards p. 2
- Product Features p. 4
- How to Use p. 5
- Care & Cleaning p. 8
Table of contents
Manual images
Click an image to enlargeQuick guide from the manual
The Vevor Portable Heated Lunch Box Bag is designed to heat food using low-slow conduction heat. To use it, place your food in a sealed, flat-bottom container, zip the bag closed, and plug it into a compatible power source. The device will heat your meal gradually, preserving moisture and nutrition.
Important Safeguards
- Hot Surfaces: The heating plate gets hot. Do not touch it directly.
- Electrical Safety: Do not immerse the cord, plugs, or housing in water. Always unplug when not in use.
- Supervision: Keep the appliance and cord out of reach of children under 8 years old.
- Usage: Do not use the equipment for unexpected purposes. For family use only.
- Connection: Always attach the plug to the appliance first, then plug the cord into the wall outlet.
Compatible Containers
You can use any flat-bottom, re-heatable, sealed container that fits within the dimensions of 9.76"L x 7.01"W x 3.94"H. Suitable materials include:
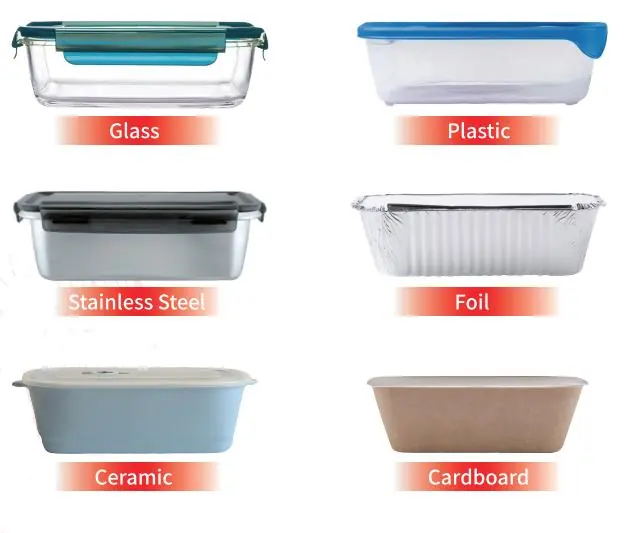
- Glass
- Plastic
- Stainless Steel
- Foil
- Ceramic
- Cardboard
Operations
For 110V Models (110-BU/110-BK): Plug the device into a standard wall outlet to begin heating. Unplug before eating.
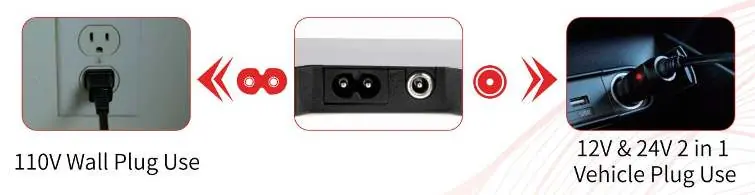

For Vehicle Models (210-BK/210-BU): Plug the device into the vehicle's power outlet after starting the car. The red indicator light will turn on to signal that heating is in progress.
For 3-in-1 Models (310-BK): This model supports both 110V wall outlets and 12V/24V vehicle outlets.
Cooking Tips
- Leftovers: Most meals warm up in 30-60 minutes.
- Refrigerated Meals: Allow 50 minutes to 2 hours for full heating.
- Pasta: Add 1-2 tablespoons of water to ensure it is perfectly reheated.
- Pizza: Wrap in foil and place directly on the heating plate.
- Meat: Food heats to approximately 168 degrees; leaving it for hours will result in well-done meat.
Care & Cleaning
- Do not use a damaged power cord or plug.
- Do not plug the device in without a container inside.
- Allow the device to cool to room temperature before cleaning.
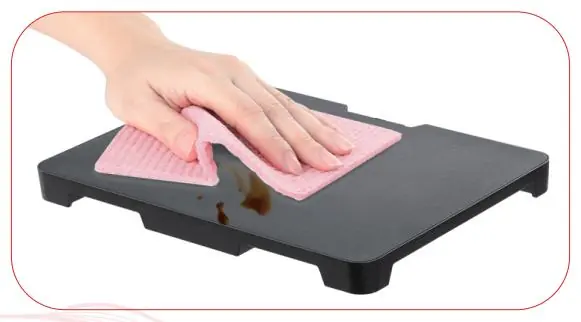
- Do not submerge the device in water. Use a soft, damp cloth or paper towel with a gentle cleanser to clean surfaces.
Manufacturer information
VEVOR
Practical help
Common problems
Food not heating
Ensure the plug is connected properly. Check if the outlet has power. For vehicle use, ensure the car engine is running.
Heating takes too long
Heating time depends on the container type, food portion, and voltage. 110V and 24V power sources provide faster heating.
Before use
- Check that the wall outlet voltage matches the rating plate.
- Ensure the power cord is not damaged.
- Place food in a flat-bottom, heat-resistant, sealed container.
- Do not plug in the device without a container inside.
Show more Show less
Specs in practice
- Working Voltage
- The power source required (DC12V/24V or AC110-120V depending on the specific model).
- Max Compatible Container
- The maximum size of container that fits inside the bag: 9.76"L x 7.01"W x 3.94"H.
Images and diagrams
- The bag features a heating plate at the bottom.
- Connect the power cord to the bag and then to the power source (wall or vehicle).
Model compatibility
- Use only flat-bottom, re-heatable, sealed containers.
- Compatible materials include glass, plastic, stainless steel, foil, ceramic, and cardboard.

Manual page author
Emily Carter
User documentation editor