Tools / Hose Reels
User Manual for VonHaus 1800W Corded Lawn Mower 3500359
Comprehensive user guide for the VonHaus 1800W Corded Lawn Mower (3500359). Includes assembly instructions, operation steps, cutting height adjustment, mulching setup, and maintenance procedures.
Quick answers from the manual
Quick answer
- To operate the lawnmower, press and hold the Safety Button (1), then squeeze the Switch Lever (2) towards the handle. Release the Safety Button while holding the Switch Lever to keep it running. Release the Switch Lever to stop. p. 9
Key actions
- Assemble the handle p. 6
- Adjust cutting height p. 7
First start
- Assemble the handle, attach the cable relief, and ensure all parts are secure before connecting to power. p. 6
Problems and fixes
Lawnmower vibrates abnormally
Stop immediately, disconnect from the mains, and investigate the cause.
p. 3Maintenance and reset
- Replace the cutting blade after 50 hours of mowing or 2 years, whichever is sooner. p. 10
Technical specifications
| Parameter | Value | Meaning | Pages |
|---|---|---|---|
| Rated Power | 1800W | Power consumption | p. 3 |
Where to find it in the PDF
- Components p. 5
- Assembly p. 6
- Operation p. 9
Table of contents
Manual images
Click an image to enlargeQuick guide from the manual
This lawnmower is designed for domestic use. Before operating, ensure the area is clear of debris, wear appropriate protective clothing (eye protection, sturdy footwear), and ensure the power cord is positioned to avoid damage. Always disconnect from the mains before performing any maintenance or adjustments.
Components
The lawnmower consists of the following main parts:
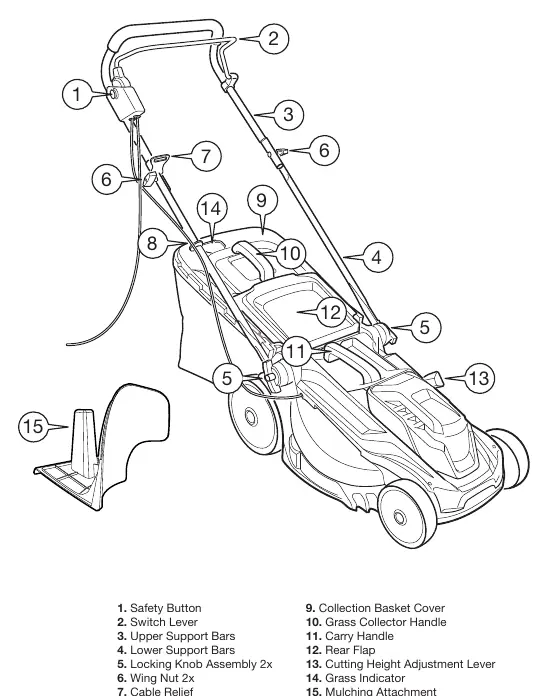
- Safety Button (1) and Switch Lever (2) for operation.
- Upper and Lower Support Bars (3, 4) for the handle assembly.
- Locking Knob Assembly (5) and Wing Nuts (6) for securing the handle.
- Cable Relief (7) to manage the power cord.
- Collection Basket (9, 10) for grass clippings.
- Cutting Height Adjustment Lever (13).
- Mulching Attachment (15).
Assembly
Follow these steps to assemble the lawnmower:
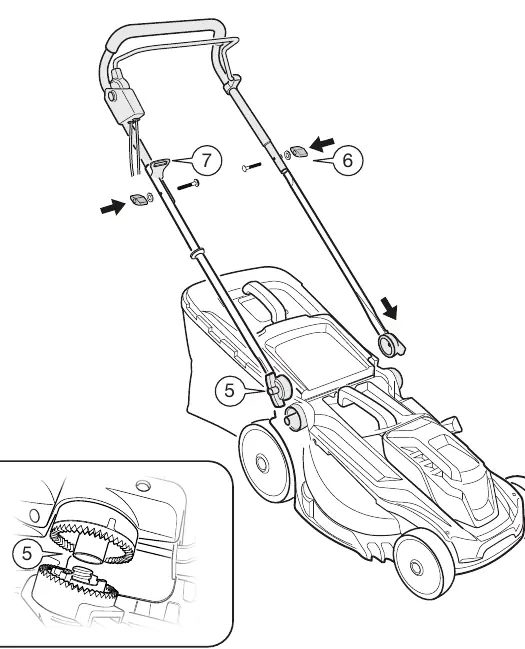
- Connect the Lower Support Bars (4) to the main unit using the Locking Knob Assembly (5). Rotate to lock.
- Attach the Upper Support Bars (3) to the Lower Support Bars (4) using the Wing Nuts (6).
- Ensure the Cable Relief (7) is added to the Upper Support Bars (3) before assembling the bars.
- To attach the carry handle to the collection basket, click it into the top panel and secure it with the provided screw.
- To attach the collection basket to the mower, lift the Rear Flap (12) and hook the basket onto the mounting points.
Operation
To start the lawnmower:
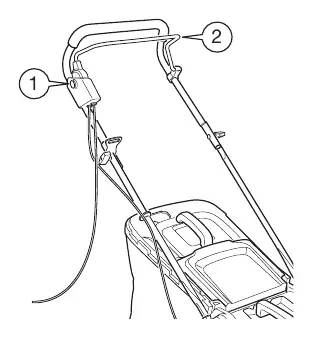
- Press and hold the Safety Button (1).
- Squeeze the Switch Lever (2) towards the handle.
- Release the Safety Button (1) while continuing to hold the Switch Lever (2).
- To stop the mower, simply release the Switch Lever (2).
Cutting Height Adjustment
The lawnmower features adjustable cutting heights:
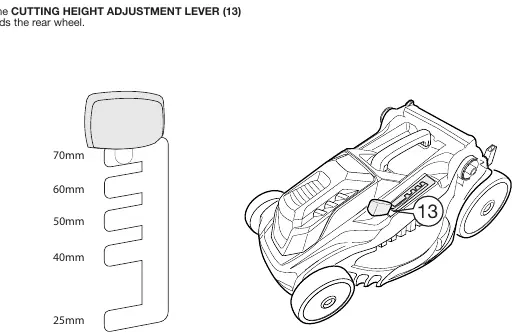
- Pull the Cutting Height Adjustment Lever (13) towards the rear wheel to adjust.
- Moving the lever towards the front lowers the ride height for a closer cut.
- For high grass, start with the maximum height and make a second pass with a lower setting.
Mulching Attachment
To use the mulching function:
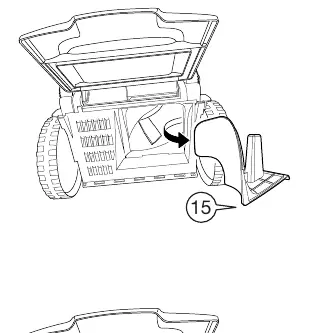
- Disconnect from the mains before opening the Rear Flap (12).
- Remove the collection basket.
- Fit the Mulching Attachment (15) into its location. This deflects clippings downwards onto the lawn.
- Ensure the attachment is removed before re-attaching the collection basket for standard grass collection.
Maintenance
Regular maintenance is essential for safety and performance:
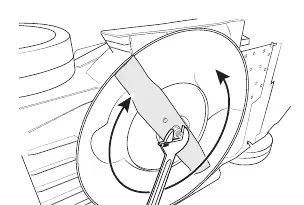
- Blade Maintenance: Regularly remove grass and dirt. If the blade is blunt, sharpen or replace it. Replace the blade after 50 hours of mowing or 2 years, whichever is sooner.
- Blade Removal: Disconnect from the mains. Use heavy-duty gloves. Loosen the hex nut anti-clockwise (16mm wrench). Replace the blade and tighten the nut clockwise to 45-50 Nm.
- Cleaning: Keep air vents and motor housing free of dirt. Wipe with a clean cloth or use low-pressure compressed air. Do not use water or solvents.
Technical Specifications
- Rated Voltage: 230V - 240V
- Rated Power: 1800W
- Rated Frequency: 50Hz
Practical help
Common problems
Lawnmower vibrates abnormally or makes unusual sounds
Stop immediately, disconnect from the mains, and investigate the cause. Inspect for damage and tighten any loose parts.
Grass collector is full
Check the grass indicator hatch. If the hatch closes, the collector is full and must be emptied.
Blade is damaged or blunt
Replace the blade after 50 hours of use or 2 years. If damaged, replace immediately.
Before use
- Check the area for wire, stones, and debris
- Ensure all parts are securely attached
- Wear protective clothing, eye protection, and sturdy footwear
- Ensure the switch is in the off position before connecting to power
- Check that the grass collector is properly attached
Specs in practice
- Rated Voltage
- 230V - 240V
- Rated Frequency
- 50Hz
Images and diagrams
- 1-2: Safety Button and Switch Lever for operation
- 3-4: Support bars assembly
- 13: Cutting height adjustment lever
- 15: Mulching attachment
Model compatibility
- For domestic use only
- Do not use in wet conditions

Manual page author
Emily Carter
User documentation editor
Prepares concise manual descriptions and highlights the most useful setup, operation, and maintenance information for readers.