Baby / Activity Centers
User Manual for VTech 2-in-1 Discovery Table
Learn how to assemble, operate, and maintain your VTech 2-in-1 Discovery Table. This guide covers battery installation, activity modes, and troubleshooting steps.
Quick answers from the manual
Quick answer
- The VTech 2-in-1 Discovery Table is an interactive learning toy that converts between a drawing desk and an activity center. It requires 2 AA batteries and should be assembled by an adult. p. 3, 4, 7
Key actions
- Battery Installation p. 5
- Assembly p. 7
- Conversion p. 7
First start
- Install 2 new AA batteries in the compartment on the Drawing Table side. p. 5
Problems and fixes
Unit malfunctions
Turn off, remove batteries, wait, replace batteries, turn on.
p. 14Maintenance and reset
- Reset by removing and replacing batteries. p. 14
Technical specifications
| Parameter | Value | Meaning | Pages |
|---|---|---|---|
| Batteries | 2 x AA (AM-3/LR6) | Required power source | p. 5 |
| Auto Shut-off | 45 seconds | Time until power-down without input | p. 9 |
Where to find it in the PDF
- Introduction p. 3
- Included Parts p. 4
- Battery Installation p. 5
- Assembly p. 7
- Troubleshooting p. 14
Table of contents
Manual images
Click an image to enlargeQuick guide from the manual
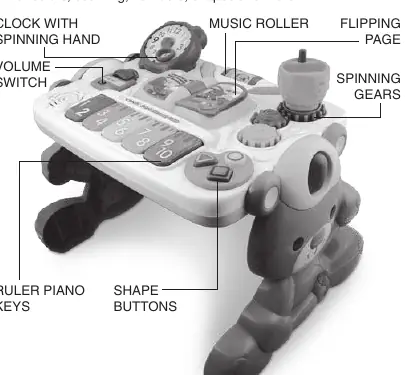
The VTech 2-in-1 Discovery Table is an interactive learning toy designed for children. It features two modes: a drawing desk and an activity center. Key features include a piano key ruler, book, clock, shape buttons, gears, and a turning pencil cup. The unit requires 2 AA batteries and includes an automatic shut-off feature to preserve battery life.
Included in the package
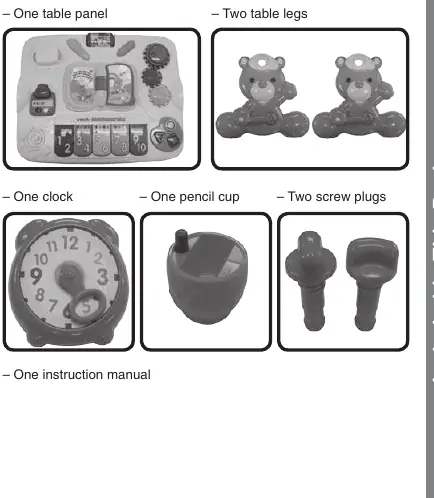
- One table panel
- Two table legs
- One clock
- One pencil cup
- Two screw plugs
Battery installation
Ensure the unit is turned OFF before proceeding.
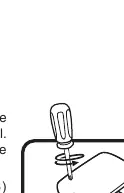
- Locate the battery cover on the Drawing Table side of the table panel.
- Use a screwdriver to loosen the screw.
- Install 2 new 'AA' (AM-3/LR6) batteries following the diagram inside the battery box. New alkaline batteries are recommended.
- Replace the battery cover and tighten the screw.
Product assembly and conversion
Important: This product must be assembled by an adult. Ensure the table is stable before allowing a child to play.
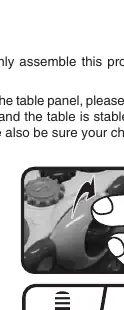
To assemble the table
- Use the screw plugs to attach the legs to the table panel.
- Place the clock on the top left corner of the table panel.
- Place the pencil cup on the blue gear.
To convert the table panel
- Release the lock on the drawing side by pressing the small button and loosening the screw plugs simultaneously.
- Flip the table panel upside down.
- Tighten the screw plugs to secure the panel at an angle for sitting play.
Product features and activities
The table offers various interactive activities:
- Volume Switch: Located on both sides of the table. Slide to Low or High volume to turn on, or to Off to power down.
- Motion Sensor: Located on the Drawing Side. Drawing or moving the panel plays sounds and tunes.
- Automatic Shut-off: The unit powers down after approximately 45 seconds of inactivity. Wake it up by pressing a button, turning the page, spinning the music roller, or turning the gears/clock arm.
- Interactive Elements: Includes a book, clock, gears, pencil cup, ruler piano keys, and shape buttons that trigger sounds, melodies, and phrases.
Note: If the legs are not attached, the responses on the drawing side cannot be activated.
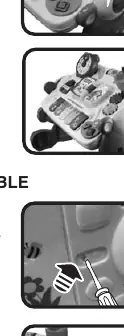
Care and maintenance
- Keep the unit clean by wiping it with a slightly damp cloth.
- Keep the unit out of direct sunlight and away from direct heat sources.
- Remove batteries if the unit will not be used for an extended period.
- Do not drop the unit on hard surfaces or expose it to moisture/water.
Troubleshooting
If the program or activity stops working or malfunctions:
- Turn the unit OFF.
- Remove the batteries to interrupt the power supply.
- Wait a few minutes, then replace the batteries.
- Turn the unit ON.
- If it still does not work, replace with a fresh set of new batteries.
For further assistance, contact the Consumer Services Department at 1-800-521-2010 (U.S.) or 1-877-352-8697 (Canada).
Practical help
Common problems
Unit stops working or malfunctions
Turn the unit OFF, remove batteries, wait a few minutes, replace batteries, and turn back ON. If it still fails, replace with a fresh set of batteries.
Drawing side responses not working
Ensure the table legs are properly attached to the table panel.
Before use
- Ensure all parts are present (panel, legs, clock, pencil cup, screw plugs).
- Install 2 new 'AA' alkaline batteries.
- Assemble the product by an adult.
- Ensure the table is stable before allowing a child to play.
Specs in practice
- Auto Shut-off
- Powers down after 45 seconds of inactivity to save battery.
Images and diagrams
- Battery compartment is located on the Drawing Table side of the panel.
- Assembly requires using screw plugs to secure the legs to the panel.
Model compatibility
- Drawing side features require the legs to be attached to the table panel.

Manual page author
Michael Turner
Technical manual editor
Reviews PDF manuals for structure, safety notes, and practical product details so readers can find the right information quickly.