Power / Portable Power Stations
Vtoman V8 Jump Starter User Manual
Comprehensive user guide for the Vtoman V8 Jump Starter. Includes setup, jump-starting procedures, charging instructions, LED status indicators, and technical specifications.
Quick answers from the manual
Quick answer
- The Vtoman V8 is a 12V jump starter. To use it, ensure the ON/OFF switch is ON, connect the jump clamps to the car battery (Red to +, Black to -), and start the engine. Use the LED indicator on the jump cable to verify the connection status. p. 3, 4
Key actions
- Jump starting a 12V vehicle p. 4
- Charging the jump starter p. 3
- Charging mobile devices p. 5
First start
- Ensure the ON/OFF switch is set to ON and the device is fully charged (approx. 4.5 hours). p. 3, 6
Problems and fixes
Reverse battery connection
Red light on with buzzing; reconnect the poles correctly.
p. 5
Battery too low to start
Press the BOOST button, wait for the green light, then start the engine within 30 seconds.
p. 4Maintenance and reset
- Charge the device every three months to extend battery service life. p. 6
Technical specifications
| Parameter | Value | Meaning | Pages |
|---|---|---|---|
| Peak Current | 2000A | Maximum starting power | p. 6 |
| Battery Capacity | 66.6Wh | Energy storage | p. 6 |
| Operating Temperature | -20°C ~ 60°C | Safe usage range | p. 6 |
Where to find it in the PDF
- Parts and Functional Description p. 2
- Jump Starting Instructions p. 4
- Technical Specifications p. 6
Table of contents
Manual images
Click an image to enlargeQuick guide from the manual
The Vtoman V8 is a portable jump starter designed for 12V gasoline and diesel vehicles. Before use, ensure the device is charged and the ON/OFF switch is set to the ON position. Always check that the battery power is above 75% before attempting to jump-start a vehicle. The device features an intelligent LED display and status indicators to guide you through the connection process.
Parts and Functional Description
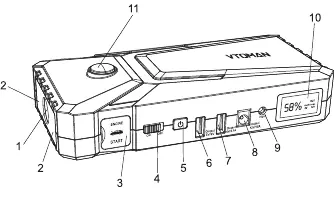
- LED Flashlight (SOS): Integrated light with multiple modes.
- Red Emergency Light: Safety warning light.
- 12V Jump Cable Socket: Port for connecting the jumper clamps.
- ON/OFF Switch: Master power switch.
- Power Button: Used to activate the device and change flashlight modes.
- Output Ports: Includes 5V/9V Quickcharge, 5V/2.1A, and 12V/10A outputs for charging devices.
- 15V/1A Input: Port for charging the jump starter.
- LCD Screen: Displays remaining battery percentage and output status.
Charging the Device
To charge the Vtoman V8, plug the wall charger into the 15V/1A input port and connect it to a universal wall socket (100-240V). A full charge takes approximately 4.5 hours.
How to Jump Start 12V Vehicles
- Ensure the ON/OFF switch is set to ON.
- Plug the blue end of the jump clamps into the 12V Jump Cable Socket.
- Connect the red clamp to the positive (+) battery terminal and the black clamp to the negative (-) terminal.
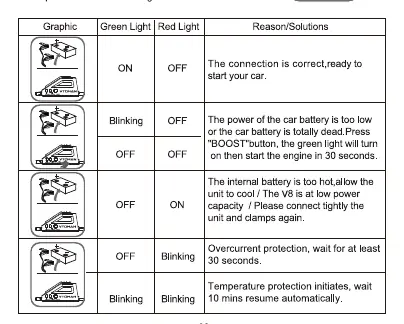
- Observe the LED indicator on the jump cable:
- Green Light ON: Connection is correct; ready to start.
- Green Light Blinking: Battery is too low/dead. Press the BOOST button, wait for the green light, then start the engine within 30 seconds.
- Red Light ON: Battery is too hot. Allow the unit to cool.
- Red Light Blinking: Overcurrent protection. Wait 30 seconds.
- Green and Red Blinking: Temperature protection. Wait 10 minutes.
- Red Light + Buzzing: Reverse connection. Reconnect poles correctly.
- Once the engine starts, disconnect the clamps and remove the V8.
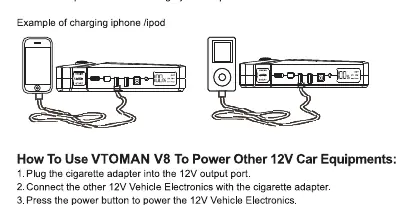
Charging Devices and Powering Equipment
The V8 can charge cell phones, tablets, and power 12V car equipment. Connect your device to the appropriate USB or 12V output port, ensure the ON/OFF switch is ON, and press the power button to begin charging.
LED Flashlight
Press the power button for a few moments to turn on the flashlight. Press again to cycle through modes: Normal, Strobe, SOS, and OFF. Press the power button twice to turn on the red emergency light.
Technical Specifications
- Battery Capacity: 66.6Wh
- Peak Current: 2000A
- Starting Current: 500A (3s), 300A (5s)
- Input: 15V 1A
- Output: 5V/9V, 5V 2.1A, 12V 10A
- Operating Temperature: -20°C to 60°C
- Full Charging Time: 4.5 hours
Safety Warnings
- Keep away from children.
- Do not use in explosive environments or near flammable liquids.
- Do not use as a toy.
- Remove metal accessories (rings, necklaces) before use to prevent short circuits.
- Only suitable for 12V gasoline and diesel vehicles.
- Do not use on equipment like airplanes or ships.
Practical help
Common problems
Red light on with buzzing
Reverse battery connections; reconnect the poles correctly until the green light turns on.
Green light blinking
Car battery is too low or dead. Press the BOOST button, wait for the green light, then start the engine within 30 seconds.
Red light on
Internal battery is too hot. Allow the unit to cool down.
Red light blinking
Overcurrent protection triggered. Wait for at least 30 seconds.
Green and Red light blinking
Temperature protection initiated. Wait 10 minutes for it to resume automatically.
Before use
- Ensure the ON/OFF switch is in the ON position.
- Check that the device power is above 75% before jump starting.
- Remove all metal accessories like rings and necklaces.
- Ensure the vehicle is a 12V gasoline or diesel model.
- Verify that the jump clamps are connected tightly to the battery terminals.
Specs in practice
- Peak Current: 2000A
- The maximum instantaneous current the device can provide for starting.
- Starting Current: 500A (3s)
- The sustained current provided for 3 seconds during engine cranking.
- Battery Capacity: 66.6Wh
- The total energy storage capacity of the internal battery.
- Operating Temperature: -20°C ~ 60°C
- The safe ambient temperature range for operating the device.
Images and diagrams
- The parts diagram (Page 2) identifies the flashlight, emergency light, jump cable socket, power switch, and various output ports.
- The LED status table (Page 4) provides a quick reference for interpreting the green and red light signals during jump starting.
Model compatibility
- Compatible with 12V gasoline and diesel vehicles.
- Not suitable for all 12V automotive products; limited to small electronics like portable tire air pumps.
- Cigarette adapter for 12V equipment is not included.

Manual page author
Emily Carter
User documentation editor
Prepares concise manual descriptions and highlights the most useful setup, operation, and maintenance information for readers.