Automotive / Tyre Inflators
Gooloo GP2000 Jump Starter User Manual
Comprehensive user guide for the Gooloo GP2000 Jump Starter. Includes instructions on jump-starting 12V vehicles, charging the device, using the LED flashlight, safety precautions, and troubleshooting steps.
Quick answers from the manual
Quick answer
- To jump start a vehicle, connect the smart jumper cable to the unit, attach the red clamp to the positive (+) terminal and the black clamp to the negative (-) terminal. If the green light is solid, start the vehicle. If the green light is blinking, press the BOOST button and wait for it to turn solid before starting. p. 1
Key actions
- Charging the device p. 1
- Using the LED flashlight p. 1
First start
- Ensure the unit is charged to at least 50% before the first use. p. 1
Problems and fixes
Green and Red light blinking
Over-start protection triggered. Disconnect and reconnect.
p. 1Maintenance and reset
- Recharge the unit every 3 months if not in use. p. 1
Technical specifications
| Parameter | Value | Meaning | Pages |
|---|---|---|---|
| Peak Current | 2000A | Maximum starting power | p. 1 |
| Capacity | 73Wh | Energy storage | p. 1 |
Where to find it in the PDF
- User Manual p. 1
Table of contents
Manual images
Click an image to enlargeQuick Guide
The Gooloo GP2000 is a portable jump starter for 12V vehicles. Before use, ensure the device is charged to at least 50% (2 bars). If the device has not been used for more than two months, charge it fully before use. Always check the indicator lights on the smart jumper cable before attempting to start the vehicle.
Parts and Functional Description
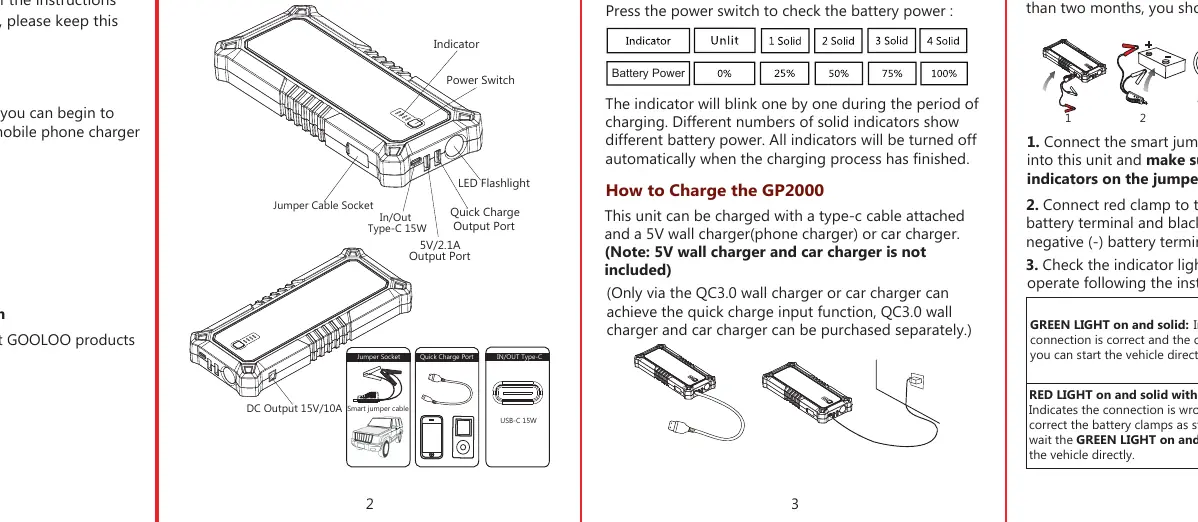
- Jumper Cable Socket
- Power Switch
- Battery Indicator
- USB-C Input/Output Port
- Quick Charge Output Port
- 5V/2.1A Output Port
- LED Flashlight
- Cigarette Lighter Socket Adapter
Charging the Device
The unit can be charged using a USB-C cable and a 5V wall charger or car charger. The battery indicators will blink sequentially during charging and turn off when fully charged. Note that quick charge input requires a QC3.0 wall charger or car charger (sold separately).
Jump Starting a Vehicle
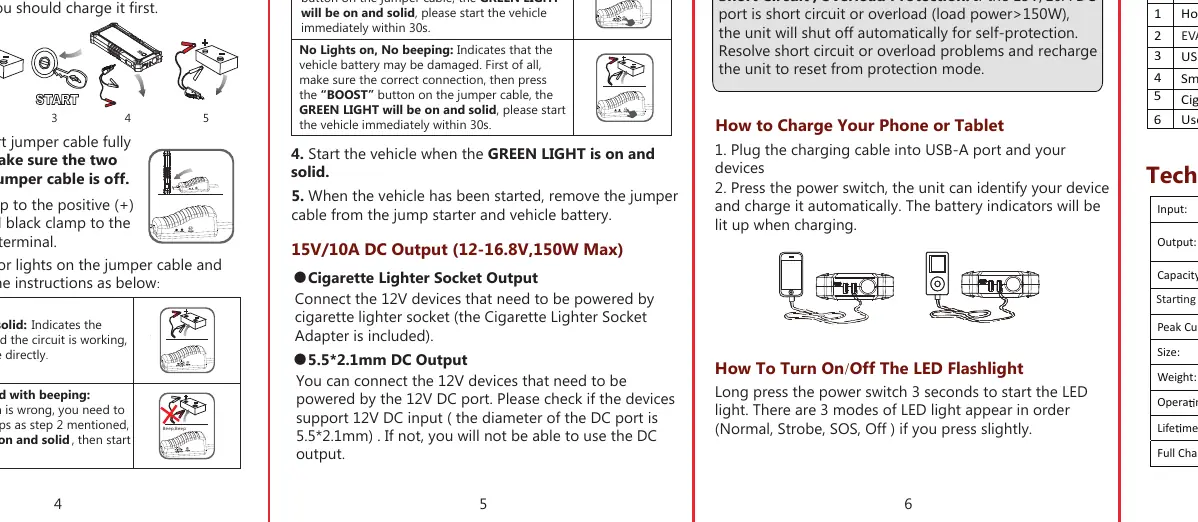
- Ensure the unit has at least 50% battery.
- Connect the smart jumper cable fully into the jump starter.
- Connect the red clamp to the positive (+) battery terminal and the black clamp to the negative (-) battery terminal.
- Check the indicator on the jumper cable:
- Green Light Solid: Connection is correct; you can start the vehicle.
- Red Light Solid + Beeping: Reverse connection; correct the clamp positions.
- Green Light Blinking: Vehicle battery is low; press the BOOST button, wait for the green light to turn solid, then start the vehicle within 30 seconds.
- No Lights/No Beeping: Vehicle battery may be damaged; press the BOOST button, wait for the green light to turn solid, then start the vehicle within 30 seconds.
- Start the vehicle.
- Remove the jumper cable from the jump starter and the vehicle battery immediately after the engine starts.
LED Flashlight Operation
Long press the power switch for 3 seconds to turn on the LED light. Press the switch lightly to cycle through the three modes: Normal, Strobe, and SOS. Use the same switch to turn the light off.
Safety Precautions
- For 12V vehicles only. Do not use on aircraft or boats.
- Do not use if cables or clamps are damaged.
- Do not use as a replacement for a vehicle battery or as a battery charger.
- Do not start the vehicle continuously more than 4 times within 2 minutes.
- Do not connect the two clamps together.
- Do not immerse in water or expose to extreme heat/fire.
- Do not disassemble or modify the unit.
Troubleshooting
- Green and Red light blinking: Over-start protection triggered. Disconnect the jumper cable and reconnect.
- Unit won't charge: Try a different charging cable or wall charger.
- No response when pressing power: Low voltage protection triggered; charge the unit.
- Unit overheated/swelled: Stop use immediately and contact support.
Technical Specifications
- Peak Current: 2000A
- Capacity: 73Wh
- Operating Temperature: -20°C to 60°C (-4°F to 140°F)
- Full Charging Time: 5-6 Hours (5V/3A)
Practical help
Common problems
Green and Red light blinking alternately
Over-start protection triggered. Disconnect the jumper cable from the starter and reconnect to reset.
Unit does not charge
Try using a different charging cable or wall charger. If the first battery indicator blinks continuously, the unit may be over-discharged or defective.
No response when pressing power switch
Low voltage protection is active. Charge the unit using a wall charger to activate it.
Before use
- Ensure the unit is charged to at least 50% (2 bars).
- Verify the vehicle is a 12V system.
- Ensure battery terminals are clean and free of corrosion.
- Charge the unit if it has been stored for more than two months.
- Remove personal metal items like rings or necklaces before working with the battery.
Specs in practice
- Peak Current: 2000A
- The maximum current the jump starter can deliver for starting the engine.
- Capacity: 73Wh
- The total energy storage capacity of the internal battery.
- Operating Temp: -20°C to 60°C
- The safe temperature range for using the device. Do not store in a hot vehicle.
Images and diagrams
- The jumper cable indicator provides real-time feedback: Green solid means ready, Red solid means reverse connection, Green blinking means low voltage (use BOOST).
- The parts diagram identifies the Jumper Socket, Power Switch, and various output ports (USB-C, Quick Charge, 5V/2.1A).
Model compatibility
- Designed for 12V vehicles only.
- Not suitable for aircraft, boats, or non-12V machinery.
- Minimum load current for output ports is 200mA; devices requiring less may not charge.

Manual page author
Michael Turner
Technical manual editor
Reviews PDF manuals for structure, safety notes, and practical product details so readers can find the right information quickly.