Electronics / Camera Accessories
Wasserstein 2-in-1 Gutter Mount User Manual
Quick guide for the Wasserstein 2-in-1 Gutter Mount. Learn how to install your Google Nest Cam and solar panel on gutters or walls, check compatibility, and adjust angles for optimal sunlight.
Quick answers from the manual
Quick answer
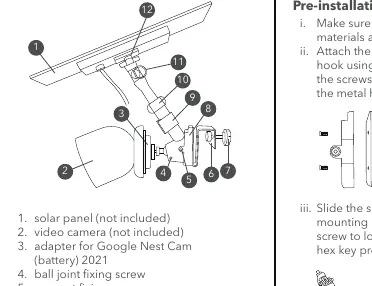
- The Wasserstein 2-in-1 Gutter Mount is designed to mount a Google Nest Cam (battery) 2021 and a solar panel to compatible gutters or walls. p. 1
Key actions
- Attach the mounting bracket to the metal hook using short screws, ensuring they pass through both holes. p. 1
- Tighten the ball joint fixing screw firmly to prevent the camera from drooping. p. 1
Problems and fixes
Mount jiggling
Ensure the short screw passes through both holes on the metal hook.
p. 1
Camera faces down
Tighten the ball joint fixing screw firmly.
p. 1Where to find it in the PDF
- Installation and Parts p. 1
Table of contents
Manual images
Click an image to enlargeQuick guide from the manual
The Wasserstein 2-in-1 Gutter Mount is designed exclusively for the Google Nest Cam (battery) 2021. This mount allows you to secure both your camera and solar panel to various gutter styles or directly to a wall. Ensure your gutter can support the combined weight of the camera, solar panel, and mount before installation. Always be aware of height-related hazards and ensure you have the necessary equipment and assistance.
In the Box
- 1 x Gutter mount
- 1 x Adapter for Nest Cam outdoor
- 1 x Hex key
- 1 x Velcro band for cable management
- 2 x Wall anchors
- 2 x Long screws
- 2 x Short screws
- 2 x Fixing screws
Compatibility
This mount is compatible with the following gutter styles:
- Fascia-style gutter
- Half-round gutter with outward-facing flange
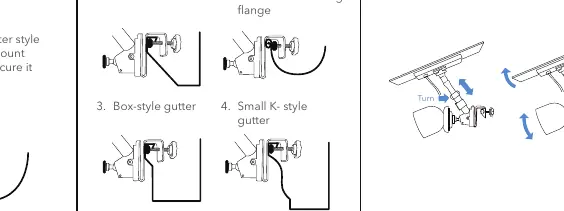
- Box-style gutter
- Small K-style gutter
- Flat-front box style gutter
Note: The mount is not compatible with round flange gutters or half-round gutters with an inward-facing flange.
Installation
Pre-installation
- Ensure you have all included materials and tools.
- Attach the mounting bracket to the metal hook using the short screws. Ensure the screws pass through the two holes on the metal hook.
- Slide the supporting part onto the mounting bracket and tighten the fixing screw using the provided hex key.
- Install the knob screw through the hole of the metal hook.
Mounting Your Camera
- Lock the base to the Google Nest Cam adapter.
- Screw it into the ball joint from the supporting part.
- Snap the camera to its original base at the designated angle.
- Ensure the ball joint fixing screw is firmly secured to lock the ball joint in place.
Mounting Your Solar Panel
Depending on your solar panel model:
- Glide model: Attach the glide end of the rod, slide them onto the solar panel, and ensure it is locked in place.
- Screw hole model: Fasten it directly onto the rod and turn the plastic screw from the end to lock the solar panel in place.
Mounting to Your Gutter
Check the compatibility of your gutter style. Hang the gutter mount onto your compatible gutter and secure it by tightening the knob screw firmly. You may use the optional plastic nut to prevent scratching the gutter surface.
Mounting On Wall
- Secure the bracket to the wall using the provided long screws and wall anchors (drill bit size 1/8").
- Attach the mounting bracket to the wall using the long screws and wall anchors.
Adjusting Devices
Adjust the camera and solar panel to the desired position. Set them directly towards the sun to maximize sunlight exposure.
Troubleshooting
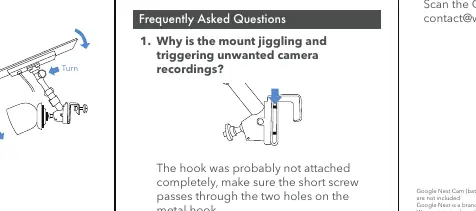
- Mount jiggling/unwanted recordings: The hook was likely not attached completely. Ensure the short screw passes through the two holes on the metal hook.
- Camera facing down: Since the camera contains a battery and extra weight, tighten the ball joint fixing screw as much as possible until the ball joint is firmly in place.
Practical help
Common problems
Mount is jiggling and triggering unwanted recordings
Ensure the short screw passes through both holes on the metal hook to attach it completely.
Camera faces down after mounting
Tighten the ball joint fixing screw as much as possible until the ball joint is firmly in place.
Before use
- Verify gutter compatibility (Fascia, Half-round outward, Box-style, Small K-style, Flat-front box).
- Ensure the gutter can support the weight of the camera, solar panel, and mount.
- Confirm camera and solar panel are weatherproof for outdoor use.
- Ensure you have all included tools (hex key, screws, anchors).
- Check that the ball joint fixing screw is tightened firmly.
Images and diagrams
- Parts list identifies 12 components including the solar panel, camera, adapter, and mounting hardware.
- Gutter compatibility diagrams show which gutter shapes are supported and which are not.
- Installation steps illustrate the assembly of the bracket, hook, and camera attachment.
Model compatibility
- Designed exclusively for Google Nest Cam (battery) 2021.
- Not compatible with round flange gutters.
- Not compatible with half-round gutters with an inward-facing flange.

Manual page author
Emily Carter
User documentation editor
Prepares concise manual descriptions and highlights the most useful setup, operation, and maintenance information for readers.