Home Appliances / Personal Care
User Manual for Waterpik Shower Care Pivoting Hand Held Shower Head
Quick guide for the Waterpik Shower Care Pivoting Hand Held Shower Head. Includes installation steps, operation instructions, cleaning tips, and troubleshooting.
Quick answers from the manual
Quick answer
- This manual provides installation, operation, and maintenance instructions for the Waterpik Shower Care Pivoting Hand Held Shower Head. p. 1
Key actions
- Install the wall mount bracket using the adhesive tape. p. 1
- Clean mineral deposits from the shower head. p. 1
First start
- Clean the wall area with Isopropyl Alcohol, remove the adhesive liner, and press the bracket firmly to the wall. p. 1
Problems and fixes
No water flow
Check for old washers in the pipe and ensure only one washer is in the pivot ball.
p. 1Maintenance and reset
- Clean filter screen by unscrewing from the pivot ball and rinsing. p. 1
Where to find it in the PDF
- Installation and Operation p. 1
Table of contents
Quick guide from the manual
This document provides instructions for installing and operating the Waterpik Shower Care Pivoting Hand Held Shower Head. Key features include a 180-degree pivoting head and an Easy Pause function for water conservation. Ensure you have the necessary tools, such as an adjustable wrench or pliers, and a soft cloth before beginning installation.
Installation
Follow these steps to install your new shower head:
- Remove the old shower head and all pipe tape. Ensure the old washer is not stuck in the shower pipe. Use a thin utensil to check inside the pipe; do not use your fingers.
- Tighten the pivot ball to the pipe by turning clockwise. Ensure the large nut is secure by hand tightening.
- Connect either end of the hose to the bottom of the bracket by turning clockwise. Hand tighten.
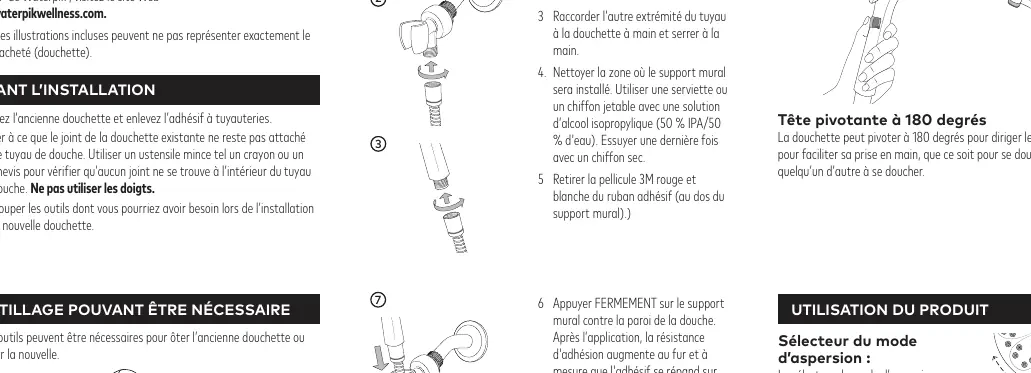
- Connect the other end of the hose to the hand held shower head and hand tighten.
- Clean the area for the wall mount bracket using a disposable towel or cloth with an Isopropyl Alcohol Solution (50% IPA/50% Water). Wipe dry with a clean cloth.
- Remove the red/white 3M liner on the adhesive tape on the back of the wall mount bracket.
- Press the wall mount bracket firmly to the shower wall. The bond strength increases over time (50% after 20 minutes, 90% after 24 hours, 100% after 72 hours).
Operation
Spray Selector: Rotate the lever at the base of the shower face to select from various spray settings.
Intensity Control (Easy Pause): Move the switch to the right for Pause (trickle) and to the left for Full Flow. You can adjust the spray strength by moving the switch to any position in the middle.
Pivoting Head: The showerhead can be pivoted 180 degrees to direct the spray where needed.
Care and Cleaning
- Mineral Deposits: Gently rub the rubber nozzles on the face of the shower head to dislodge mineral deposits. For heavier deposits, remove the shower head and soak face down in 1-2 cups of white vinegar for 2-3 hours.
- Filter Screen: Unscrew the filter screen from the pivot ball, rinse by back flushing to remove particles, and reinstall.
- Caution: Do not use harsh chemicals, heavy-duty cleaners, or abrasives, as these may damage the finish and void the warranty.
Troubleshooting
- No water flow: Confirm the previous shower washer is not in the shower pipe and that there is only one washer in the pivot ball.
- Low water pressure: Clean the shower head in a vinegar/water solution and clean the filter screen.
- Leaking at connection: Confirm only one washer is seated on top of the screen. Ensure all old pipe tape is removed.
- Stiff bracket: Install the bracket to provide additional leverage to change the angle.
Warnings
- Ensure your water heater is set to 120°F (48.9°C) or below to avoid hot water dangers.
- Test the water temperature with your hand before bathing.
- For external use only.
- Always ensure the hand held shower head is properly placed in the bracket to prevent it from falling.
- Do not pull on or tug the flexible hose.
Practical help
Common problems
No water flow from installed shower head
Confirm the previous shower washer is not in the shower pipe and that there is only one washer in the pivot ball.
Low water pressure or missing spray patterns
Clean the shower head in a vinegar/water solution and clean the filter screen.
Leaking at pipe/pivot ball connection
Confirm only one washer is seated on top of the screen and ensure all old pipe tape is removed from the shower pipe.
Bracket is too stiff to change angle
Install the bracket to provide additional leverage to change the angle of the spray.
Before use
- Remove old shower head and all pipe tape.
- Check inside the shower pipe for old washers using a thin utensil (not fingers).
- Have an adjustable wrench or pliers, soft cloth, and Isopropyl Alcohol Solution ready.
- Ensure the water heater is set to 120°F (48.9°C) or below.
Specs in practice
- 180-Degree Pivoting Head
- Allows the showerhead to pivot 180 degrees to direct spray where needed.
Images and diagrams
- Installation steps show the connection of the pivot ball, hose, and wall mount bracket.
- Operation diagram illustrates the spray selector lever and the intensity control switch.
Model compatibility
- For external use only.
- Some U.S. municipal plumbing codes require a vacuum breaker device for hand showers.

Manual page author
Emily Carter
User documentation editor
Prepares concise manual descriptions and highlights the most useful setup, operation, and maintenance information for readers.