Plumbing / Showers & Tubs
Installation Guide for AXOR One 280 2-Jet Showerhead
A comprehensive installation and maintenance guide for the AXOR One 280 2-Jet showerhead (models 48481XX1 and 48482XX1). Includes step-by-step mounting instructions, technical specifications, cleaning procedures, and troubleshooting tips.
Quick answers from the manual
Quick answer
- This document provides installation, maintenance, and troubleshooting instructions for the AXOR One 280 2-Jet showerhead (models 48481XX1 and 48482XX1). p. 1
Key actions
- Install the showerhead by preparing the wall, flushing the rough, mounting the holder, and attaching the showerhead. p. 6, 7, 8, 9
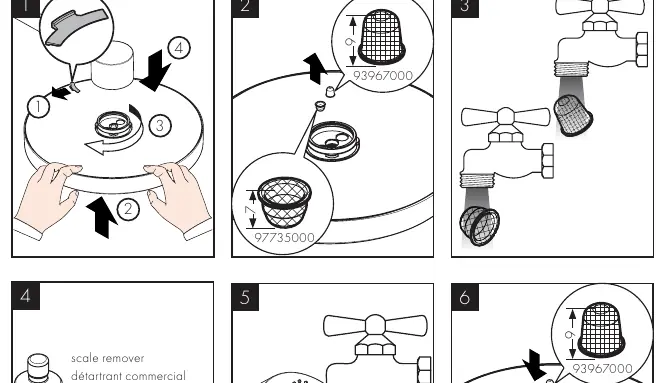
- Clean the showerhead by removing and cleaning filters and descaling spray channels. p. 15
Problems and fixes
Shower drips continuously
Service the shutoff valve (not included) as it may be dirty or worn.
p. 16Technical specifications
| Parameter | Value | Meaning | Pages |
|---|---|---|---|
| 48481XX1 Flow Rate | 2.5 GPM (9.5 L/min) | Maximum flow rate | p. 2 |
| 48482XX1 Flow Rate | 1.75 GPM (6.6 L/min) | Maximum flow rate | p. 2 |
Where to find it in the PDF
- Installation Steps p. 6, 7, 8, 9
- Cleaning p. 15
- Troubleshooting p. 16, 17
Table of contents
Manual images
Click an image to enlargeQuick Guide
This document provides instructions for the installation and maintenance of the AXOR One 280 2-Jet showerhead. Key requirements include professional installation, specific rough-in valves, and adherence to temperature safety limits to prevent scalding.
Installation Considerations
- Professional Installation: Hansgrohe recommends that this unit be installed by a licensed, professional plumber.
- Rough-in Requirements: This showerhead requires rough-in valve #35361181 (not included). For Australia, use rough-in valve #35361180.
- Surface Preparation: Ensure the fastening surface is even, smooth, and free of weak points.
- Temperature Safety: To prevent scald injury, the maximum output temperature of the shower valve must not exceed 120°F (49°C). In Massachusetts, the limit is 112°F (44°C).
- Valve Compatibility: 48481XX1 requires automatic compensating valves rated at 1.9 GPM (7.2 L/min) or less. 48482XX1 requires automatic compensating valves rated at 1.3 GPM (4.9 L/min) or less.
Installation Steps
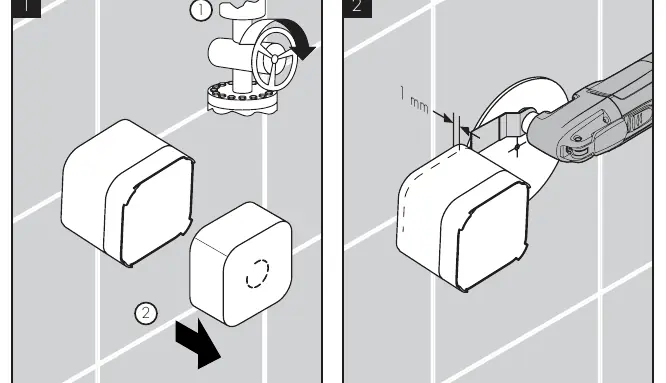
- Prepare the Wall: Turn off the water supply at the main. Remove the insert from the plaster shield. Cut the plaster shield so it extends 1/16" (1 mm) outside the finished wall surface.
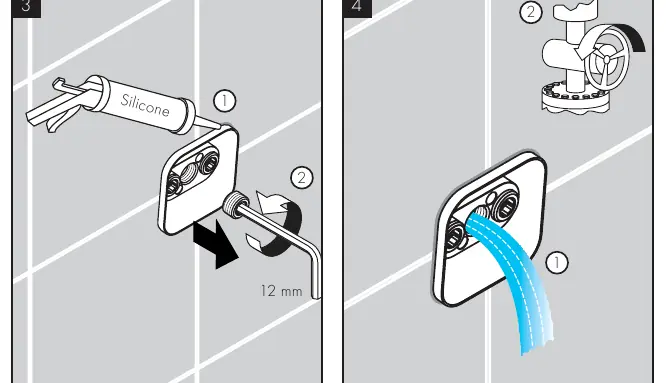
- Seal and Flush: Seal the wall around the plaster shield with waterproof sealant. Use a 12 mm Allen wrench to remove the center plug. Turn on the water and flush the rough for at least 1 minute, then turn the water off.
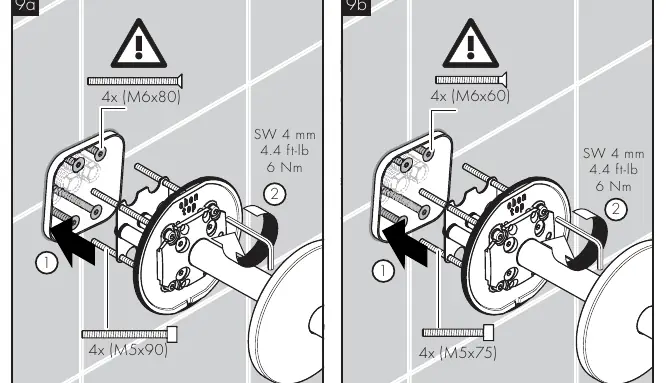
- Install Screws: Remove the flush insert. Select the appropriate screws based on the wall depth: 2-3/8" (60 mm) for "min" marking or 3-1/8" (80 mm) for "max" marking. Install the screws so they are even with the edge of the plaster shield.
- Install Holder: Install the plug in the right port. Install the holder assembly using the appropriate M5 screws (M5x90 for M6x80 screws, M5x75 for M6x60 screws). Tighten to 4.4 ft-lb (6 Nm).
- Leveling: Ensure the holder is level. Tighten or loosen the leveling screws using a 4 mm Allen wrench as necessary.
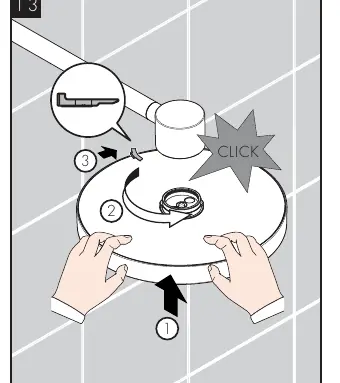
- Final Assembly: Install the shower arm escutcheon. Install the filter and lightly lubricate the o-rings on the showerhead. Push the showerhead into the shower arm until it clicks, then rotate approximately 1/4 turn clockwise. Insert the retaining clip.
Cleaning and Maintenance
To maintain the finish and functionality, clean the product when necessary. Avoid abrasive cleaners, steam cleaners, or products containing hydrochloric, formic, or acetic acid. Spray cleaners onto a soft cloth or sponge rather than directly on the product. Rinse thoroughly with clear water after cleaning.
Troubleshooting
- Shower drips continuously: The shutoff valve (not included) may be dirty or worn. Service the valve according to the manufacturer's instructions.
- Water drips for a few minutes after closing: This is normal clearing of the showerhead.
- Spray channels not functioning: Filters may be dirty or channels clogged with scale. Clean the filters or descale the showerhead.
- Low flow: Check filters for debris or verify water pressure.
Manufacturer information
AXOR
Practical help
Common problems
Shower drips continuously
The shutoff valve (not included) is likely dirty or worn. Service the valve according to the manufacturer's instructions.
Spray channels not functioning correctly
Filters are dirty or spray channels are clogged with scale. Clean the filters or descale the showerhead.
Low flow from showerhead
Filters are dirty or water pressure is too low. Clean filters or check system pump/pressure.
Before use
- Ensure water supply is turned off at the main.
- Verify the wall surface is even and smooth.
- Ensure you have the correct rough-in valve (#35361181 or #35361180 for Australia).
- Check that you have the required tools: 3mm, 4mm, 5mm, and 12mm Allen wrenches.
- Verify valve compatibility (1.9 GPM or less for 48481XX1; 1.3 GPM or less for 48482XX1).
Specs in practice
- 48481XX1 Flow Rate
- 2.5 GPM (9.5 L/min)
- 48482XX1 Flow Rate
- 1.75 GPM (6.6 L/min)
- Max Output Temperature
- 120°F (49°C) to prevent scald injury.
Images and diagrams
- Installation steps show cutting the plaster shield, sealing, flushing the rough, mounting the holder, and attaching the showerhead.
- Cleaning section illustrates removing the filter and using scale remover.
Model compatibility
- Requires rough-in valve #35361181 (standard) or #35361180 (Australia).
- 48481XX1 requires automatic compensating valves rated at 1.9 GPM or less.
- 48482XX1 requires automatic compensating valves rated at 1.3 GPM or less.

Manual page author
Emily Carter
User documentation editor
Prepares concise manual descriptions and highlights the most useful setup, operation, and maintenance information for readers.