HVAC / Duct Heaters
Installation Guide for Sterling Vikrell and Acrylic Bathtubs and Shower Bases
A comprehensive installation guide for Sterling Vikrell and Acrylic bathtubs and shower bases. This manual covers framing, plumbing, drain installation, wall set assembly, and final sealing procedures.
Quick answers from the manual
Quick answer
- This manual provides installation instructions for Sterling Vikrell and Acrylic bathtubs and shower bases, covering framing, plumbing, basin setting, and wall installation. p. 1, 2
Key actions
- Construct plumb stud pocket p. 1
- Install drain and rough plumbing p. 1
- Secure unit to studs using support clips p. 1
- Apply silicone sealant to all joints p. 1, 2
Where to find it in the PDF
- Installation Steps 1-18 p. 1
- Installation Steps 19-22 and Dimensions p. 2
Table of contents
Manual images
Click an image to enlargeQuick guide from the manual
This document provides installation instructions for Sterling Vikrell and Acrylic bathtubs and shower bases. Key requirements include constructing a plumb stud pocket, ensuring the subfloor is level, and using 100% silicone sealant for all joints. Always observe local building and plumbing codes before starting the installation.
Preparation and Framing
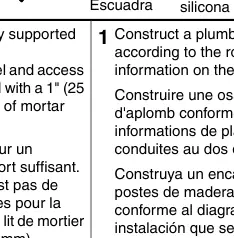
Before installing the unit, ensure the subfloor is adequately supported. If the subfloor is not level and access for shimming is difficult, install the unit on a 1" (25 mm) to 2" (51 mm) bed of mortar cement. Construct the stud pocket according to the roughing-in information provided in the technical diagrams.
Installation Steps
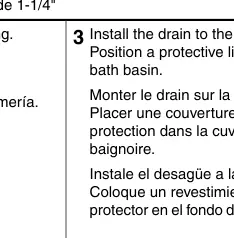
- Drain Installation: Install the drain to the bath and place a protective liner in the basin to prevent damage.
- Support: If a felt pad is provided, staple it to the subfloor so it contacts all support feet. If no pad is used, the basin area should be set in a 1" to 2" bed of mortar cement.
- Positioning: Attach the apron brace if provided. Lift and position the bath into the stud pocket.
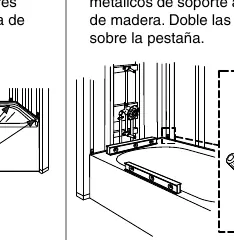
- Securing: Attach metal support clips to the flange at the locations shown in the roughing-in diagrams. Level the unit and secure the clips to the studs, bending the tabs over the flange.
- Shimming: With the unit level, shim under the support feet as needed.
Wall Installation
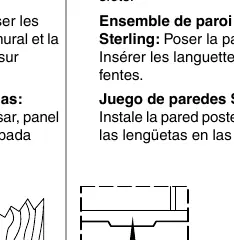
For Sterling Wall Sets, install the back wall by inserting the tabs into the slots. Measure, mark, and drill faucet holes in the end wall before installation. Install the end walls by engaging the pins in the slots. Ensure front edges are flush with no more than a 1/32" (1 mm) gap. Secure the walls to the studs along the top, using shims if necessary.
Finishing and Sealing
Apply an L-shaped bead of 100% silicone sealant at each outside corner. After painting or finishing the surrounding wall material, apply 100% silicone sealant where the unit contacts the finished wall. Install faucet trim and accessories, sealing all contact points with the wall panels.
Practical help
Common problems
Subfloor is not level
Install the unit on a 1" (25 mm) to 2" (51 mm) bed of mortar cement.
Gap between front edges
Ensure edges are flush with no more than a 1/32" (1 mm) gap.
Before use
- Verify local building and plumbing codes
- Ensure subfloor is adequately supported
- Check if a felt pad is provided
- Prepare 100% silicone sealant
- Have 1-1/4" galvanized or plated truss head screws ready
Specs in practice
- Silicone sealant
- 100% silicone required for sealing joints and contact points to prevent leaks.
Images and diagrams
- Roughing-in information is required for stud pocket construction.
- Support clip locations are critical for securing the unit to studs.
Model compatibility
- Compatible with Sterling Vikrell and Acrylic Baths and Shower Bases.
- Requires specific roughing-in dimensions based on the model.

Manual page author
Emily Carter
User documentation editor
Prepares concise manual descriptions and highlights the most useful setup, operation, and maintenance information for readers.