Garden / Pool Equipment
User Manual for Waterway Power Defender 1.10HP Pump
Comprehensive user manual for the Waterway Power Defender 1.10HP Pump. Includes installation, electrical wiring, maintenance, winterizing, troubleshooting, and parts replacement guides.
Table of contents
Manual images
Click an image to enlargeQuick Guide from the Manual
The Waterway Power Defender 1.10HP Pump is designed for pool circulation. Safety is paramount: this pump must be installed by a licensed electrician or qualified pool serviceman. Always disconnect power at the circuit breaker before servicing. Before the initial start, the pump strainer pot must be filled with water to prime the system.
Installation and Wiring
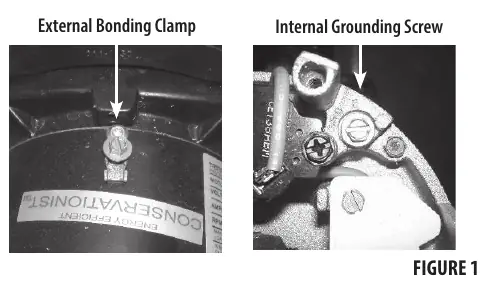
Proper electrical installation is critical to prevent shock or electrocution. Ensure the wiring voltage matches the motor (115v or 230v). Use the provided chart in the manual to select the correct wire gauge (AWG) based on horsepower and distance. Always ground the motor using the internal green ground terminal and bond the motor to the pool structure using a solid No. 8 AWG or larger copper conductor.
Pump Strainer Basket Maintenance
The strainer basket (Hair and Lint Pot) must be kept clean of leaves and debris. Inspect it at least once a week. A dirty basket reduces filter efficiency and puts stress on the motor.
- Cleaning Procedure: Turn off the motor and relieve system pressure.
- Turn the lid counter-clockwise to remove.
- Remove the basket, empty debris, and rinse.
- Replace the basket and fill the pump pot with water.
- Clean the O-ring and sealing surface, grease the O-ring with Teflon or silicone, and reinstall the lid hand-tight.
Winterizing
If temperatures drop below 35°F, water in the pump can freeze and cause damage. To winterize:
- Shut off electrical power.
- Remove the two drain plugs from the pump case to drain water.
- Cover the motor to protect it from rain, snow, and ice.
- Do not wrap the motor in plastic, as this causes condensation and rust.
Pump Disassembly and Seal Replacement
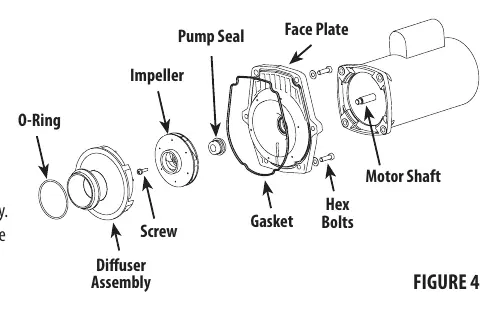
If the mechanical seal leaks, it must be replaced. This requires basic tools like open-end wrenches and screwdrivers. The process involves removing the pump body, separating the motor sub-assembly, removing the diffuser and impeller, and tapping out the old seal. When installing the new seal, ensure the ceramic/carbon faces are clean and handled with care to avoid scratches.
Troubleshooting
If the pump fails to prime, check for air leaks in suction piping, ensure the lid gasket is properly seated, and verify the water level is sufficient. If flow is reduced, check for a clogged impeller or a clogged suction trap.
Practical help
Common problems
Pump will not prime (too much air)
Check suction piping and valve glands, secure the lid on the strainer pot, ensure the lid gasket is in place, and check the pool water level.
Pump will not prime (not enough water)
Ensure suction lines, pump strainer, and volute are full of water; verify suction valves are open.
Reduced flow or head
Check for air leaks in the suction line or clean the clogged impeller and suction trap.
Before use
- Ensure electrical breakers are off before wiring.
- Verify wiring voltage matches the motor (115v or 230v).
- Ensure suction and discharge valves are open.
- Fill the pump strainer pot with water before starting.
- Ensure the lid O-ring is properly seated and the lid is hand-tight.
Images and diagrams
- Figure 1: Shows the location of the external bonding clamp and internal grounding screw.
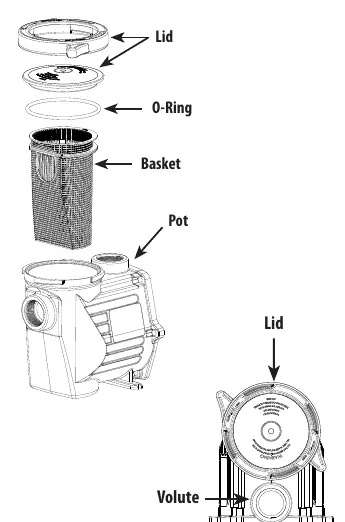
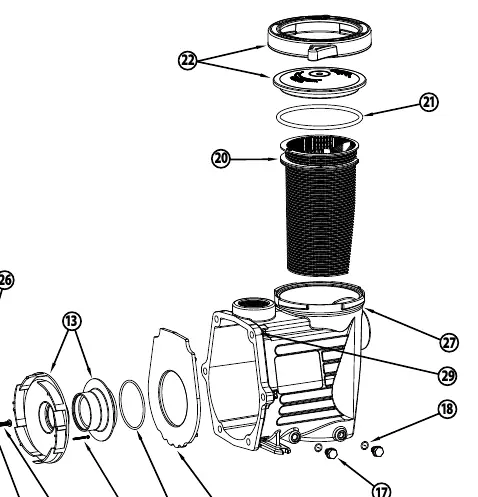
- Figure 2 & 3: Illustrates the assembly of the strainer basket, lid, and O-ring.
- Figure 4: Exploded view of the pump disassembly and seal replacement process.
Model compatibility
- Must be installed by a licensed electrician or qualified pool serviceman.
- Do not install within an outer enclosure or beneath the skirt of a hot tub or spa unless marked.
- For 2-speed pumps, use high-speed for priming.

Manual page author
Michael Turner
Technical manual editor
Reviews PDF manuals for structure, safety notes, and practical product details so readers can find the right information quickly.