Electronics / Security Cameras
Wyze Cam OG Security Camera Quick Start Guide
Quick start guide for the Wyze Cam OG security camera. Learn how to set up your device, interpret light indicators, and install the camera on walls or ceilings.
Table of contents
Manual images
Click an image to enlargeQuick Start Guide
This guide provides the essential steps to set up and install your Wyze Cam OG security camera. Ensure you have the Wyze app installed on your mobile device before beginning the setup process.
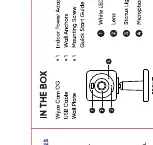
In the Box
- Wyze Cam OG
- Power Adapter
- Power Cable
- Wall Plate
- Wall Anchors
- Quick Start Guide
Setup
- Download the Wyze app and log in or create an account.
- Connect the power adapter to the camera and plug it into a power outlet. Wait for the status light to flash red.
- Press the SETUP button on the back of the camera.
- Open the Wyze app, tap the + icon, and select "Add Device" to find your Wyze Cam OG. Follow the in-app instructions to complete the setup.
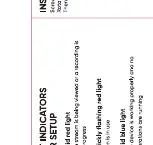
Light Indicators
The status light on the camera indicates its current state:
- Solid red: The device is powered and initializing.
- Flashing red: The device is ready to connect.
- Flashing blue: Connection is in progress.
- Solid blue: The device is working properly.
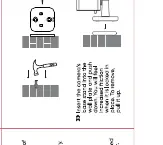
Installation
Wall Mount
- Determine the location for the camera.
- Drill holes for the wall anchors (5mm drill bit).
- Insert the wall anchors into the holes.
- Secure the wall plate to the wall using the provided screws.
- Slide the camera base onto the wall plate.
Ceiling Mount
- Determine the location for the camera.
- Drill holes for the wall anchors (5mm drill bit).
- Insert the wall anchors into the holes.
- Secure the wall plate to the ceiling using the provided screws.
- Slide the camera base onto the wall plate.
Practical help
Common problems
Solid red light
The device is powered and initializing.
Flashing red light
The device is ready to connect.
Flashing blue light
Connection is in progress.
Solid blue light
The device is working properly.
Before use
- Download the Wyze app on your smartphone.
- Ensure you have a stable Wi-Fi connection.
- Verify all items listed in the 'In the Box' section are present.
- Have a 5mm drill bit ready for installation.
Images and diagrams
- In the Box: Identifies the camera, power adapter, cable, wall plate, and anchors.
- Setup: Shows the location of the setup button on the back of the camera.
- Wall Mount: Illustrates the drilling and mounting process for wall installation.
- Ceiling Mount: Illustrates the drilling and mounting process for ceiling installation.

Manual page author
Michael Turner
Technical manual editor
Reviews PDF manuals for structure, safety notes, and practical product details so readers can find the right information quickly.