Electronics / Security Cameras
User Manual for ZOSI 0235USTG Bullet Network Camera
Quick guide for the ZOSI 0235USTG Bullet Network Camera. Includes detailed instructions for waterproof cable management, wall mounting, device connection, and network configuration via app or web interface.
Table of contents
Manual images
Click an image to enlargeQuick Guide from the Manual
This document provides essential installation and setup instructions for the ZOSI 0235USTG Bullet Network Camera. It covers critical waterproofing procedures, physical mounting, and initial network configuration.
Waterproof Requirements
Proper waterproofing is mandatory to prevent device damage. Failure to follow these steps may void the warranty.
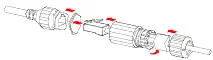
- Cable Insulation: Use insulation tape to insulate the connection part of each cable.
- Waterproof Tape: Fully stretch self-adhesive waterproof tape at both ends and wrap the connection part and cable ends tightly.
- Network Cable: Install the supplied waterproof components onto the network cable in sequence. Ensure the rubber ring is mounted onto the network cable interface first.
- Unused Cables: If a DC cable is not used, insert the plug into the interface.
- Junction Box: It is recommended to place cables into a waterproof junction box (purchased separately) after treatment.
Packing List
- Camera (1 PCS)
- Waterproof components (1 Set)
- Product documents (1 Set)
Cable Connection
The camera features several tail cables. Ensure all connections are secure and waterproofed. Interfaces include:
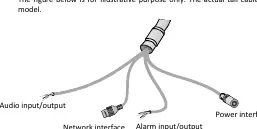
- Audio input/output
- Network interface
- Alarm input/output
- Power interface
Mounting the Camera
Tools required: ESD wrist strap or gloves, Phillips screwdriver, electric drill.
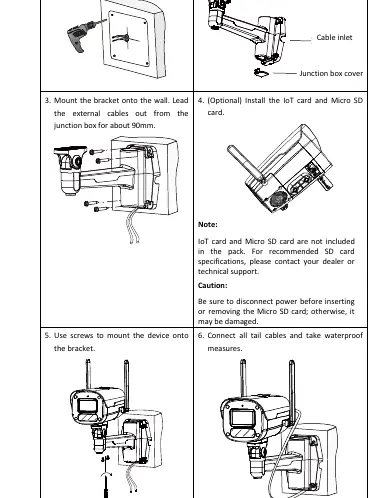
- Locate and drill holes for the bracket.
- Remove the junction box cover.
- Mount the bracket onto the wall and lead external cables out from the junction box (approx. 90mm).
- (Optional) Install the IoT card and Micro SD card. Caution: Disconnect power before inserting or removing the Micro SD card.
- Use screws to mount the device onto the bracket.
- Connect all tail cables and apply waterproof measures.
Device Management
Option 1: Guard Live App
Download the app by scanning the QR code. Register an account, log in, and tap 'Add Device' to scan the register code on the camera or quick guide.
Option 2: Web Management
Access the camera via a web browser using the default IP address: 192.168.1.13. The default username is admin and the password is 123456. It is strongly recommended to change the password immediately after the first login.
Safety and Network Security
To ensure device security, change the default password to a strong one (at least nine characters, including digits, letters, and special characters). Keep firmware updated, disable unused features like UPnP or SNMP if not required, and ensure the device is physically protected.
Practical help
Common problems
Water ingress or cable damage
Ensure all cable connections are insulated with tape and waterproof components are installed correctly on the network cable.
Cannot access web interface
Ensure you are using the default IP 192.168.1.13 and the default credentials admin/123456.
Micro SD card not working or damaged
Always disconnect power before inserting or removing the Micro SD card.
Before use
- Ensure the wall can withstand the weight of the device.
- Prepare tools: ESD wrist strap, Phillips screwdriver, and electric drill.
- Verify the power supply provides stable voltage meeting device requirements.
- Ensure all unused cables are properly plugged or bundled.
- Change the default password upon first login.
Specs in practice
- Default IP Address
- 192.168.1.13
- Default Login
- Username: admin, Password: 123456
- Mounting Thread
- 2-1/4-20UNC-2B
Images and diagrams
- Waterproof components: Shows the sequence of installing the rubber ring and sealing the network cable interface.
- Cable connection: Identifies the specific tail cables for audio, network, alarm, and power.
- Wall mount: Illustrates the 6-step process from drilling to final cable connection.
Model compatibility
- IoT card and Micro SD card are not included in the package.
- The junction box is purchased separately.
- The device must be installed by a trained professional.

Manual page author
Michael Turner
Technical manual editor
Reviews PDF manuals for structure, safety notes, and practical product details so readers can find the right information quickly.