Electronics / Networking
Installation Guide for TP-Link 10GBase SFP+ LC Transceiver
Quick installation and removal guide for TP-Link 10GBase SFP+ LC Transceiver (TL-SM5110-SR and TL-SM5110-LR). Includes connection diagrams, technical specifications, and safety precautions.
Table of contents
Manual images
Click an image to enlargeQuick guide from the manual
This guide provides instructions for the installation and removal of TP-Link 10GBase SFP+ LC Transceivers. Always wear an ESD-preventive wrist or ankle strap to prevent electrostatic discharge damage to the transceiver.
Installation
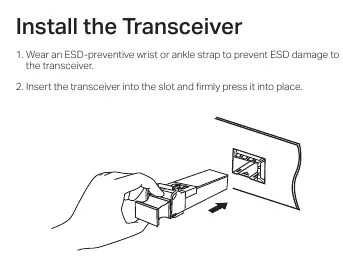
- Wear an ESD-preventive wrist or ankle strap.
- Insert the transceiver into the slot and firmly press it into place.
- Remove the protective dust plug from the transceiver.
- Plug the fiber-optic cables into the transceiver. The device works without additional configuration.
Removal
- Wear an ESD-preventive wrist or ankle strap.
- Disconnect the network fiber-optic cables from the transceiver.
- Pull the safety latch downwards to release the transceiver, then pull it out from the slot.
- Reinstall the protective dust plug in the transceiver’s optical bores and place the device on an antistatic mat or in a static shielding bag.
Connection
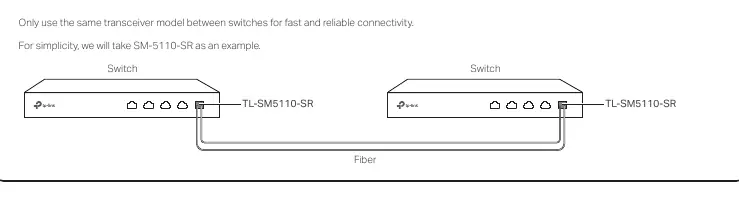
For fast and reliable connectivity, use the same transceiver model between switches. The transceiver is hot-swappable.
Specifications
- Data Rate: 10 Gbps
- Port Type: LC Duplex
- Power Support: 3.3 V
- TL-SM5110-SR: 850 nm wave length, 50/125 or 62.5/125 μm Multi-mode Fiber, 300 m (OM3) max cable length.
- TL-SM5110-LR: 1310 nm wave length, 9/125 μm Single-mode Fiber, 10 km max cable length.
- Operating Temperature: 0°C to 70°C (32°F to 158°F).
Safety Information
- Do not touch the output pins on the transceiver with your hand.
- Keep the protective dust plug on the transceiver’s optical bores until you are ready to make a connection.
- Warning: Do not point or stare directly into the beam or into the optical port of the transceiver when it is operating, as this can injure your eyesight.
- Keep the device away from water, fire, humidity, or hot environments.
- Avoid using this product during an electrical storm.
Practical help
Common problems
Incompatibility with other vendors
The transceiver may be incompatible with other vendors' devices. It is recommended to use only TP-Link transceivers on TP-Link devices.
Radio interference
This is a Class A product. In a domestic environment, it may cause radio interference, in which case the user may be required to take adequate measures.
Before use
- Wear an ESD-preventive wrist or ankle strap.
- Ensure you have the correct fiber-optic cable type (Multi-mode for SR, Single-mode for LR).
- Keep the protective dust plug on until ready to connect.
- Verify the switch has a 10G SFP+ slot.
Specs in practice
- Max. Cable Length
- The maximum distance the signal can travel reliably (300m for SR, 10km for LR).
- Hot Swappable
- The device can be installed or removed while the switch is powered on.
Images and diagrams
- Installation: Shows inserting the transceiver into the slot and removing the dust plug.
- Removal: Shows disconnecting cables, pulling the safety latch down, and removing the transceiver.
- Connection: Illustrates connecting two switches using the same transceiver model and fiber cable.
Model compatibility
- Compatible with TP-Link switches with 10G SFP+ slots.
- Compatible with TX432.
- Use the same transceiver model between switches for best results.

Manual page author
David Miller
Documentation analyst
Organizes user manual content into clear summaries, with attention to model details, product context, and everyday usability.