Home Appliances / Coffee Equipment
User Manual for Mr. Coffee 14-Cup Programmable Coffeemaker
Quick guide and user manual for the Mr. Coffee 14-Cup Programmable Coffeemaker. Learn how to set the clock, brew coffee, use the strong brew and 1-4 cup settings, clean the machine, and troubleshoot common issues.
Table of contents
Manual images
Click an image to enlargeQuick Guide from the Manual
This guide helps you set up and operate your Mr. Coffee 14-Cup Programmable Coffeemaker. Before first use, wash the carafe and brew basket, fill the reservoir to the MAX line, and run a cleansing brew cycle with an empty basket.
Getting Started
Unpack the unit and remove all packaging materials. Plug the unit into an outlet. To set the clock, use the HR and MIN buttons; the time will be set after 5 seconds of inactivity.
Advanced Water Filtration System
This system reduces chlorine and calcium for better-tasting coffee.

- Soak the cartridge in cold water for 5 minutes.
- Rinse the cartridge for 1 minute.
- Insert the cartridge into the holder and place it in the designated slot in the water reservoir.
- Replace the cartridge every 30 days or 30 uses.
Brewing Coffee
Follow these steps for a standard brew:
- Fill the water reservoir with fresh water.
- Place an 8-12 cup basket-style paper filter or the reusable coffee filter into the brew basket.
- Add coffee grounds according to the measurement chart (e.g., 14 cups = 11.5 tbsp).
- Place the carafe on the warming plate.
- Press the BREW NOW button to start.
Special Brewing Features

- Strong Brew: Slows down the brewing process for bolder flavor. Press the STRONG button before starting.
- 1-4 Cup Setting: Optimizes brewing for smaller batches. Press the 1-4 CUP button before starting.
- Brew Later: Allows you to schedule brewing. Press BREW LATER, then use HR and MIN buttons to set the desired time.
- Keep Warm: Customize how long the warming plate stays on (1-4 hours). Press the KEEP WARM button to adjust.
Cleaning and Maintenance
Daily Cleaning: Wash the carafe and brew basket with mild detergent and water. These parts are top-rack dishwasher safe.

Decalcifying: When the CLEAN indicator appears, decalcify the machine:
- Remove the water filtration system.
- Pour 4 cups (20 oz) of white vinegar into the reservoir.
- Place an empty filter and carafe in the unit.
- Hold the STRONG button for 3 seconds to start the clean cycle.
- Once complete, rinse the system by running two full cycles with fresh water.
Troubleshooting
- Brew Now light not on: Check power connection or circuit breaker.
- Coffee not brewing: Ensure water is in the reservoir and the brew basket is properly inserted.
- Coffee tastes bad: Use filtered water and ensure the machine is clean.
- Filter basket overflows: Ensure the carafe is correctly placed and do not overfill with coffee grounds.
Practical help
Common problems
The BREW NOW light does not light up
Check if the unit is plugged into a working outlet or if there is a power outage.
The coffee is not brewing
Ensure there is water in the reservoir and the brew basket is properly inserted.
The filter basket overflows
Ensure the carafe is placed correctly on the warming plate and do not use too many coffee grounds.
The coffee tastes bad
Use fresh coffee grounds, ensure the correct coffee-to-water ratio, and use filtered water.
Before use
- Wash the carafe and brew basket with mild detergent.
- Fill the water reservoir to the MAX line.
- Place the carafe on the warming plate.
- Run a cleansing brew cycle with an empty brew basket.
Specs in practice
- 1-4 Cup Setting
- Optimized brewing cycle for smaller batches.
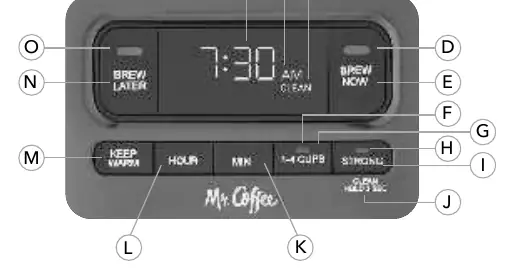
Images and diagrams
- Control panel layout showing clock, indicators, and function buttons.
- Water filtration system installation steps.
- Brewing process steps including filter and coffee placement.
Model compatibility
- Use 8-12 cup basket-style paper filters or the included reusable coffee filter.
- Use only capsules intended for this appliance (if applicable).

Manual page author
David Miller
Documentation analyst
Organizes user manual content into clear summaries, with attention to model details, product context, and everyday usability.