Computers / PC Components
User Manual for StarTech.com 2-Port Serial Card PEX2S1050
Quick guide for the StarTech.com PEX2S1050 2-Port Serial Card. Includes hardware installation steps, low-profile bracket configuration, and driver installation instructions for Windows and Mac.
Quick answers from the manual
Quick answer
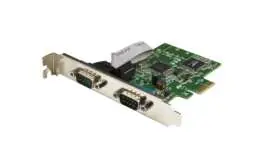
- The PEX2S1050 is a 2-port RS232 serial card for PCIe slots. It requires a PCIe x1 slot and supports Windows and Mac OS. p. 4
Key actions
- Install low-profile brackets p. 6
- Install the PCIe card p. 6
First start
- Install the card into an open PCIe slot and install the appropriate drivers. p. 6, 7
Technical specifications
| Parameter | Value | Meaning | Pages |
|---|---|---|---|
| Data Rate | 460Kbps | Maximum data transfer speed | p. 4 |
Where to find it in the PDF
- Introduction and Product Diagram p. 4
- Hardware Installation p. 6
- Software Installation p. 7
Table of contents
Manual images
Click an image to enlargeQuick guide from the manual
This document provides instructions for installing the StarTech.com PEX2S1050 2-Port Serial Card. Ensure your computer is powered off and disconnected from power before installation. The card is compatible with PCIe x1, x4, x8, and x16 slots. If you are using a small form-factor computer, you may need to replace the pre-installed full-profile bracket with the included low-profile brackets.
Product Overview
The PEX2S1050 is a serial card that adds two RS232 serial ports to your computer via a PCI Express expansion slot. It features a dual-channel 16C1050 UART and supports data transfer rates up to 460Kbps.

Hardware Installation
Installing Low-Profile Brackets:
- Remove the four screw locks securing the DB9 serial ports to the full-profile bracket.
- Remove the full-profile bracket from the card.
- Align the low-profile bracket's DB9 port holes with the DB9 ports on the card.
- Insert one DB9 serial port into the DB9 port hole on each of the two low-profile brackets using the screw locks.
- Tighten the screw locks into place on each low-profile bracket.
Installing the PCIe Card:
- Turn off your computer and disconnect all peripherals and the power cable.
- Remove the computer case cover.
- Locate an open PCIe slot and remove the corresponding metal cover plate from the back of the case.
- Gently insert the card into the PCIe slot and fasten the bracket to the back of the case.
- Replace the computer case cover, reconnect power and peripherals, and turn on the computer.
Software Installation
Windows:
- Insert the provided driver CD.
- Open Device Manager.
- Under 'Other devices', right-click the PCI Serial Port device and select 'Update Driver Software'.
- Browse to your CD/DVD drive and select the folder applicable to your operating system (32-bit or 64-bit).
- Click 'Next' to complete the installation.
Mac OS:
- The card is natively supported by Mac OS 10.8 through 10.11.
- Drivers will install automatically after the card is installed.
Official resources from the manual
Practical help
Common problems
Card not detected by the system
Ensure the card is fully seated in the PCIe slot and that drivers have been installed correctly via Device Manager.
Card does not fit in small form-factor case
Replace the pre-installed full-profile bracket with the two included low-profile brackets.
Before use
- Verify you have an available PCIe x1, x4, x8, or x16 slot.
- Ensure you have a CD/DVD drive for driver installation.
- Check if your computer case requires low-profile brackets.
- Have RS232 serial cables (DB9) ready for connection.
Specs in practice
- Data Transfer Rate
- Supports speeds up to 460Kbps.
Images and diagrams
- Top view shows the PCIe x1 connector and the placement of DB9 ports.
- Front view highlights the screw locks used to secure the serial cables.
Model compatibility
- Compatible with Windows 95, 98SE, ME, XP, Vista, 7, 8, 8.1, 10.
- Compatible with Windows Server 2008 R2, 2012, 2012 R2, 2016, 2019.
- Compatible with Mac OS 10.8, 10.9, 10.10, 10.11.

Manual page author
Emily Carter
User documentation editor
Prepares concise manual descriptions and highlights the most useful setup, operation, and maintenance information for readers.