Power / Uninterruptible Power Supplies
User manual for 2E 2E-BS006 Portable Power Station
A comprehensive guide for the 2E 2E-BS006 Portable Power Station, covering setup, charging methods (AC, solar, car), UPS mode, display icons, and troubleshooting.
Quick answers from the manual
Quick answer
- The 2E-BS006 is a 2000W portable power station with a 1997Wh LiFePo4 battery. It supports fast AC charging (2 hours), solar charging (up to 500W), and car charging. It features a UPS mode and multiple output ports (AC, USB, DC). p. 4, 12
Key actions
- Charging via wall socket p. 7
- Using UPS mode p. 9
- Connecting solar panels p. 10
First start
- Charge the unit fully before first use as it is shipped at 30% capacity. p. 1
Problems and fixes
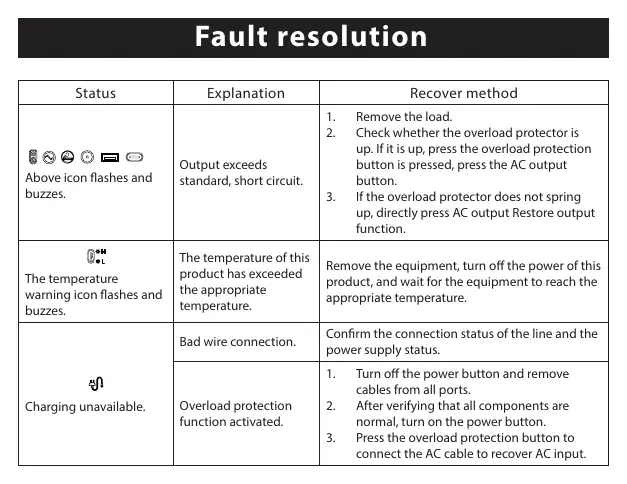
Output exceeds standard/short circuit
Remove load, check overload protector, press AC output button.
p. 13Maintenance and reset
- For long-term storage, discharge to 0% and recharge to 50% every 3 months. p. 2
Technical specifications
| Parameter | Value | Meaning | Pages |
|---|---|---|---|
| Capacity | 1997Wh | Total energy storage | p. 12 |
| AC Output | 2000W rated | Rated power output | p. 12 |
Where to find it in the PDF
- Safety Warnings p. 2
- Controls and Ports p. 5, 6
- Display Icons p. 8
- Specifications p. 12
Table of contents
Manual images
Click an image to enlargeImportant Information
The 2E 2E-BS006 Portable Power Station is a high-capacity energy storage device. Upon receiving the product, it is charged to approximately 30%. Please fully charge the unit before first use. Do not use extension cords or cable taps when charging from a wall socket. Ensure a clearance of at least 30cm around the side suction and exhaust ports to prevent overheating.
Product Overview
This unit features a 1997Wh LiFePo4 battery with a 2000W rated power output (4000W peak). It supports ultra-fast 1100W AC charging, solar charging up to 500W, and car charging. It is designed for emergency power backup, camping, and powering various electric tools.
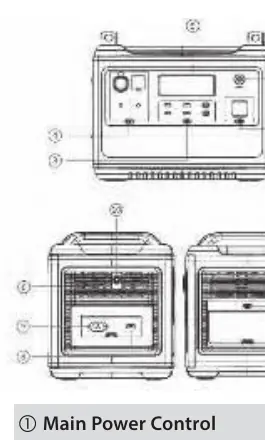
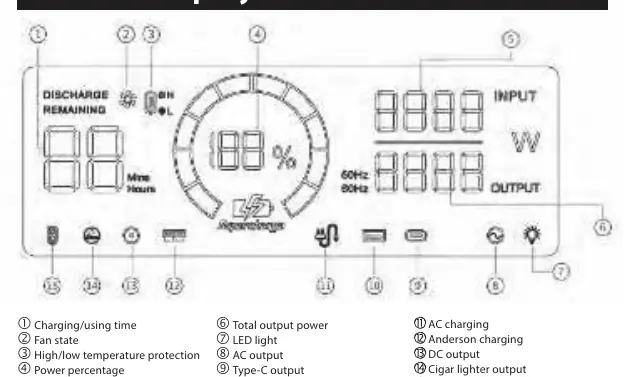
Controls and Ports
The front panel includes the main power control, LED light control, USB, DC, and AC output controls, and the LCD display. The side panel houses the AC input, Anderson input port (for solar/car charging), and the overload protection button.
Display Icons
The LCD display provides real-time data including charging/using time, fan state, temperature protection status, power percentage, and total input/output power. Warning icons will blink or light up to indicate faults such as AC input errors, output faults, or high/low temperature protection.
Charging Methods
- AC Charging: Connect directly to a wall socket for 1100W fast charging (0-100% in 2 hours). Do not use extension cords.
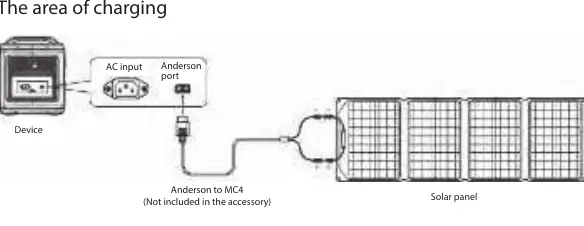
- Solar Charging: Use the included Anderson to MC4 conversion cable. Maximum input is 500W (max voltage 50V).
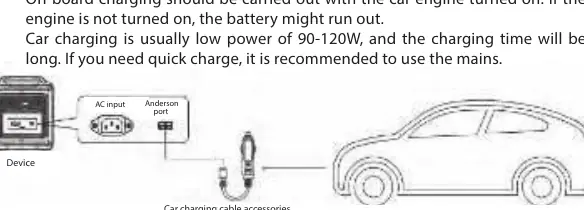
- Car Charging: Connect the ACC charging cable to the car cigarette lighter and the Anderson interface on the unit. Ensure the car engine is running during charging.
UPS Mode
The unit supports a bypass mode. Connect the power station between the wall socket and your electrical appliance. In the event of a power outage, the unit automatically switches to battery power within 10ms.
Troubleshooting
If the unit displays errors, check the following:
- Output exceeds standard/short circuit: Remove the load, check the overload protector, and press the AC output button.
- Temperature warning: Turn off the unit and wait for it to reach a safe operating temperature.
- Charging unavailable: Verify wire connections and power supply status.
Safety Instructions
- Do not disassemble or modify the product.
- Keep away from high temperatures, humidity, and direct sunlight.
- Use only genuine accessories.
- For long-term storage, discharge to 0% and recharge to 50% every 3 months.
Manufacturer information
2E
Practical help
Common problems
Output exceeds standard or short circuit
Remove the load, check if the overload protector is up, press the overload protection button, and then press the AC output button.
Temperature warning icon flashes
Remove equipment, turn off the power, and wait for the device to reach a normal operating temperature.
Charging unavailable
Check wire connections, verify power supply status, and ensure the overload protection function is not active.
Before use
- Charge the unit to 100% upon receipt (it arrives at 30%).
- Ensure the area around suction/exhaust ports is clear (30cm).
- Check that the AC input voltage/frequency matches your region.
- Use only genuine accessories to avoid warranty issues.
- Verify the car engine is running if charging via the cigarette lighter.
Specs in practice
- Charging Time
- Approx. 2 hours via AC wall socket.
- Operating Temperature
- -10 to 40°C.
Images and diagrams
- The front panel features the main power button, LED light control, USB/DC/AC controls, and the LCD display.
- The side panel contains the AC input, Anderson port for solar/car charging, and the overload protector.
Model compatibility
- Solar panels must not exceed 50V input voltage.
- AC output frequency can be switched between 50Hz and 60Hz.
- Car charging is low power (90-120W) and recommended only when mains power is unavailable.

Manual page author
David Miller
Documentation analyst
Organizes user manual content into clear summaries, with attention to model details, product context, and everyday usability.