Power / Portable Power Stations
User Manual for Oupes B2 2048Wh Smart Extra Battery
Quick guide for the Oupes B2 2048Wh Smart Extra Battery. Learn how to connect, charge, troubleshoot error codes, and maintain your device.
Quick answers from the manual
Quick answer
- To connect the Oupes B2 Smart Extra Battery, turn off both the power station and the extra battery, then use the provided battery expansion cable to link them. Once connected, they will charge and discharge together. p. 8
Key actions
- Power ON/OFF: Press and hold the main power button for 3 seconds. p. 9
- Change Frequency: Turn off AC/DC output, hold DC output button and main power button for 3-5 seconds, select frequency with AC button, confirm with main power button. p. 13
Problems and fixes
E008, E010, E011, E012 (Overload/Short Circuit)
Press the DC output power button to restore.
p. 11
E020 (BMS failure)
Contact after sales service team.
p. 11Error codes
| Code | Meaning | Action | Pages |
|---|---|---|---|
| E008 | Overload or short circuit of 12V30A output port | Press the DC output power button to restore. | p. 11 |
| E030 | Connect the wrong expansion battery | Connect correct extra battery to restore. | p. 12 |
Maintenance and reset
- Charge to 60% before storage. For long-term storage, fully discharge and recharge every 3 months. p. 13
Technical specifications
| Parameter | Value | Meaning | Pages |
|---|---|---|---|
| Battery Capacity | 2048Wh (51.2V/40Ah) | Total energy capacity | p. 5 |
| Solar Input | 12V~148V MPPT: 18V~140V 15A Max 2100W Max | Maximum solar charging input | p. 5 |
Where to find it in the PDF
- Specifications p. 5
- Error Codes p. 11, 12
Table of contents
Manual images
Click an image to enlargeImportant Information
Before using the Oupes B2 2048Wh Smart Extra Battery, read the manual carefully. The unit must be operated and stored within the temperature range of 32°F to 104°F (0°C to 40°C). Do not expose the unit to fire, water, or liquids. Do not disassemble the unit, as this will void the warranty. If the unit is not used for extended periods, turn it off and charge it regularly.
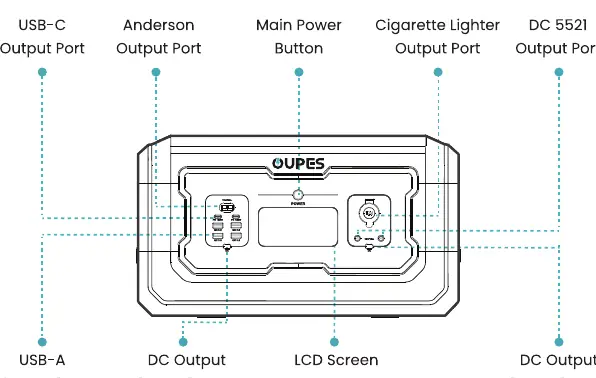
Product Overview
The unit features various ports for output and input, including USB-C, USB-A, Anderson, and DC outputs. The LCD screen displays battery percentage, input/output power, and error warnings. The main power button is located on the front panel.
Connection Method
To connect the extra battery to the power station:
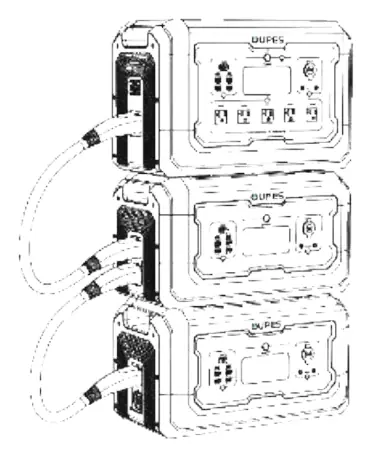
- Turn off both the power station and the extra battery before connecting or disconnecting.
- Use the provided battery expansion cable to connect the extra battery to the power station.
- Once successfully connected, the extra battery and the power station will charge and discharge together.
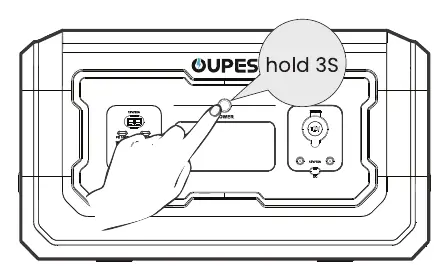
Power ON/OFF
Press and hold the main power button for 3 seconds to turn the unit on or off. When the power is on, a short press of the main power button toggles the screen on or off. The unit will automatically shut down after 5 minutes of inactivity.
Solar Charging
To charge via solar panels:
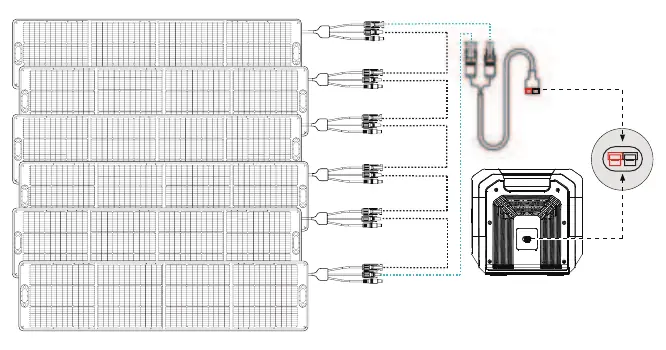
- Use the MC4 to Anderson charging cable to connect the solar panels to the power station.
- Connect up to 6 x 240W solar panels in series for maximum power.
- Ensure solar panels meet the requirements: OCV: 148V; Current: 15A; Max Power: 2100W.
Troubleshooting
The LCD screen displays error codes when a fault occurs. Common codes include:
- E008/E010/E011/E012: Overload or short circuit on specific ports. Press the DC output button to restore.
- E014/E015/E025/E026/E028/E029: Temperature issues. Stop charging/discharging and wait for the temperature to return to normal.
- E020: BMS communication failure. Contact support.
- E030: Wrong expansion battery connected. Connect the correct battery.
Maintenance and FAQ
Cleaning: Use a dry, soft, clean cloth or paper towel to wipe the product.
Storage: Store in a dry, well-ventilated place at room temperature (-20°C to 60°C). Charge to 60% before storage. For long-term storage, fully discharge and recharge every 3 months.
Frequency Setting: Turn off AC/DC output. Simultaneously press and hold the DC output button (USB side) and the main power button for 3-5 seconds until the frequency flashes. Use the AC output button to select 50Hz or 60Hz. Long press the main power button to confirm.
Practical help
Common problems
Unit displays error code E008, E010, E011, or E012
Overload or short circuit detected. Press the DC output button to restore.
Unit displays error code E020
BMS communication failure. Contact the after-sales service team.
Unit displays error code E030
Incorrect expansion battery connected. Connect the correct extra battery.
Unit is overheating (E014, E025, E028, E029)
Stop charging or discharging and wait for the temperature to return to normal.
Before use
- Ensure the unit is within the operating temperature range (0°C-40°C).
- Turn off both the power station and extra battery before connecting.
- Use the provided battery expansion cable for connection.
- Charge the unit regularly if stored for long periods.
- Verify solar panel requirements (OCV 148V, 15A max) before connecting.
Specs in practice
- Battery Capacity
- 2048Wh (51.2V/40Ah) LiFePO4 battery.
- USB-C Output
- Supports up to 100W max output.
Images and diagrams
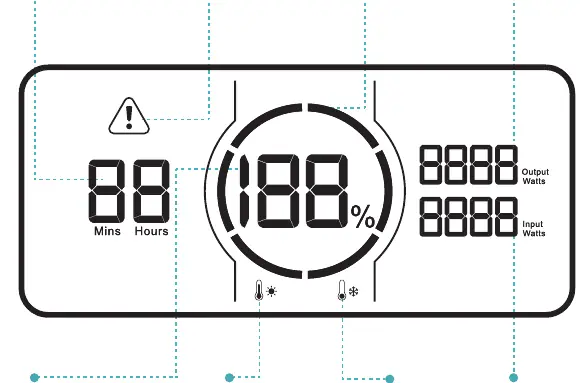
- The LCD screen displays battery percentage, remaining time, input/output power, and error warnings.
- The connection diagram shows how to stack and connect the extra battery to the power station using the expansion cable.
- The solar charging diagram illustrates the series connection of solar panels to the Anderson input port.
Model compatibility
- Compatible with solar panels meeting OCV 148V and 15A current requirements.
- Can be charged by generators with a built-in pure sine wave inverter.
- Cannot be taken on airplanes due to lithium battery regulations.

Manual page author
Emily Carter
User documentation editor
Prepares concise manual descriptions and highlights the most useful setup, operation, and maintenance information for readers.