Electronics / Network Adapters
User Manual for Photonic Universe P1200S Power Station
Quick guide for the Photonic Universe P1200S power station. Learn how to charge, operate, use the app, and troubleshoot your device.
Quick answers from the manual
Quick answer
- To use the Photonic Universe P1200S, press the switch button next to the port you want to use. The indicator light will turn on, and the device will provide power. Ensure the unit is charged before use. p. 6
Key actions
- Charging the device p. 4
- Connecting the App p. 7, 8
First start
- Charge the device fully before first use. p. 4
Problems and fixes
Appliances not getting power
Ensure output is enabled, battery is not empty, load is within limits, and cables are connected properly.
p. 9Maintenance and reset
- Recharge every three months if not used for a long time. p. 6
Technical specifications
| Parameter | Value | Meaning | Pages |
|---|---|---|---|
| Capacity | 1030.4Wh | Total energy storage capacity. | p. 5 |
| AC Output | 1200W | Stable power output for AC devices. | p. 5 |
Where to find it in the PDF
- Ports and Interface p. 2
- Charging Methods p. 4
- Specifications p. 5
- App Instructions p. 7, 8
Table of contents
Manual images
Click an image to enlargeQuick guide from the manual
The Photonic Universe P1200S is a portable power station designed for emergency and temporary power supply. Before first use, ensure the device is fully charged. To operate, press the switch button next to the specific port you wish to use; the indicator light will turn on when the output is active. The device supports charging via AC mains, solar panels, or a car charger.
Device Overview
The front panel features various input and output ports:

- AC Input: For charging via wall outlet.
- XT60 Input: For solar or car charging.
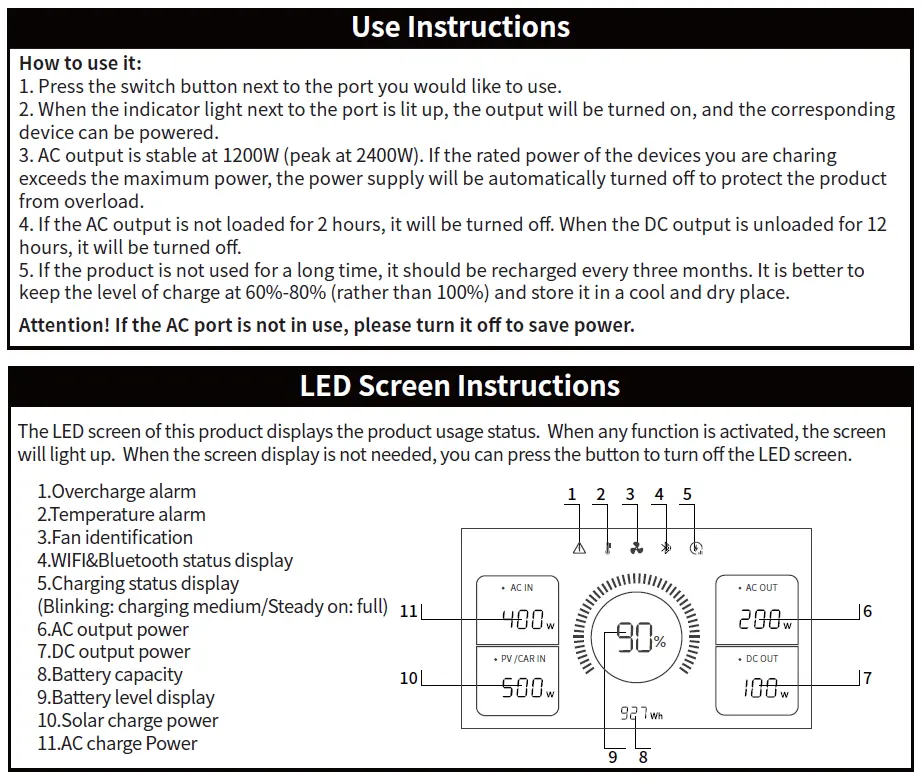
- Outputs: Includes AC outlets (1200W stable, 2400W peak), USB-C (PD 100W/45W), USB-A (18W), and DC/Car charger output.
- LED Display: Shows battery level, input/output power, and status icons.
Charging Methods
The device can be charged using three methods:
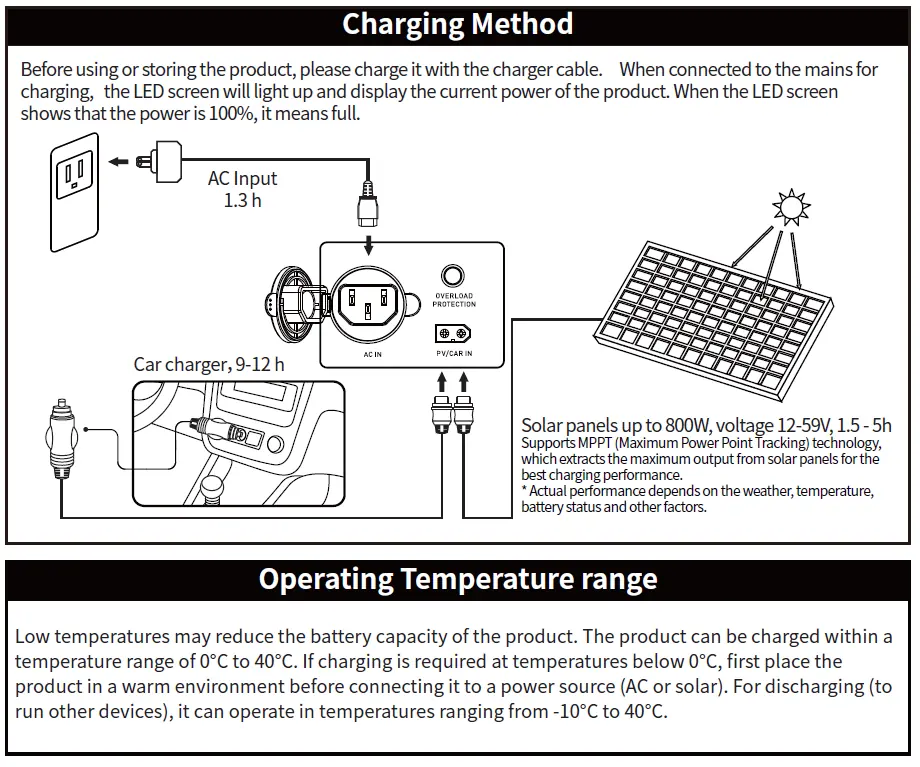
- AC Charging: Connect to a wall outlet using the provided cable.
- Solar Charging: Supports solar panels up to 800W (12-59V). The device uses MPPT technology for optimal efficiency.
- Car Charging: Connect via the car charger port.
Note: The product can be charged within a temperature range of 0°C to 40°C. If charging below 0°C, move the device to a warmer environment first.
Operating Instructions
To power devices, press the button next to the desired port. The LED screen displays real-time status, including battery percentage, input/output power, and alerts (overcharge, temperature, fan status). If the AC output is not loaded for 2 hours, it will automatically turn off. For long-term storage, keep the charge level between 60%-80% and recharge every three months.
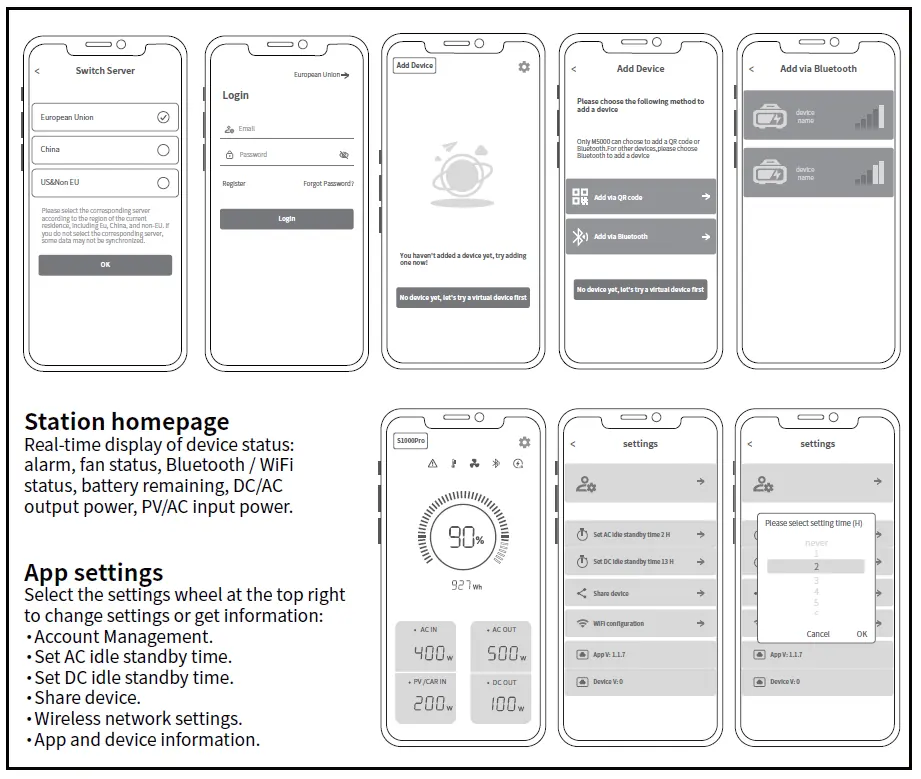
App Connectivity
You can monitor and control the power station via the Power Zero app, available on Google Play and the App Store. The app connects via Bluetooth or Wi-Fi and allows you to view real-time status, manage settings, and update device information. It is compatible with Android 6.0 or iOS 12.0 and higher.
Troubleshooting
If your appliances are not receiving power:
- Ensure the output is enabled and the indicator light is on.
- Check the LED display for battery level; if 20% or less, recharge the station.
- Verify that the total power consumption of your devices does not exceed the station's maximum output.
- Check that all cables are properly connected and have good contact.
Safety Information
- Do not short-circuit the device; avoid storing with metal objects.
- Keep away from liquids, heat, fire, and direct sunlight.
- Do not disassemble the device.
- Do not cover the device while in use or charging.
- Dispose of the product according to local regulations.
Practical help
Common problems
Appliances not receiving power
Ensure the output button is pressed (indicator light on), check battery level (recharge if <=20%), verify total load does not exceed 1200W, and check cable connections.
Charging issues in cold weather
The device can only be charged between 0°C and 40°C. Move the unit to a warmer environment before charging if temperatures are below 0°C.
Before use
- Charge the device fully before first use.
- Ensure the device is stored in a cool, dry place.
- Check that all cables are undamaged.
- Verify the device is not covered by towels or clothing during operation.
Images and diagrams
- The front panel contains the AC input, XT60 input, overload recovery button, LED display, and various output ports (AC, USB-C, USB-A, DC).
- The LED screen displays battery percentage, input/output power, and status icons for alarms and connectivity.
Model compatibility
- App requires Android 6.0+ or iOS 12.0+.
- Solar panels must be 12-59V DC, max 800W.
- Not suitable for aircraft travel (capacity > 100Wh).

Manual page author
David Miller
Documentation analyst
Organizes user manual content into clear summaries, with attention to model details, product context, and everyday usability.