Electronics / Monitors
User Guide for AcuRite 00439DI Weather Center
Quick start guide and user manual for the AcuRite 00439DI Weather Center. Learn how to set up the 3-in-1 sensor, synchronize units, calibrate readings, and troubleshoot common issues.
Table of contents
Manual images
Jump to the sectionQuick guide from the manual
To get your AcuRite 00439DI Weather Center running, follow these essential steps:
- Synchronization: Ensure the A-B-C switch inside the battery compartments of both the sensor and the display unit are set to the same letter (A, B, or C).
- Batteries: Install 4 AA batteries in the 3-in-1 sensor. For the display unit, install 3 AAA batteries (optional backup) and connect the power adapter.
- Placement: Place the sensor outdoors in an open area, at least 5 feet off the ground, away from heat sources and obstructions.
- Learning Mode: The unit requires 14 days to calibrate to your location. The Learning Mode icon will disappear once complete.
Device components
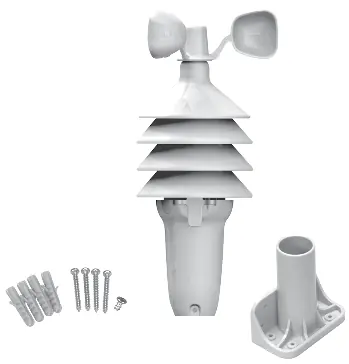
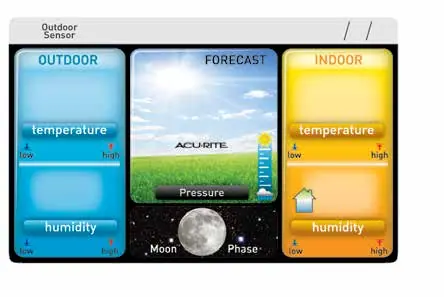
The system consists of a display unit and a 3-in-1 wireless sensor. The sensor includes a wind speed anemometer, temperature and humidity sensors, and a mounting point. The display unit features a color screen, backlight button, and setup controls on the back.

Setup and synchronization
The A-B-C switch is critical for communication between the sensor and display. If the units do not synchronize, ensure both are set to the same channel. When replacing batteries, it may take up to 20 minutes for the units to re-establish a connection.
Placement guidelines
For maximum accuracy, follow these placement rules:
- Wireless Range: Keep units within 330 feet (100 m) of each other.
- Interference: Place units at least 3 feet (0.9 m) away from electronics like TVs, computers, or microwaves.
- Sensor Location: Avoid heat sources (heaters, vents, asphalt), humidity sources (pools, spas), and sprinkler heads.
- Wind Obstructions: Mount in a wide-open area with minimal surrounding structures.
Sensor installation
The sensor can be mounted using the included bracket for top or side mounting on wooden posts or surfaces. Alternatively, it can be pipe-mounted using 3/4 inch steel or PVC pipe. Ensure the sensor is level for accurate wind measurement.

Operation and features
The display provides a 12 to 24-hour weather forecast based on self-calibrating data. It also tracks barometric pressure, moon phases, and wind speed (current, average, and peak). High and low records for temperature, humidity, and wind speed are tracked and reset automatically at midnight.
Calibration
You can calibrate temperature, humidity, and barometric pressure readings. To enter calibration mode, press and hold the up, gear, and down buttons simultaneously for at least 5 seconds. Use the up/down buttons to adjust values and the gear button to save and move to the next preference.
Maintenance
Clean the display unit with a soft, damp cloth. For the sensor, remove foreign matter from the wind anemometer to ensure free movement. You may apply a small amount of spray lubricant or graphite powder to the anemometer if it hesitates. Use household insect repellent on the sensor housing to prevent nesting, but do not spray internal components.
Troubleshooting
If you experience issues, try the following:
- No sensor reception: Relocate units, check A-B-C switch settings, and ensure batteries are fresh.
- Flashing temperature: This often indicates wireless interference; try changing the A-B-C channel.
- Inaccurate forecast: Ensure the Learning Mode has completed (up to 33 days for full calibration).
- Inaccurate wind readings: Ensure the sensor is mounted at least 5 feet high and wind cups are spinning freely.
Specifications
The system operates at 433 MHz. The outdoor temperature range is -40°F to 158°F (-40°C to 70°C), and the indoor range is 32°F to 122°F (0°C to 50°C). Wind speed is measured from 0 to 99 mph (0 to 159 kph).
Manufacturer information
AcuRite
Practical help
Common problems
No outdoor sensor reception
Relocate units within 330 ft (100 m), ensure A-B-C switches match, and check for electronic interference.
Outdoor temperature is flashing or showing dashes
Indicates wireless interference. Ensure A-B-C switches match on both units or try changing to a different channel.
Inaccurate forecast
Learning Mode must complete. Allow the unit to run continuously for up to 33 days for full calibration.
Inaccurate wind readings
Ensure sensor is mounted at least 5 ft high with no obstructions. Check if wind cups spin freely; lubricate if necessary.
Before use
- Remove protective film from the LCD screen.
- Set the A-B-C switch to the same letter on both the sensor and the display unit.
- Install 4 AA batteries in the 3-in-1 sensor.
- Install 3 AAA batteries in the display unit (optional backup).
- Plug in the power adapter for the display unit.
- Allow 14-33 days for the Learning Mode to calibrate.
Specs in practice
- Wireless Range
- 330 ft (100 m) depending on home construction materials.
- Operating Frequency
- 433 MHz.
- Outdoor Temperature Range
- -40°F to 158°F (-40°C to 70°C).
- Wind Speed Range
- 0 to 99 mph (0 to 159 kph).
Images and diagrams
- 3-in-1 Sensor: Shows wind speed anemometer, battery access lever, and mounting point.
- Display Unit Back: Shows setup buttons, battery compartment, and power adapter plug.
Model compatibility
- Use lithium batteries in the sensor for temperatures below -4°F (-20°C).
- Do not use heavy-duty or rechargeable batteries.

Manual page author
David Miller
Documentation analyst
Organizes user manual content into clear summaries, with attention to model details, product context, and everyday usability.