Home Appliances / Small Kitchen Appliances
User Manual for Adler Europe AD 1192W Radio Alarm Clock
Quick guide for the Adler Europe AD 1192W radio alarm clock. Learn how to set the clock, configure alarms, use Bluetooth, charge devices wirelessly, and operate the radio.
Table of contents
Manual images
Click an image to enlargeQuick guide from the manual
The Adler Europe AD 1192W is a multifunctional radio alarm clock featuring Bluetooth connectivity, wireless charging, and USB charging capabilities. This guide covers the essential setup and operation steps to get your device running quickly.
Safety Instructions
- Use indoors only.
- Do not expose to water or humid conditions.
- Ensure the power source is 230V ~ 50Hz.
- Do not place on hot surfaces or near combustibles.
- If the power cable is damaged, have it replaced by a professional service.
- Children over 8 years old may use the device under supervision.
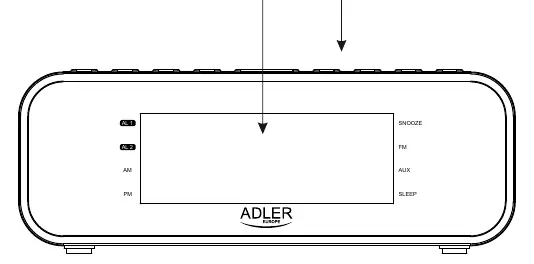
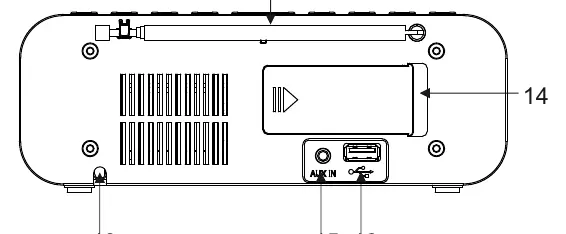
Device Overview
The device features a front display, top-mounted control buttons (Standby/Function, Clock/Memory, Volume/Alarm, Scan, Sleep/Preset, Play/Pause), and a wireless charging area. The rear panel houses the antenna, AUX-IN jack, and USB charging port.
Initial Setup

- Remove all packaging material.
- Open the backup battery door (14) and insert 2x AAA 1.5V batteries to maintain settings during power outages.
- Connect the AC power cord (13) to a wall socket.
Clock and Alarm Setup
Clock Setting
- Press and hold the CLK./MEM. button (3).
- Select 12/24H format using the SCAN +/- buttons (7,8).
- Confirm with the CLK./MEM. button.
Alarm Setting
- Press and hold the Vol-/Vol+ / Al.1/Al.2 button (4,5).
- Set the time using the SCAN +/- buttons.
- Select alarm type (Buzzer or Radio) and volume level.
- Confirm settings.
- To activate, press the Vol-/Vol+ / Al.1/Al.2 button once; a dot will appear on the display indicating the alarm is active.
Radio Operation
- Press the STANDBY/FUNCTION button (2) to turn on the radio.
- Use the SCAN +/- buttons to tune frequencies.
- Press and hold SCAN +/- to automatically search for the next station.
- To store presets, press and hold CLK./MEM. (3) for 3 seconds to auto-scan and save stations.
Bluetooth and AUX
- Bluetooth: Press STANDBY/FUNCTION (2) until "Pairing" mode is active. Search for "AD 1192" on your playback device and pair.
- AUX: Press STANDBY/FUNCTION (2) twice to switch to AUX mode. Connect your device via the AUX-IN port (15).
Charging
- Wireless Charging: Place a compatible phone on the top area marked with the Lightning/Charging logo. Ensure the phone case is not thicker than 5mm.
- USB Charging: Connect a USB cable to the USB port (16) on the back of the radio.
Cleaning and Maintenance
Unplug the device before cleaning. Use a slightly damp cotton cloth to wipe the front and upper parts. Do not allow water to enter the device.
Practical help
Common problems
Wireless charging not working
Ensure the phone case is not thicker than 5mm; remove the phone from the case if necessary.
Wireless charging stops
Wireless charging is suspended when the radio is in FM mode. Use the USB charging port instead.
Alarm not sounding
Ensure the alarm is set and the dot next to AL-1 or AL-2 is visible on the display.
Before use
- Remove all packaging material.
- Insert 2x AAA 1.5V batteries for clock backup.
- Connect the AC power cord to a wall socket (220-240V).
Specs in practice
- Wireless Charging
- 5V 1A
- FM Frequency
- 87.5 - 108 MHz
Images and diagrams
- Buttons 2-10 control functions like Standby, Clock/Memory, Volume/Alarm, Scan, Sleep/Preset, and Play/Pause.
- Rear panel contains AUX-IN (15) and USB charging port (16).
- Wireless charging area is marked with a Lightning/Charging logo on top.
Model compatibility
- Wireless charging is suspended while the radio is in FM mode.
- Phone cases thicker than 5mm may interfere with wireless charging.

Manual page author
Michael Turner
Technical manual editor
Reviews PDF manuals for structure, safety notes, and practical product details so readers can find the right information quickly.