Home / Clocks
User Manual for av:link Recharge 10W Wireless Charging Digital Alarm Clock
Quick guide for the av:link Recharge digital alarm clock. Learn how to set time, date, alarms, display modes, and use the 10W wireless charging feature.
Table of contents
Quick Guide for av:link Recharge
The av:link Recharge is a versatile digital alarm clock featuring a built-in Qi-certified wireless charging plate. It supports fast charging for compatible devices, displays room temperature, and offers multiple alarm and display settings. Ensure you use a fast-charge enabled USB power supply to utilize the 10W/7.5W fast charging capabilities.
Device Overview
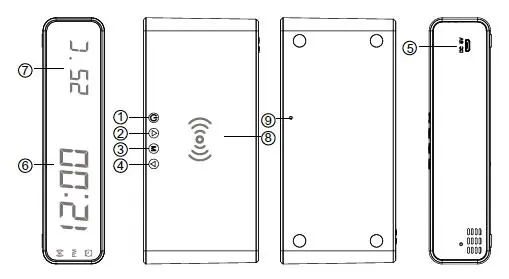
The device features a front LED display, a top wireless charging plate, and control buttons located on the side. Key controls include the Display on/off button, Up/Down adjust buttons, and the Menu button for configuration.
Setting Time and Date
To set the internal clock, first switch the unit on using the Display on/off button. Long press the Menu button to select between 12H or 24H time display. Use the up and down adjust buttons to make selections and the Menu button to confirm. Follow the same procedure to set the hour, minutes, year, month, and day.
Alarm Configuration
The device supports 3 individual alarms (A1, A2, A3). To set an alarm, press the Menu button repeatedly until the desired alarm mode appears. Long press the Menu button to adjust the time. Once set, the alarm will read ONA1, ONA2, or ONA3, and an icon will appear on the screen. To enable or disable alarms, use the up and down buttons while in the relevant alarm mode.
Display Settings
There are three display modes available:
- DP--1: Alternates between time and date.
- DP--2: Shows only the current date.
- DP--3: Shows only the current time.
To select a mode, press the up adjust button repeatedly. Additionally, a power-saving mode can be enabled by pressing the down adjust button to select ONSD (on) or --SD (off).
Wireless Charging
To charge a device, place it squarely on the wireless charging plate on top of the unit. A small charging icon will flash in the top left of the display when charging is active. For fast charging (Samsung 10W or Apple 7.5W), ensure the clock is connected to a fast-charge enabled USB power supply.
Temperature Display
The clock displays the current room temperature. To toggle between Centigrade and Fahrenheit, press and hold the down adjust button for approximately 2 seconds.
Safety and Maintenance
For electrical safety, never immerse the device in water or expose it to damp conditions. Do not attempt to repair or disassemble the unit, as this will invalidate the warranty. Clean the device only with a soft, dry cloth.
Practical help
Common problems
Wireless charging plate does not charge the device.
Ensure your device is wireless charging compatible, the Recharge is connected to a compatible USB power supply, and the device is placed squarely on the charging plate.
Fast charging is not working.
Ensure your device is fast-charge compatible and that the Recharge is connected to a fast-charge enabled USB power supply.
Before use
- Connect the device to a suitable USB power supply.
- Press the Display on/off button to turn the unit on.
- Ensure your device is Qi-compatible for wireless charging.
- Place the device squarely on the charging plate for optimal connection.
Images and diagrams
- 1-4: Control buttons (Display on/off, Up, Menu, Down).
- 5: Micro USB charging port.
- 8: Wireless charging plate.
- 9: Reset aperture.
Model compatibility
- Supports Samsung 10W and iPhone 7.5W fast charging.
- 5W Universal Qi certified charging mode for other devices.

Manual page author
David Miller
Documentation analyst
Organizes user manual content into clear summaries, with attention to model details, product context, and everyday usability.