Tools / Woodworking Tools
AKYPACH 15PCS Wood Router
Quick guide for the AKYPACH 15PCS Wood Router. Learn about assembly, motor height adjustment, collet installation, operation modes, and maintenance.
Table of contents
Manual images
Click an image to enlargeQuick guide from the manual
The AKYPACH Wood Router is a versatile tool designed for routing and edge trimming. Before operation, ensure the tool is unplugged, inspect for damage, and verify that all parts are present. Always wear safety goggles and earmuffs during operation. Never adjust the motor height while the tool is running.
Technical Specifications
- Motor: 110 Volts, 50-60Hz, 800W
- No load speed: 10,000 - 33,000 RPM
- Bit shank diameter: 1/4 inch or 3/8 inch
Safety Instructions
- Keep the workplace clean and well-lit.
- Do not use power tools in the presence of explosive gases or combustible liquids.
- Ensure the switch is in the OFF position before plugging the tool into a power source.
- Always hold the tool with two hands during start-up and operation.
- Keep hands away from rotating parts and do not wear loose clothing.
- Disconnect the power cord before changing accessories or bits.
Unpacking and Contents
The set includes the electric trimmer, straight line auxiliary gauge, trimming guide wheel, two small wrenches, two carbon brushes, two screws and nuts, a user manual, and 15 router bits. Verify all items are accounted for before discarding packaging.

Assembly and Adjustments
ON/OFF Switch
The power switch is located on the side of the top cover. Push the rocker switch to the I position to turn on and the 0 position to turn off.
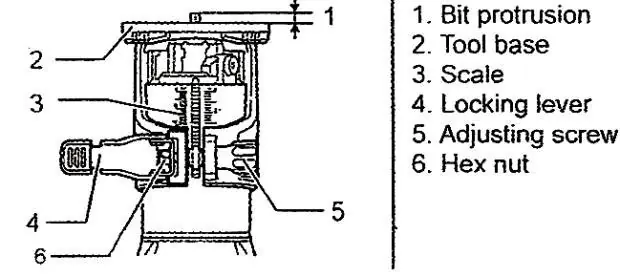
Adjusting the Router Motor Height
The router uses a rack and pinion gear system. Loosen the locking flip lever, turn the height adjustment knob to raise or lower the motor, and re-engage the locking mechanism. If the motor is not secure, tighten the hex nut behind the locking lever.
Inserting a Router Bit
Use the spindle lock button to hold the spindle in place while using the supplied wrench to loosen or tighten the collet nut. Ensure at least 3/4 inch of the router bit shank is inserted into the collet. Do not bottom out the bit; pull it out 1/16 to 1/8 inch before tightening.
Operations
Freehand Routing
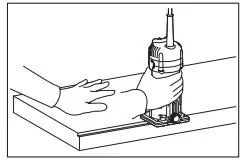
Install the bit, adjust the base height, and guide the router around the stock in a clockwise direction using both hands on the height adjusting knobs.
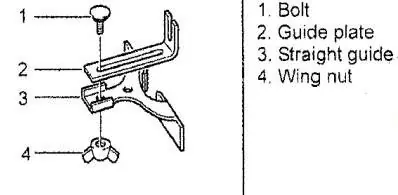
Cutting a Straight Line
Use a straight edge template or the included straight edge guide. Clamp the guide to the workpiece, place the router base against the guide, and slide the router plate along the edge while cutting.
Cutting Curved Lines
Create a template from hardboard. The radius of the curve must be greater than 2 1/2 inches. Secure the template to the workpiece and guide the router base against it.
Using the Trimmer Guide
Secure the trimming guide to the base so the ball bearing is just below the straight bit. Adjust the roller flush with the edge of the bit to follow the substrate.
Maintenance
Inspect carbon brushes regularly and replace them when worn to the limit line. Replace both brushes at the same time. Do not clean the tool with volatile liquids like gasoline or solvents. Keep the handle free from oil and grease.
Practical help
Common problems
Router bit slips or comes loose
Ensure at least 3/4 inch of the shank is inserted and the collet nut is fully tightened.
Excessive vibration during operation
Check if the cutter is correctly installed. Disconnect the machine, re-install the cutter, and test again.
Motor height does not stay locked
Tighten the hex nut behind the locking lever to apply more tension.
Before use
- Inspect the tool for obvious signs of damage.
- Ensure the router bit is sharp and clean.
- Verify the correct collet size (1/4 inch or 3/8 inch) is installed.
- Check that the workpiece is free of nails, screws, or foreign objects.
- Ensure the switch is in the OFF position before plugging in.
- Verify the power cord is routed safely away from the operating area.
Specs in practice
- No load speed
- The rotational speed of the motor without resistance, ranging from 10,000 to 33,000 RPM.
- Bit shank diameter
- The size of the router bit shaft the collet can accept (1/4 inch or 3/8 inch).
Images and diagrams
- Motor height adjustment: Uses a rack and pinion system with a locking lever and scale.
- Straight edge guide: Attaches to the base with a bolt and wing nut for consistent straight cuts.
- Bit installation: Requires using the spindle lock button to secure the spindle while tightening the collet nut.
Model compatibility
- Use only UL listed extension cords.
- Radius of curve for template routing must be greater than 2 1/2 inches.
- Use only accessories recommended by AKYPACH.

Manual page author
David Miller
Documentation analyst
Organizes user manual content into clear summaries, with attention to model details, product context, and everyday usability.