Garden / Pruning Tools
User Manual for Black+Decker 20V MAX Alligator Lopper LLP120
Quick guide for the Black+Decker 20V MAX Alligator Lopper LLP120. Includes setup, chain tensioning, operation, maintenance, and troubleshooting.
Quick answers from the manual
Quick answer
- The Black+Decker LLP120 is a cordless alligator lopper for pruning trees and cutting logs up to 4 inches in diameter. It requires regular chain tensioning and oiling every 10 minutes of use. p. 2, 13
Key actions
- Tension the chain p. 11
- Oil the chain p. 13
First start
- Charge the battery p. 10
Problems and fixes
Unit will not start
Check battery installation and charge status.
p. 16Technical specifications
| Parameter | Value | Meaning | Pages |
|---|---|---|---|
| Cutting Capacity | 4 inches (100mm) | Maximum log diameter | p. 3 |
Where to find it in the PDF
- Components p. 8
- Charging p. 10
- Maintenance p. 14
Table of contents
Manual images
Click an image to enlargeImportant Information from the Manual
The Black+Decker 20V MAX Alligator Lopper is designed for pruning trees and cutting small logs up to 4 inches (100mm) in diameter. This tool is intended for consumer use only. Always follow safety precautions to prevent kickback and injury.
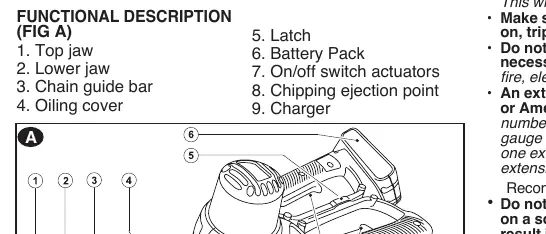
Components
The tool consists of a top jaw, lower jaw, chain guide bar, oiling cover, battery pack, on/off switch actuators, and a chipping ejection point.
Charging Procedure
The battery pack is not fully charged out of the carton. Charging takes 3.5-4 hours.
- Plug the charger into an appropriate outlet.
- Insert the battery pack into the charger.
- The green LED will flash while charging and remain on continuously when fully charged.
- Do not charge in temperatures below 40°F (+4.5°C) or above 105°F (+40.5°C).
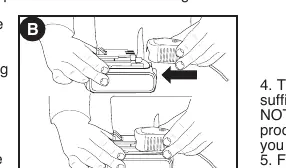
Installing and Removing the Battery
Ensure the lock-off button is engaged before installing or removing the battery.
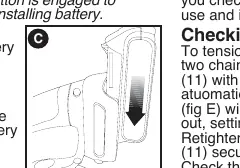
- To Install: Insert the battery pack into the tool until an audible click is heard.
- To Remove: Depress the battery release button on the back of the battery pack and pull it out.
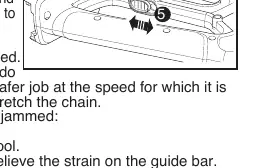
Chain Tension Adjustment
The product comes assembled, but you should check the tension before use.
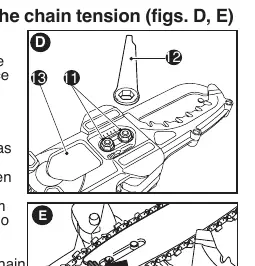
- Slacken the two chain cover retention bolts with the provided wrench.
- The automatic chain tensioning device will push the chain bar out.
- Retighten the two retention bolts securely.
- The tension is correct when the chain snaps back after being pulled 1/8 inch (3mm) away from the guide bar.
Operation
This tool features a double-switching system to prevent accidental starting. Both switches must be activated to use the tool. Always hold the tool firmly with both hands. When trimming, start from the branch tip and cut in logical, small sections.
Maintenance
- Oiling: Use high-quality bar and chain oil or SAE30 motor oil. Oil the product before first use and every 10 minutes of use via the oil filling hole.
- Cleaning: Regularly remove the chain access cover to clear debris. Clean ventilation slots with a dry paint brush.
- Sharpening: Use a 4.5mm file and file holder. Keep the top plate filing angle at 30°.
Safety
Always wear protective gear, including safety glasses, non-slip gloves, and sturdy footwear. Never use the tool above shoulder height or to fell trees.
Practical help
Common problems
Unit will not start
Check that the battery pack is installed properly and charged.
Battery will not charge
Ensure the charger is plugged in and the surrounding air temperature is between 40°F and 105°F.
Unit shuts off abruptly
The battery may have reached its thermal limit; allow it to cool down or recharge.
Before use
- Check chain tension
- Ensure battery is fully charged
- Wear safety glasses, gloves, and hearing protection
- Clear the work area of obstructions
- Ensure the tool is clean and free of debris
Specs in practice
- Cutting Capacity
- Up to 4 inches (100mm) in diameter
Images and diagrams
- Figure A: Overview of components including jaws and switch actuators
- Figure B: Battery charging process
- Figure C: Battery installation and removal
- Figure D/E: Chain tensioning adjustment
- Figure F/G: Chain and bar removal/assembly
Model compatibility
- Use only Black+Decker replacement chain RC600

Manual page author
David Miller
Documentation analyst
Organizes user manual content into clear summaries, with attention to model details, product context, and everyday usability.