Health / Laboratory Equipment
User Manual for A&D UA-1020-W Digital Blood Pressure Monitor
Comprehensive user guide for the A&D UA-1020-W Digital Blood Pressure Monitor. Includes setup instructions, measurement modes, troubleshooting, and technical specifications.
Quick answers from the manual
Quick answer
- The A&D UA-1020-W is a digital blood pressure monitor. To use it, install batteries, connect the cuff, sit comfortably, and press the START button. p. 8, 9, 14
Key actions
- Install batteries p. 9
- Apply cuff p. 12
- Start measurement p. 15
First start
- Install batteries, set the clock, and connect the air hose before the first measurement. p. 9, 10, 11
Problems and fixes
Nothing appears on display
Check battery installation or replace drained batteries.
p. 22
Cuff does not inflate
Replace batteries if low.
p. 22Error codes
| Code | Meaning | Action | Pages |
|---|---|---|---|
| Err | Unstable blood pressure, systolic/diastolic too close, or pressure did not increase. | Fasten cuff correctly and try again. | p. 7 |
| Err 9 | Internal error. | Remove batteries, press START, re-install batteries. Contact dealer if it persists. | p. 7 |
Maintenance and reset
- Delete all data: Press and hold both the ▲ and ▼ buttons until the M mark blinks. p. 8
Technical specifications
| Parameter | Value | Meaning | Pages |
|---|---|---|---|
| Measurement Method | Oscillometric | Standard electronic measurement | p. 23 |
| Memory | 90 sets | Stores last 90 measurements | p. 23 |
Where to find it in the PDF
- Parts Identification p. 5
- Troubleshooting p. 22
Table of contents
Manual images
Click an image to enlargeQuick Guide
The A&D UA-1020-W is a digital blood pressure monitor designed for home use. Before your first measurement, ensure you have installed the batteries, set the built-in clock, and selected the correct cuff size. Sit comfortably, relax for 5-10 minutes, and ensure the cuff is at heart level before starting the measurement.
Parts Identification
The device consists of the main monitor unit with a display, START button, SET button, and navigation buttons. The air socket connects to the air hose of the arm cuff. The display shows systolic/diastolic pressure, pulse rate, and various indicators like IHB/AFib, battery status, and WHO classification.

Setup
Installing Batteries: Remove the battery cover and insert 4x 1.5V (R6P, LR6, or AA) batteries, ensuring correct polarity. Replace all batteries when the low battery mark blinks.
Connecting the Air Hose: Firmly insert the air connector plug into the air socket on the side of the monitor.
Adjusting the Clock: Press the SET button until the year blinks. Use the arrow buttons to adjust the year, month, day, hour, and minute, pressing SET to confirm each step.
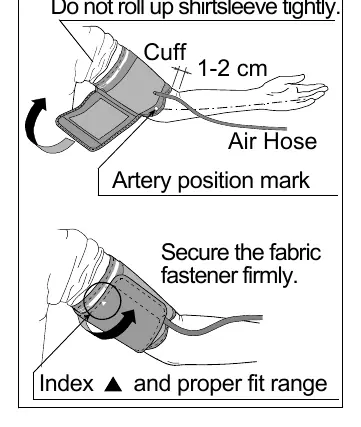
Applying the Cuff: Wrap the cuff around the upper arm, 1-2 cm above the elbow. Ensure the index mark points within the proper fit range printed on the cuff.
Measurement
Normal Measurement: Press the START button. The device will automatically inflate and measure. Remain still and quiet during the process. Once complete, the cuff will deflate, and results will be displayed.
TriCheck Mode: This mode takes three consecutive measurements automatically and displays the average. Enable this in the settings menu.
Measurement with SET Pressure: If re-inflation occurs, you can set a fixed pressure value (180, 210, or 240 mmHg) in the settings menu to avoid automatic re-inflation.
Troubleshooting
If the device does not function correctly, check the following:
- Nothing appears on display: Check if batteries are drained or installed incorrectly.
- Cuff does not inflate: Replace batteries if the low battery mark is blinking.
- Device does not measure: Ensure you remain still and quiet; check that the cuff is applied correctly and at heart level.
- Err/Err 9: For internal errors, remove batteries, press START, and re-install batteries. Contact the dealer if the error persists.
Maintenance
Do not open the device. Clean the monitor and cuff with a dry, soft cloth or a cloth dampened with water and a neutral detergent. Never use alcohol, benzene, or thinner. It is recommended to have the device inspected every 2 years for accuracy.
Technical Data
The device uses the oscillometric measurement method. It has a memory capacity of 90 measurements. Operating conditions are +10 to +40 °C and 15 to 85 %RH.
Practical help
Common problems
Nothing appears on the display
Check if batteries are drained or installed with incorrect polarity.
The cuff does not inflate
Replace all batteries with new ones if the low battery mark is blinking.
The device does not measure
Ensure you remain still and quiet; check that the cuff is applied correctly and at heart level.
Before use
- Install 4x 1.5V batteries (R6P, LR6, or AA).
- Connect the air hose to the air socket.
- Adjust the built-in clock.
- Select the correct cuff size for your arm circumference.
- Sit comfortably and relax for 5-10 minutes before measurement.
Specs in practice
- Measurement Method
- Oscillometric measurement.
- Measurement Range
- Pressure: 0-299 mmHg; Pulse: 40-180 beats/minute.
- Operating Conditions
- +10 to +40 °C / 15 to 85 %RH.
Images and diagrams
- Parts Identification: Shows the display, buttons, air socket, and cuff components.
- Applying the Cuff: Illustrates proper placement 1-2 cm above the elbow.
Model compatibility
- Use only specified AC adapter (TB-233C).
- Not for use on newborns or infants.
- Consult a doctor if you have a mastectomy or severe circulatory deficit.

Manual page author
David Miller
Documentation analyst
Organizes user manual content into clear summaries, with attention to model details, product context, and everyday usability.