Electronics / Security Systems
Annke NVR Network Video Recorder User Guide
Quick start guide for the Annke Network Video Recorder. Learn how to install the hard drive, connect cameras, perform initial system setup, configure network settings, and enable remote access via mobile or PC.
Table of contents
Manual images
Click an image to enlargeQuick guide from the manual
This guide provides essential instructions for setting up and managing your Annke Network Video Recorder (NVR). Before starting, ensure you have a compatible monitor, a hard drive (if recording is required), and a stable network connection. The system requires an initial activation process where you must set a strong administrator password.
What's in the box
- NVR unit
- USB Mouse
- Power Adapter and Cable
- Network Cable
- Wall Sticker
- HDD Power and Data Cables
- HDMI Cable
Hardware installation
If your device does not have a pre-installed hard drive, you must install one to record and play back videos:
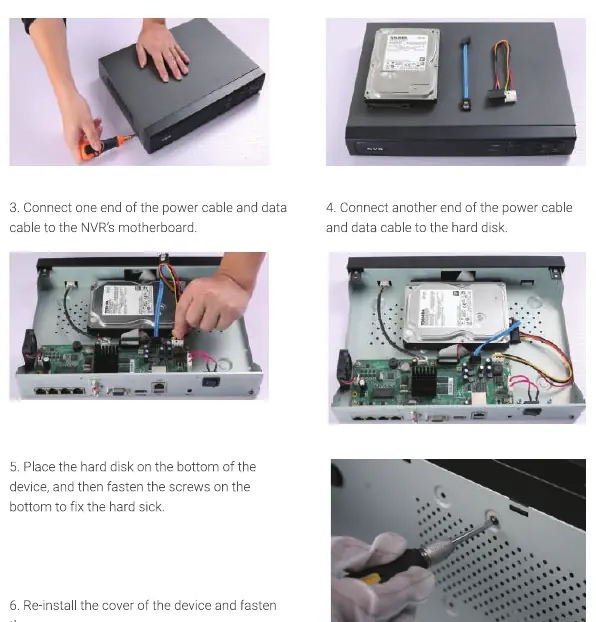

- Disconnect the power supply.
- Remove the cover by unfastening the screws on the back and side.
- Connect the power and data cables to the NVR motherboard and the hard drive.
- Secure the hard drive to the bottom of the device using the provided screws.
- Re-install the cover and fasten the screws.
System connections
Connect your system components before final installation:
- Monitor: Connect via VGA or HDMI cable.
- Cameras: Connect IP cameras to the PoE ports on the rear panel.
- Mouse: Connect to the USB port.
- Network: Connect the NVR to your router using a network cable.
- Power: Connect the power adapter to the NVR and a power outlet.
Initial setup
Upon first boot, you must activate the device:
- Select your preferred language.
- Set the display resolution (1080P or higher recommended).
- Create a strong administrator password.
- Follow the Setup Wizard to configure time settings, network parameters, and format the hard drive.
Remote access
To view your cameras remotely:
- Mobile: Download the ANNKE Vision app, register an account, and scan the QR code found in Menu > Configuration > Network > Platform Access.
- PC (Browser): Use the SADP software to find the device IP address, then log in via a web browser.
- PC (CMS): Use the Guarding Vision client software to manage the device.
Troubleshooting
- Device Offline: Check network cable connections, router settings, and ensure Platform Access is enabled.
- No Picture: Verify camera username/password and network status in the IP Channel menu.
- Forgot Password: Use the ANNKE Vision app, registered email, or security questions to reset your credentials.
Manufacturer information
ANNKE
Practical help
Common problems
Device shows as offline
Check if the network cable is connected properly, verify router settings, and ensure the ANNKE Vision platform access is enabled in the NVR settings.
No picture on camera channels
Check if the camera username and password are correct. Ensure the camera status is 'Online' in the IP Channel configuration menu.
Forgot administrator password
Use the password reset options: ANNKE Vision app scanning, registered email, or pre-configured security questions.
Before use
- Ensure power supply is 48V DC or 100-240V AC.
- Install a hard drive if you intend to record video.
- Connect a monitor via HDMI or VGA for initial setup.
- Connect IP cameras to the PoE ports.
- Connect the NVR to your router via LAN cable for network access.
Specs in practice
- PoE Interface
- Network ports that provide both data connection and power to compatible IP cameras.
- Status Indicator
- Red blinking light indicates the system is reading from or writing to the hard drive.
- ANNKE Vision
- The cloud platform service required for remote mobile viewing and P2P connection.
Images and diagrams
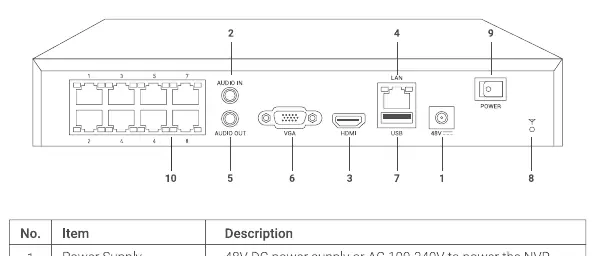
- The rear panel features 8 PoE ports, Audio In/Out, VGA and HDMI video outputs, USB ports for mouse/backup, and a power switch.
- The connection diagram illustrates connecting the monitor, cameras, mouse, router, and power adapter to the NVR.
Model compatibility
- Supports IP cameras using the ONVIF protocol.
- Requires a monitor with 1080P or 4K resolution for optimal display quality.
- Device should be used in a well-ventilated, dust-free indoor environment.

Manual page author
Emily Carter
User documentation editor
Prepares concise manual descriptions and highlights the most useful setup, operation, and maintenance information for readers.