Home Appliances / Food Processing Equipment
User Manual for Ardesto 1750R Electric Meat Grinder
Get the most out of your Ardesto 1750R Electric Meat Grinder with this comprehensive user guide. Learn how to assemble, operate, clean, and maintain your appliance safely.
Table of contents
Manual images
Click an image to enlargeQuick Guide
The Ardesto 1750R is a household electric meat grinder. Key operational rules include a maximum continuous running time of 10 minutes, after which the motor must cool down to room temperature. Do not grind hard foods like bones, nuts, ginger, or fibrous materials. Always use the provided pusher to feed food; never use your fingers. If the device clogs, use the Reverse function, but wait for the motor to stop completely before switching directions.
Device Description
The meat grinder consists of a motor housing, power cord, switch, head fixation button, head inlet, pusher, loading tray, meat grinder head, auger, cutting blade, three cutting plates (fine, medium, coarse), fixing ring, kibbe nozzle, and sausage nozzles. The vegetable cutter attachment includes its own pusher, head, and various shredding/slicing nozzles.
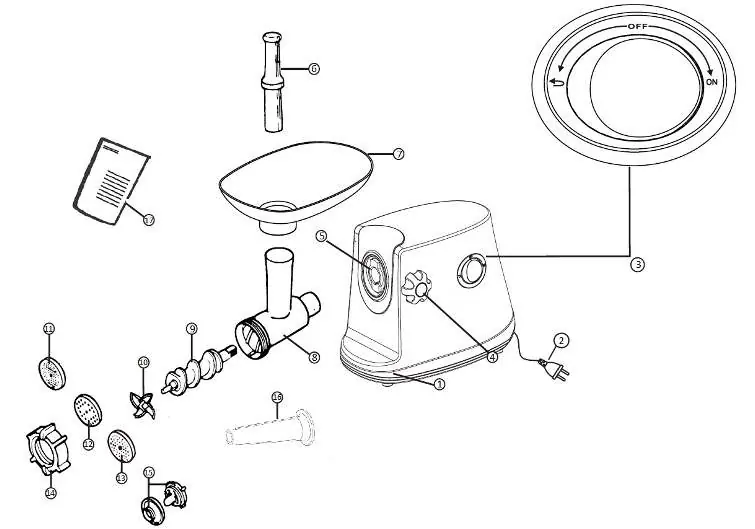
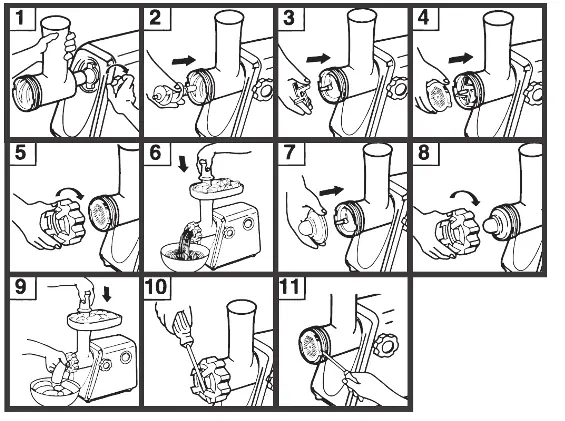
Assembly
To assemble the meat grinder: 1. Insert the meat grinder head into the head inlet on the body and fix it by turning the fixation button clockwise. 2. Insert the auger into the head and turn until it locks. 3. Place the cutting blade on the auger shaft with blades facing forward. 4. Insert the desired cutting plate, ensuring protrusions fit into the grooves. 5. Tighten the fixing ring (do not overtighten). 6. Install the loading tray.
Meat Grinding
Cut meat into small pieces, removing tendons, bones, and fat. Connect the device and turn the switch to ON. Place meat on the loading tray and feed it into the grinder using the pusher. After use, turn off the device and unplug it.
Reverse Function
If the grinder becomes clogged, turn the switch to the R/REV/REVERSAL position. The auger will rotate in the opposite direction to push out stuck products. If this does not resolve the issue, turn off the device, unplug it, disassemble, and clean.
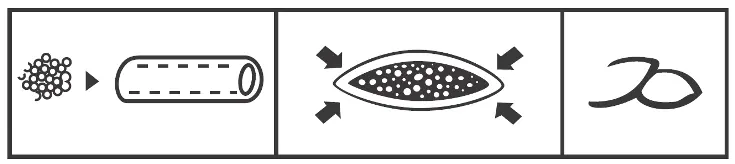
Kibbe and Sausage Making
For Kibbe: Assemble the unit with the kibbe nozzle instead of the cutting plate. Form the outer shell from the mixture and shape as shown in the manual before deep frying. For Sausage: Assemble the unit with the sausage nozzle and fix it with the fixing ring. Follow the same assembly steps as for meat grinding.
Vegetable Cutter
Insert the desired nozzle (grater, shredder, etc.) into the vegetable cutter head. Attach the head to the motor housing and fix it. Turn the device on and push vegetables through the feed opening using the vegetable cutter pusher.
Disassembly
Ensure the motor has stopped completely and unplug the device. Disassemble in the reverse order of assembly. If the fixing ring is tight, use tools. To remove the cutting plate, use a screwdriver as a lever between the plate and the head.
Cleaning and Maintenance
Never clean the device or its parts in a dishwasher. Wash all food-contact parts with warm water and detergent. Do not use water hotter than 50°C on metal parts to prevent oxidation. Dry all parts thoroughly. If storing for a long time, wipe metal parts with a cloth soaked in vegetable oil. Do not immerse the motor housing in water; wipe it with a damp cloth.
Safety Guidelines
The device is for household use only. Do not use outdoors or for industrial purposes. Keep the power cord away from sharp edges and heat sources. Do not place the appliance on hot stoves. If the device has been in temperatures below 0°C, let it sit at room temperature for at least 2 hours before use. If the overheating protection trips, wait for the device to cool down completely before restarting.
Practical help
Common problems
Grinder is clogged
Turn the switch to R/REV/REVERSAL to reverse the auger. If it remains clogged, unplug, disassemble, and clean.
Meat is not being minced
Ensure the cutting blade is installed with the blades facing forward and that the cutting plate is properly aligned.
Device stops working
The overheating protection may have tripped. Turn off the device and let it cool down completely before attempting to use it again.
Before use
- Wash all food-contact parts (except the motor housing) with warm water and detergent.
- Ensure the voltage matches your local power supply.
- Ensure the switch is in the OFF position before plugging in.
- Place the unit on a level surface.
- Ensure ventilation holes are not blocked.
Images and diagrams
- Assembly steps 1-11 illustrate the correct sequence for attaching the head, auger, blade, cutting plate, and fixing ring.
Model compatibility
- Do not grind hard foods like bones or nuts.
- Do not grind ginger or fibrous materials.
- Do not use the kibbe attachment with the cutting blade or plate.

Manual page author
Michael Turner
Technical manual editor
Reviews PDF manuals for structure, safety notes, and practical product details so readers can find the right information quickly.