Home Appliances / Deep Fryers
User Manual for Avantco Gas Donut Fryers
Comprehensive user guide for Avantco gas donut fryers. Includes installation, operation, cleaning, maintenance, and troubleshooting procedures for models 177FBF1824LP, 177FBF1824NG, 177FBF2424LP, and 177FBF2424NG.
Quick answers from the manual
Quick answer
- This manual covers the installation, operation, and maintenance of Avantco gas donut fryers. Key procedures include lighting the pilot, filling the tank with liquid shortening, daily cleaning, and weekly boil-out procedures. p. 1, 12, 15, 16
Key actions
- Lighting the pilot p. 12, 13
- Filling the tank p. 12
- Boil out procedure p. 16
First start
- Wash tank and accessories, dry completely, verify gas type, and check for leaks before first use. p. 11
Problems and fixes
No Heat
Check thermostat, pilot, gas supply, and wire connections.
p. 17
Insufficient or too much heat
Check thermostat setting, high limit, or temperature probe.
p. 17Technical specifications
| Parameter | Value | Meaning | Pages |
|---|---|---|---|
| Natural Gas Pressure | 4" W.C. | Required manifold pressure | p. 4, 9 |
| Propane Gas Pressure | 10" W.C. | Required manifold pressure | p. 4, 9 |
Where to find it in the PDF
- Installation p. 5, 6, 7, 8
- Operation p. 11, 12, 13, 14
- Cleaning & Maintenance p. 15, 16, 17
Table of contents
Manual images
Click an image to enlargeQuick Guide
This manual provides essential instructions for the safe installation, operation, and maintenance of Avantco gas donut fryers. Key safety requirements include ensuring proper ventilation, checking for gas leaks before use, and never using solid shortening. The fryer is intended for indoor use only.
Installation
Before installation, verify that the gas type (natural or propane) matches the specifications on the fryer data plate located inside the door panel. Ensure the unit is installed in an area with sufficient air supply and adequate clearance from combustible construction (6 inches on sides and back). The fryer must be leveled front-to-back and side-to-side, and wheels must be locked once positioned.
Assembly
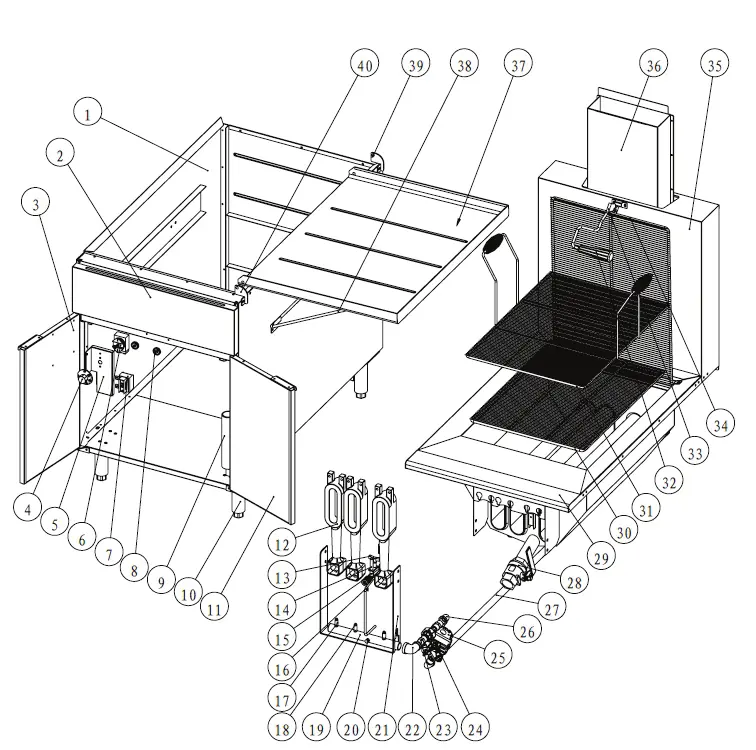
The fryer requires assembly of the chimney and handle. Fasten the inner chimney to the support using four screws, connect the outside chimney using screws, and fix the supporting brackets. Assemble the handle using the provided screws.
Operation
Filling the Tank: Close the drain valve and fill the tank with liquid shortening between the MIN and MAX lines. Do not use solid shortening. Lighting the Pilot: Open the door, ensure the thermostat is OFF, push and turn the gas control valve knob to the 'L' in PILOT, and ignite with a match while holding the knob down for 30 seconds. Once lit, turn the knob to ON. Turning On/Off: Set the temperature knob to the desired level. To shut down, turn the thermostat to OFF and the gas valve to the OFF position.
Cleaning and Maintenance
Daily Cleaning: Clean exterior surfaces with a damp cloth and mild soap. Boil Out Procedure: Perform weekly or as required. Drain the oil, flush sediment, fill with water and a low-foaming cleaner, simmer for 15-20 minutes, scrub the fry pot, drain, rinse thoroughly, and refill with shortening. Flue Vent Inspection: Inspect the flue annually for obstructions.
Troubleshooting
If the unit fails to heat, check that the thermostat is on, the pilot is lit, the gas supply is active, and wire connections are secure. If the tank will not drain, ensure the shortening is not too cold and the drain pipe is free of debris.
Manufacturer information
Avantco Equipment
Practical help
Common problems
No Heat
Check if the thermostat dial is on, the pilot is lit, the gas supply is turned on, or if wire connections are loose.
Insufficient or too much heat
Verify the thermostat dial is set to the desired temperature, check if the high limit switch has tripped, or if the temperature probe needs service.
Tank will not drain
Ensure the shortening is not too cold and the drain pipe is not clogged with debris.
Before use
- Verify gas type matches the data plate
- Ensure proper ventilation and air supply
- Wash tank and accessories with hot soapy water
- Dry tank completely
- Check for gas leaks using a soap and water solution
Specs in practice
- Natural Gas Pressure
- 4" W.C. (Water Column)
- Propane Gas Pressure
- 10" W.C. (Water Column)
- High Limit Control
- Secondary heat control that prevents oil temperature from exceeding 450°F
Images and diagrams
- Assembly steps for chimney and handle
- Gas valve knob positions (OFF, PILOT, ON)
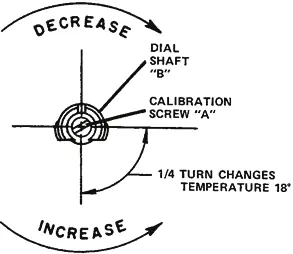
- Thermostat calibration screw location
Model compatibility
- Solid shortening must NOT be used
- Indoor use only

Manual page author
Michael Turner
Technical manual editor
Reviews PDF manuals for structure, safety notes, and practical product details so readers can find the right information quickly.