Electronics / Cameras
User Manual for AVerMedia EzRecorder 330 Video Capture Box
Quick guide for the AVerMedia EzRecorder 330. Learn how to set up your standalone video capture box, connect devices, record gameplay, stream to Twitch/YouTube/Facebook, and manage storage.
Table of contents
Manual images
Click an image to enlargeQuick Start Guide
The AVerMedia EzRecorder 330 (ER330) is a standalone capture device that allows you to record video or stream gameplay without a computer. Follow these steps to get started:
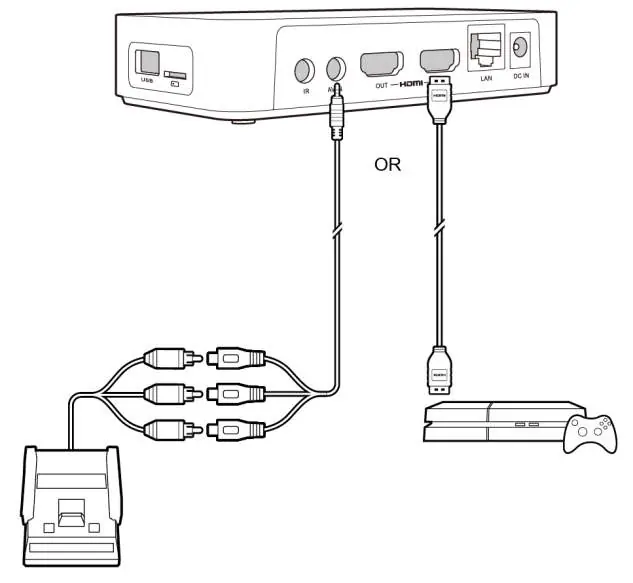
- Connect Video Source: Connect your video source (e.g., game console) to the ER330 using HDMI or Composite cables.
- Connect to TV: Connect the ER330 to your TV using an HDMI cable.
- IR Blaster (Optional): Connect the IR Blaster cable to your set-top box's IR sensor if you wish to control it via the ER330.
- Power: Connect the power adapter and power on the device.
- Setup Wizard: Upon first power-on, follow the on-screen Setup Wizard to select your language, configure HDMI pass-through, and set up storage/network.
Remote Control Overview
The remote control provides full access to device functions:
- Power: Turns the device on/off.
- Record: Starts/stops recording.
- Stream: Starts/stops live streaming.
- T.REC: Accesses Timer Recording.
- Snapshot: Takes a screenshot.
- F1/F2/F3: Context-sensitive buttons for on-screen instructions (e.g., removing storage, editing).
- Navigation: Arrow keys and OK button for menu navigation.
Recording Methods
The ER330 offers several ways to capture content:
- Basic Recording: Press the Record button on the remote or the power button on the device to start/stop recording.
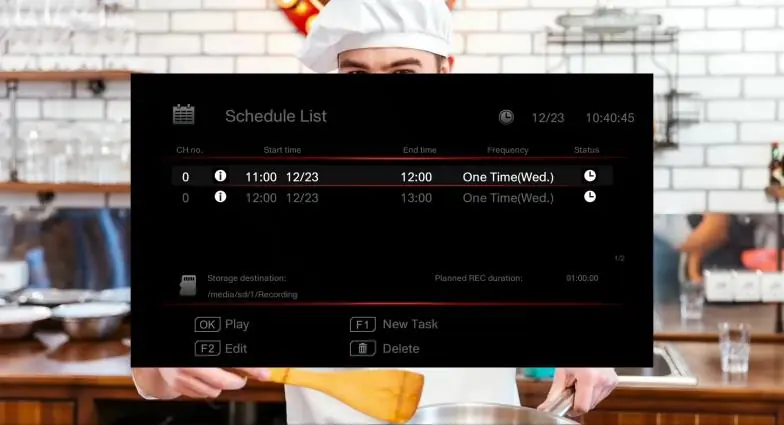
- Timer Recording: Use the T.REC button to set a specific time to record an ongoing TV program.
- Schedule Recording: Go to Menu > Schedule List > F1 to set up recurring or specific time-based recordings.
- Instant Highlight: Enable this in Menu > Settings > Instant Highlight. When enabled, press the Record button to save the last few minutes of gameplay retroactively.
Live Streaming
You can stream directly to Twitch, Facebook, or YouTube without a computer:
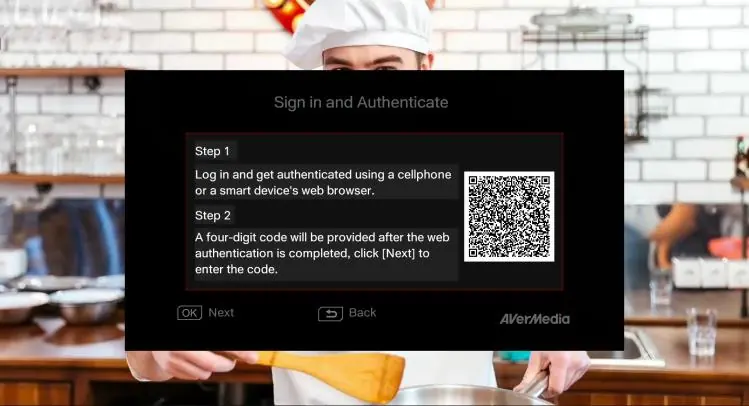
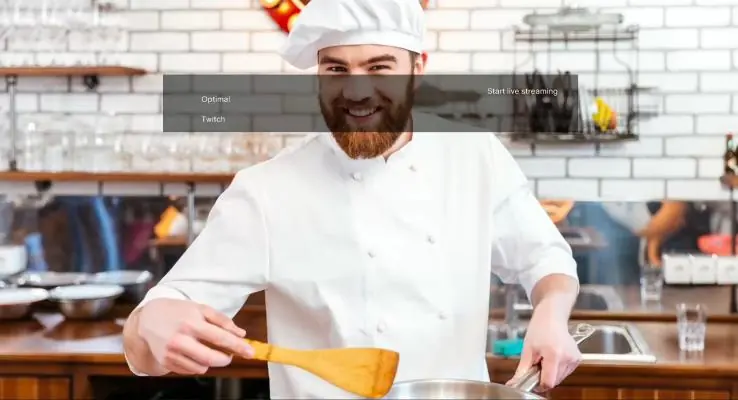
- Go to Menu > Settings > Streaming.
- Select your platform.
- Press F1 to log in. A QR code will appear on the screen.
- Scan the QR code with your smartphone, enter your account credentials on the webpage, and enter the provided 4-digit code into the ER330.
- Once bound, press the Stream button on the remote to start/stop your broadcast.
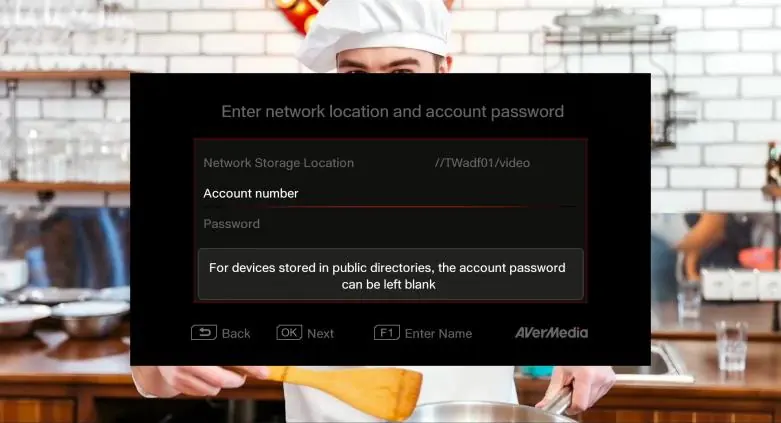
Storage and Media Management
The device supports microSD cards, external USB 2.0 HDDs, and NAS storage.
- Supported Formats: NTFS or exFAT.
- SD Card Requirements: microSDXC, UHS-I Speed Class 3 (U3) A2 V30 or higher recommended.
- Media Studio: Access recorded videos and screenshots via Menu > Media Studio. You can also edit videos here by selecting a file and pressing F3.
LED Status Indicators
- Flashing Blue: Booting, deleting, or updating firmware.
- Solid Blue: Ready.
- Breathing Blue: Streaming.
- Flashing Red: Processing recording.
- Breathing Red: Recording in progress.
- Solid Red: Paused or error (storage full/no storage).
- Solid Orange: Pass-through ON while powered OFF.
Official resources from the manual
Manufacturer information
AVerMedia Technologies, Inc.
Practical help
Common problems
Recording does not start
Check if the storage device is full, not found, or if the content is HDCP-protected.
Cannot stream to platform
Ensure the device is connected to the internet and the account is properly bound via the QR code process.
NAS recording fails
Ensure the network speed is at least 10 Mbps and the device is in the same domain as the ER330.
Cannot record/stream specific content
The ER330 does not support viewing, recording, or streaming of HDCP-protected signals.
Before use
- Connect video source via HDMI or Composite.
- Connect the device to your TV via HDMI.
- Connect the power adapter.
- Insert a compatible microSD card or connect a USB HDD/NAS.
- Ensure internet connection for streaming features.
Specs in practice
- Max Pass-Through
- 4Kp60 (allows 4K gaming while recording).
- Max Recording
- 1080p60 (standard high-quality recording).
- Record Format
- MPEG 4 (H.264 + AAC) or (H.265 + AAC).
Images and diagrams
- Installation diagram shows connecting video source, TV, IR blaster, and power.
- Remote control diagram maps buttons 1-23 to specific functions like Power, Record, and Streaming.
Model compatibility
- Does not support HDCP-protected signals.
- NAS recording requires 10 Mbps minimum speed.
- Supports YouTube, Facebook, and Twitch for live streaming.

Manual page author
David Miller
Documentation analyst
Organizes user manual content into clear summaries, with attention to model details, product context, and everyday usability.